

Detailed information about the QuickTiles plugin. Version 1.4.0.2
Common information
QuickTiles is a texture plugin for 3d max. It cuts the texture you set into individual elements, and then reassembles it in the order you specify. It does NOT generate textures from thin air, according to the specified parameters. To use it, you need the original texture sets.
There are two main ways to work. The first is the reorganization of finished tile textures (which have separate elements and seams between them), such as brickwork or paving stones.
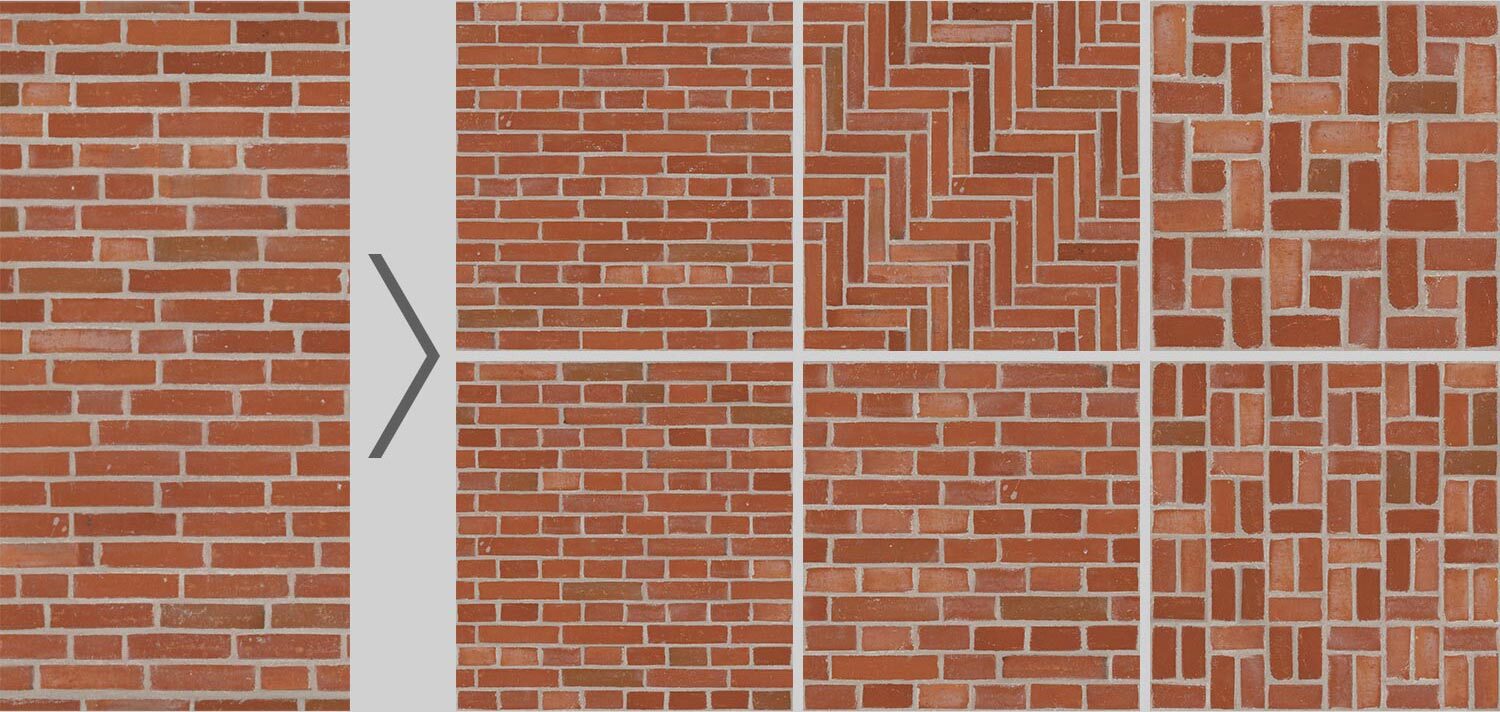
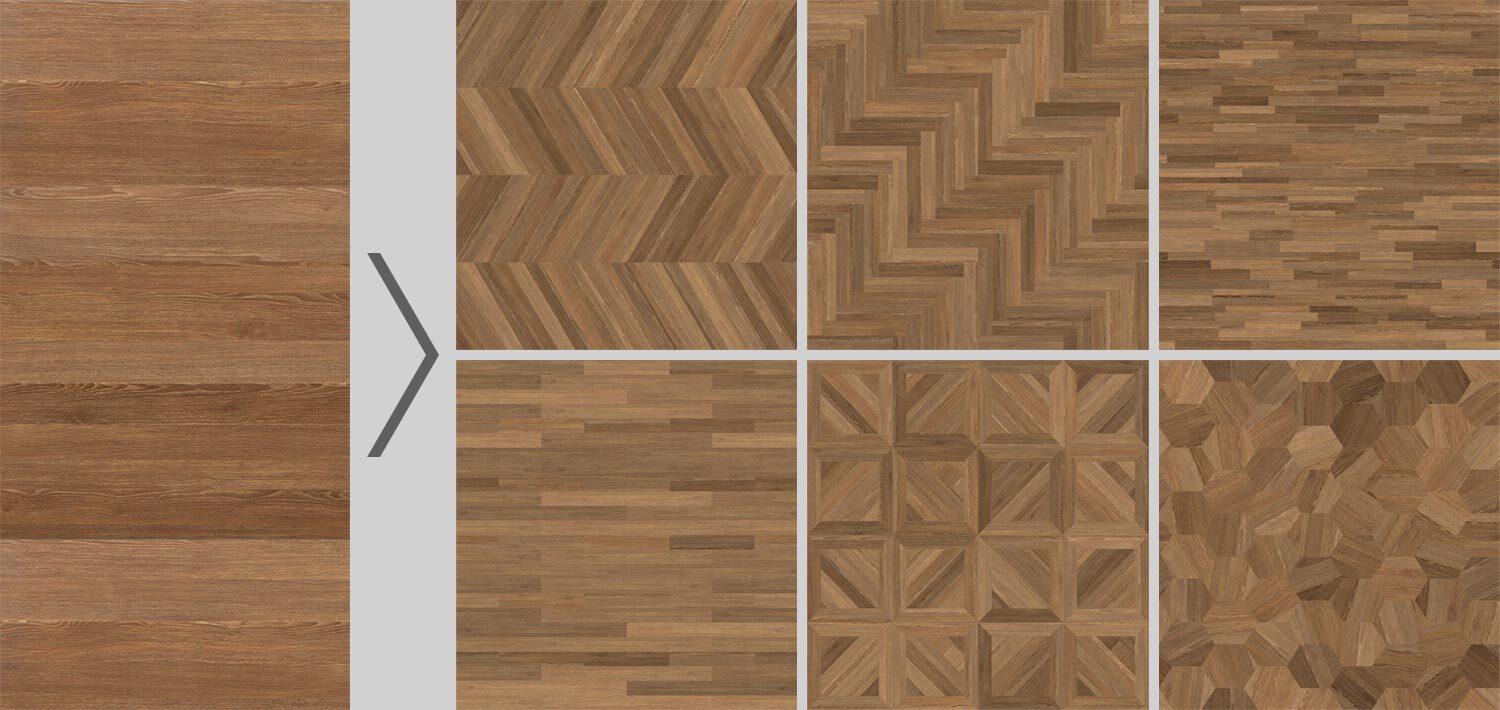
The second method is to cut and distribute solid textures, such as concrete, stone, or wood surfaces, into containers.
The entire working process in the QuickTiles can be divided into 3 stages. Adding the original texture and slicing in the Slice Editor, selecting or creating a layout pattern in the Pattern Editor, and setting up details and randomizations in the general texture interface inside the Material editor.
One of the main distinguishing features of QT is that it generates a seamless piece of texture of a certain size, which is set by the user himself. It can't generate an infinite texture, like the procedural Noise or Gradient.
For the best understanding of the instructions for using QuickTiles, we recommend reading the chapters in a row, without skipping additional materials and video instructions.
Release notes
QuickTiles 1.4.0.2 (14.11.2025)
Bug fix
- Fixed a critical bug with normals - they were generated completely randomly and incorrectly
- Fixed crash when selecting any color in the picker inside the plugin
- Fixed a bug where a single click on the spinners arrows in the picker did not change the values
QuickTiles 1.4.0.1 (11.11.2025)
Major improvements
- Improved the mode of bending tiles in a circle
- Improved NCS and RAL color sets in the picker
- The algorithm of pattern formation has been improved (now not only the pattern but also the unique color is taken into account)
- Improved the edge blurring algorithm
- The Update and large preview windows no longer hang on top of all windows
- Displaying the steps of the material update process in the Update window
- Fixed mismatch of the Pattern Mask channel with other channels
- A lot of bugs fixed regarding version 1400
QuickTiles 1.4.0.0 (11.08.2025)
Major improvements
- A new version of the Crop – Center+ algorithm has been added, allowing you to add tile lengths. To do this, the plugin mixes multiple tiles from the same ID.
- A new, more reliable algorithm for working with auxiliary files. Increased reliability in case of scene crashes and material breakdowns
- Possibility of direct editing of seams on a mask through HSV in a slicer
- The ability to disable the mask affect in the slicer for each channel
- Updated the algorithm for generating the shape of seams. It has become faster and smoother, and is now superimposed on the replaced seam texture.
- Added an algorithm for auto-downloading missing textures from the server when starting a scene and updating materials
- Added an algorithm for automatic re-downloading in case of damage to library texture files
- Added a multiformat when saving files. By default, all channels are saved in JPG 8 bits, and normals and displacement in PNG 16 bits.
- The Outline function in the slicer can now stretch selected tiles separately in width or height.
- Added the ability to work efficiently with Real World map size. The function works in Vray and Corona. The texture size is automatically transferred to the appropriate fields during the Update.
- When working with Real World map size, the texture is displayed in the viewport at the correct scale.
- Added the possibility of random series shifting in linear patterns
- The block of work with the tilt of the tiles has been changed. Now you can activate randomization for each side and turn separately.
- Added a new Color Picker, developed by our programmer in-house. You can also activate it for the entire 3d max environment.
- Added the ability to dim the brightness of the created edge in the shape generator.
- It is possible to add a background image to the Editor's Pattern substrate.
- Added a version for 3d max 2026
- Added automatic creation of firewall rules during installation
Minor improvements
- Two new color templates have been added to search in the preset library – pink and beige
- Added AO generation in the seam, when setting the shape
- Added a randomization seed shift for different channels. For example: if the current tile in the diffuse channel has darkened when randomization is set, it may brighten or remain the same on other channels. Previously, the seed and the degree of randomization coincided.
- The update status bar has been added to the Update window. The last operation and the time it took are now displayed
- In the slicer, the deactivated black tiles now also become more transparent
- Added automatic channel recognition when working with the seam substrate
- Added a light grid on top of the tiles in the pattern editor. It has become more convenient to see the size of the tiles being created
- The maximum field size for creating a linear pattern is now 300x300 cells (previously it was 100x100)
- The subscription activation button is now always available
- Improved the algorithm for randomizing the width of tiles in linear patterns
- Now, when enlarging the tiles in the container, the specified edge shape does not go beyond the edges, but remains anchored to the container
- The channel activation algorithm by color has been changed. Previously, the color should have been different from black, now it's enough to enter and exit the color picker, and the channel is activated
- Added automatic window size reduction for low-resolution monitors
Bug fix
- Fixed the seam distortion algorithm
- When working with the plain texture as the source, the scale did not increase by more than 100%
- When working with the plain texture, the scale changed depending on the resolution and size of the patch
- Improved the algorithm for loading textures from the server. Now, if the file breaks, the texture is re-uploaded automatically
- Shortcuts have been restored (some were not working)
- The storage time of temp files was 30 times longer than it was set in the menu. Now it matches the specified one
- There were holes when working with some large patterns
- Fixed crash when resaving one preset on another
- Fixed distorted display of the normal map in the slicer
- In the slicer, when switching from mode 1 to 3, the tiles were incorrectly sliced
- The display of names and information in the lister has been fixed on 4K monitors
- Fixed incorrect operation of some tools in the slicer when using grid border reduction (Cropping)
- Other minor fixes
QuickTiles 1.3.0.1 (1.12.2024)
Major improvements
The update now works with interactive rendering enabled
Fixed interface with 4K monitors
Three new channels have been added – AO, Metallness and Opacity – which expands the possibilities for creating fully adjusted presets
Added a version for 3d max 25
A unique automatic algorithm has been added to optimize the size of textures depending on the pixel density per centimeter – work with large final textures has accelerated tenfold.
The update at the start of the scene now begins only after the scene is fully loaded
Added auto-save of finished materials to Temp and the ability to disable it.
The script for creating the material structure has been changed – new nodes have been added, old versions of the Corona (6 and earlier) are supported by default
Common interface
Added the ability to switch the options for mixing flat colors when working with seams
Added the ability to adjust the hue saturation and brightness of images on the substrate when working with seams
Added the ability to invert the color of any channel when working with seams
In the texture generation scroll, the patch height is now equal to the specified width by default
Optimized the mechanism for setting the size of the sides of the created texture with non-square patches
The texture generation scroll now displays the file name after saving to temp
The Herringbone function now resets the current layout only as long as it is enabled, and also turns off automatically after opening the Pattern Editor
Fixed a bug with incorrect normals and the automatic switching of the Crop/Stretch mechanism for individual tiles when the base tile is a perfect square
The update window now displays the name of the texture and the temp of the file to which it is linked. In case of problems, you can determine exactly which of the textures cause them
Added dynamic display of the list of randomizations depending on the texture channels used
Added a button to go to the Help from the plugin
Added the ability to buy a license from the plugin
Added a notification about the Internet disconnection
Minor improvements to the interface design
The restrictions on the width of the procedural seam have been removed
Added a QT lister opening icon in the texture generation scroll
Fixed crisp edge interpolation when working with procedural seams
Fixed: the name of the sets was not visible when using the 3d max light interface
Fixed: the roughness channel in the seams was created black by default.
Redesigned icons and labels to match the new QuickTiles style
Preset library
It is now possible to change the size of icons in four versions – small, standard, large and huge.
It is now possible to view the full size of the icon (Ctrl+Click). For our library, this is 1200 px in height
It is now possible to add materials to Favorites
A category of new items has appeared. It will display several recent materials that we have added to the library
The type of loaded materials has been changed. They are now displayed in color with a download icon in the corner, for easy viewing
It is now possible to assign and easily select a texture color
All icons have been updated to capture a larger part of the texture
Fixed the color of the presets. The previous version was lost in the light scheme of the 3d max
Slicer
Added the ability to automatically set the direction for selected tiles (Direction Tool, RMB)
Added the ability to adjust the transparency of an flat color on the channel in the slicer
Added the ability to switch the options for mixing a smooth color with a texture (color icon, RMB)
Added the ability to invert the color of any channel (inside HSV)
Added a mechanism for tracking texture updates in the library – sometimes we refine textures in the library and replace them on the server. Now the plugin will mark such materials as not uploaded
Fixed: when auto-slicing a large number of tiles, the operation interruption warning disappeared
Pattern editor
Fixed: in the Pattern Editor, when pressing Enter, the current pattern was saved to the library.
Added the ability to automatically set the direction for selected tiles (Direction Tool, RMB)
Added sorting of tiles by depth (along the Z axis). Now you can create patterns with tiles placed on each other. This is useful for example for different types of roofing tiles
Temp files
Added the ability to adjust the storage period of temp files
The regeneration of deleted temp files has been simplified
Improved the mechanism for auto-deleting old temp files
When importing materials from another scene, separate temp files are created for them. This allows you to avoid proxy editing when changes in the new scene affected the materials in the old one.
Other
The plugin installation and removal screen has been completely redesigned. Added options for deleting user libraries, and the setup has become even easier.
QT Lister: now it is possible to change the name of the material directly from the lister
QT Lister: new column is the size of the created texture
QT Lister: new column - resolution of the created texture
Fixed Max crash at startup if Windows started without an internet connection
QuickTiles 1.2.0.4 (13.05.2024)
Added interface translation into Russian and Chinese
The interface has been slightly changed. Unnecessary buttons have been removed and the organization of parameters has been streamlined
Added the ability to add Noise wherever you can choose a plain color
Added dynamic channels in the procedural gap and bitmap randomization sections. Now only the channels added in the slicer are displayed and processed there.
The large preview is no longer lost when panning or zooming
Added shortcut to open a large Preview - Ctrl+Shift+P
Added shortcut for switching preview channels - Ctrl+Shift+PageUp/PageDown
Added the "Download All" button to the preset library
In the slicer, paneling with the wheel no longer resets the selection of tiles
Added shortcut in the slicer to select all tiles - Ctrl+A
Fixed a serious deep bug that led to accidental crashes. The plugin now works much more stable.
Improved work with old projects with QuickTiles
The Pattern mask channel is now also saved as plain bitmap
QuickTiles 1.2.0.3 (7.03.2024)
Significantly improved stability and performance
Additional optimization of tools and processes has been carried out
The algorithm of the Orientation tool has been significantly improved
The Presets library has been modified for the new algorithm of the Orientation tool
Disabling preview auto-update is now instantaneous
Improved the search algorithm in Presets, Slicer and Pattern Editor
Fixed all known crashes
Increased stability when working with large circular layouts in the younger versions of 3ds max
QuickTiles 1.2.0.2 (12.12.2023)
Slicer:
Fixed an issue with tiles flipped 180 degrees upside down
The HSV window in the slicer is now scaled to fit the screen resolution
Added a crosshair through the middle of a tile in the slicer
Improved algorithm for moving the selected tile to the foreground in the slicer
Fixed missing and inability to select tiles in the slicer and PE after copying
Pattern Editor:
Added a "Set tiling box" button that sets the repeat zone within the PE
General fixes and improvements:
Depth of displacement edge generation made more uniform
Improved shape smoothing algorithm during displacement generation
Improved opening of old scenes
Improved work with Orientation in complex cases
Removed center generation in circular layouts
Scale of Plain texture in tiles is no longer resolution dependent
Scale of Edge distortion effect is no longer resolution dependent
Improvements to interface update in 24 3dsmax when switching between nodes
Fixed artifacts on tile borders
Fixed bug with wrong mask channel size in Corona
Minor and major bug fixes and stability improvements
QuickTiles 1.2.0.0 (10.10.2023)
Loading the library directly from the plugin interface
The size of the installation file is now about 50 MB
Installation is now via EXE, no more unnecessary archives
Auto-updating libraries inside the plugin
Numbering of tiles in the slicer (debug)
A new way to import a Polygonal pattern
Fixed a bug with the node interface freeze in 3ds max 2024
Minor fixes and stability improvements
QuickTiles 1.1.0.1 (4.08.2023)
Version for 3d max2018-2022 fixed
Import of polygonal patterns import simplified
Tile edge distortion fixed
New Orient tool mode - Ctrl+Shift+Click - vertex orientation
Minor fixes and accelerations
QuickTiles 1.1.0.0 (30.06.2023)
Feature added common:
Version for 3d max 2024
QuickTiles Lister - a general list of all QT nodes in the scene + batch processing capability
Added a library of ready-made presets with all material settings.
The displacement is now processed in 16 bits. This makes possible to work with three-dimensional smooth surfaces without artifacts, even in reflections.
The algorithm for generating rounding on the edges of tiles has been completely redesigned. It is now possible to procedurally create the volume of tiles of any shape.
The ability to disable auto-update previews. This greatly speeds up the setup of the material.
In the large preview, the ability to switch between channels and update the preview and material has been added. Functions are called with a right mouse click.
Added tooltips to all parameters in Russian and English
Feature added slicer:
Significantly accelerated autoslice (occurs in 1-2 seconds)
The ability to set a flat color on any channel.
The mechanism of adding individual tiles has been greatly simplified
Added the Outline function - evenly changes the size of the selected tiles
Auto-removal of small garbage tiles during autoslice
Now the history of operations in the third mode works correctly
Feature added Pattern Editor:
When exporting a pattern, the plugin recognizes the IDs set to tiles from 1 to 40
Adjusting the arrow size with the mouse wheel when working with the Orient tool
Small improvements:
At the opening of the scene, the materials are now updated in turn. This speeds up the download and increases stability.
When editing the diffuse channel in the slicer (HSV) - the color of the icon in the main interface will also change
The sizes in the Result size fields do not disappear and change only when you click Update or when you open a large preview
When renaming a QT node, the name is now saved after the scene is reloaded
In the About zone, the exact license period is now displayed (when it is less than 30 days)
A tip for enabling Store to temp has been added to the Update window
Added a warning when deleting sets in slicer and PE
Removed artifact micro seams when setting all seams to 0
The plugin no longer crushes 3d max, due to the lack of Internet
QuickTiles 1.0.9.1 (19.09.2022)
Feature added:
Added the ability to set tile IDs inside the slicer
Added the ability to select all tiles in a given ID by double-clicking in the slicer and Pattern Editor
Added the ability to set the direction of the tiles in the slicer and Pattern Editor
Added icons to the slicer library
Added the ability to drag-n-drop textures between slots in the slicer
Improved:
Improved the ctrl+z mechanism in slicer and PE
Tilt of the displacement follows the direction of the tiles
When textures are lost, their names are saved in the slicer
Significantly simplified polygonal patterns creation
Increased the speed and stability of the plugin
Fixed:
Contrast in Color correct in the slicer now works more accurately
The problem of selection the tiles in PE when scaling the window
Added zoom to the autoslice window and made its original size small
Deformation of tiles when working in a slicer with non-square textures
Slicer crush when creating new tiles
When deleting sets from the library, the very first set was loaded
Small improvements:
Patches have become more square
Added a status window while slicing tiles in the Slicer
Removed the vertical mirroring of the middle part in the Crop/center algorithm
Slightly changed the default plugin parameters
Slightly changed the settings of the base material in V-ray and CoronaLegacy
Generation of tiles in the slicer when slicing in 1 and 2 mode has become more accurate
Removed artifact microgaps when setting all gaps to 0
Library:
File size been optimized
The hue and brightness of some maps are balanced
Added:
Paving long brown 4317
Paving tactile 7145
Wood planks 7543
Paving rounded 4380
Brick grey 4717
Wood planks grey 9351
Paving rounded 4381
Paving salmon 4167
Paving red square 1789
Paving simple colored 7183
Paving park wet 4659
Paving bowtie 5974
Paving fishscale 5198
Paving grassy 6623
Brick red black 7137
Paving brown 4316
Paving rounded red 6174
Paving rounded yellow 6175
Stone tiles old 2731
Shinglas brown 3176
Paving trapeze 9174
Paving sandstone 3030
Paving sandstone 7444
QuickTiles 1.0.8.3 (25.03.2022)
Improved:
Significantly improved operation stability
Significantly increased the speed of material generation
Significantly increased the speed of the Store function
Significantly increased the speed of HSV in the slicer (added multithreading)
Sliced tiles and material are no longer saved in the scene. Now QT does not affect its size
Increased recognition accuracy by disabling map reduction. Now you adjust the size of the bitmaps yourself and can slice them quickly, or slower, but as accurately as possible
Feature added:
Store to temp function – after activation, the material loads faster and can be rendered without a license
Store to scene function – the material is saved to the scene and can be transferred to another computer without additional actions, as well as rendered without a license
Result size is now always displayed in Store modes
Ability to move the library and temp files to another location during installation
Function of quickly reducing maps in the Slicer – now you can use smaller sources, while significantly speeding up the work. No additional disk space is required for these files
Search for source textures in case of loss. Now the plugin searches for them in the libs folder, as well as in the project folder, next to the max file and the maps folder
Fixed:
Bug with rows disappearing during regeneration
Bug with a crash when generating 8K materials
Pattern library – some patterns disappeared in the previous version
Crash when switching previews between channels. If there was no source bitmaps on the channel, there was a crash
Crash when trying to create a material without a selected pattern
Library:
Paving moorish 8179
Paving terrazzo 6178
Paving square 6287
Paving broken 7341
Paving snowy 3387
Paving snowy 3215
Paving grainy flat 3180
Roofing corrida 8762
QuickTiles 1.0.8.2 (18.01.2022)
Feature added:
Interface lock during updating
Fixed:
Patterns display during window scaling
The tile randomization mask did not work on render
Other minor bugs
Library:
Paving old city 5811
Wood ash 6871
Paving origami 6931
Paving antique 7375
Paving rounded 4379
Paving colour 1547
Paving modern 3177
Paving old city 1987
Paving hexagon 1834
Paving grained 1563
Paving rounded 6173
QuickTiles 1.0.8.0 (7.12.2021)
Feature added:
Partial multithreading. The speed of slicing and updating has increased significantly
Added the ability to create non-square patterns
Added the Save all QT to scene function. After activation, the scene can be transferred to another computer. The other user must have the plugin installed. No active subscription require!
Added the ability to render QT materials after the subscription ends (Store must be activated for this)
Improved:
The distribution of aspect groups has been improved and has become neater
In Crop/Center mode, when aspect groups match, the tile switches to Stretch
Large preview works without any restrictions – you can make any zoom and expand to full screen
Updated indicators of container randomization
Small improvements:
The Delete, Ctrl+C, Ctrl+V buttons now work in 2022 max as usual (without Shift)
The gap color on the Roughness channel is now white by default
Removed the Autoupdate button
Added recognition of texture names based on a template from Polygon
Fixed:
The interface on 4K monitors is working properly
Fixed the "thick" seams bug after closing/opening the scene
In PE and Slicer, when clicking on an empty zone, tiles were generated
Fixed crash when copying a QT node
Fixed: QT nodes remained instances after copying
Fixed normals for circular layouts
Fixed crash when enabling circular layout in polygonal patterns
When opening the Slicer, PE and gap color selection windows, the large preview is slightly reduced
Library:
Brick orange 3997
Brick red 6922
Bricks grey 4927
Geomesh 1549
Paving red wet 3164
Paving simple wet 5736
Travertin yellow 7349
Stone blocks 6371
Paving granite 3168
Brick yellow 1383
Paving park 1785
QuickTiles 1.0.7.4
Feature added to slicer:
Contrast correction in HSV
Direction of normals correction
Mark all & Unmark all functions added to Eraser
In the Slicer and PE, shortcuts (Ctrl+C, Ctrl+V & Delete) now works with Shift
Feature added common:
Position of the buttons in Generated texture settings section has been changed
CoronaPhysicalMtl is creates in Corona 7 now
Fixed:
When copying, the QT nodes in any case remained instances
In the slicer, when you press Enter, the plugin offered to reset the settings
Incorrect generation of the gaps normals
Small improvements:
Improved autoslicing
HSV operation in the slicer has been slightly accelerated
Small fixes in the slicer when working with nonsquare textures
Library
Paving park 1785
Paving orange 8742
Brick old red 9439
Paving Tiara 4891
Paving simple 7468
Wood decking 5936
QuickTiles 1.0.7.3
Feature added:
3d max 2022 support
Individual tiles sets loading
Subscription expiration notification. It will appear in the About section 5 days before the subscription end
Improved layout algorithm. Now the plugin tries to take unique source tiles and place same tiles far from each other
New Crop/Center algorithm. Now, for lengthening, the tile can be duplicated 2 or 3 times, and does not scale in height
Fixed problems:
Slicing was not saved to the library if Plain texture was checked
3d max crush when set zero dimensions of base tile or some other parameters. Now generation is disabled is this case
3d max crash when working with QT in the compact editor mode, on the diffuse of the standard material in the Corona render
The plugin didn't work on the last day of the subscription
When saving QT to the bitmap, the texture was generated reflected
Due to the new Crop/Center algorithm, vertical stripes appeared
When copying tiles in the slicer, new tiles appears highlighted now
QuickTiles 1.0.7.1
Fixed problems:
No warning message when trying to install plugin with working 3d max
Convert all QT to textures didn't work with non-latin characters
3dmax crush when trying to copy QuickTiles node
Offset tiles appears in slicer when container cross the border line
Copied QT nodes worked as instances
Other minor bugs
QuickTiles 1.0.7.0
Features added:
Slicer zoom
Slicer HSV
Save generated mask to file
Slicer non-square preview
Overlapping tiles autoslice
Non-tiled tiles excluded from autoslice
Select smaller tiles in slicer
Select same aspect tiles in slicer
Group disabling in slicer
Full size texture preview in slicer
Slicer tools hotkeys (Ctrl+1 - Ctrl+6)
Procedural gap channels drag'n'drop
"Update" button hotkey — ctrl+space
Mask creation speed up
Some icons changed
False activating message changed
Fixed problems:
Pattern loss when canceling pattern editor
Source gap size in all patterns
Herringbone interactive pattern regeneration
Minor bugs and crushes
QuickTiles 1.0.6.0
Fixed crush on empty texture viewport show
Fixed 3max 2018 tiles offset with 4K testures
Fixed vertical sliced elements excessive overlap
Fixed slicer second mode now called "Lines"
Fixed crush on mat.editor close/open
Loading accelerated
Fixed edit poly lags in 2021 max
Fixed "Convert all QT to plain textures" same file name issue
Compatibility
The Quick Tiles plugin is fully compatible and works in the 3d max version from 2018 to 2025
Currently supported render engines: Vray, Corona, Fstorm*
Working with Fstorm

Due to the complexity and specifics of Fstorm and similar GPU rendering engines, the first version of QucikTiles cannot work with it as directly as with Vray or Corona. Therefore, unlike them, when creating material in Fstorm, QT saves the texture as bitmaps to the hard disk, and then automatically loads them into Mat. editor as FstormBitmap. In this case, the QuickTiles node is not deleted.
To update the textures you should use "Save to plain texture" function. Unfortunately, due to the limitations of Fstorm, the bitmaps will need to be updated manually.
If you use the "Create Material" function, another new material will be created.
Don't try to connect Quick Tiles on one of the FStorm material channels. Put it on an empty Compact mat.editor slot or in an empty Slate mat.editor space
Installation and activation
1. ATTENTION! The plugin requires an active internet connection to work.
2. Run the plugin installation as administrator. The included archive must be located next to the file QuickTiles.exe at the time of installation, to install a new version, or update the libraries
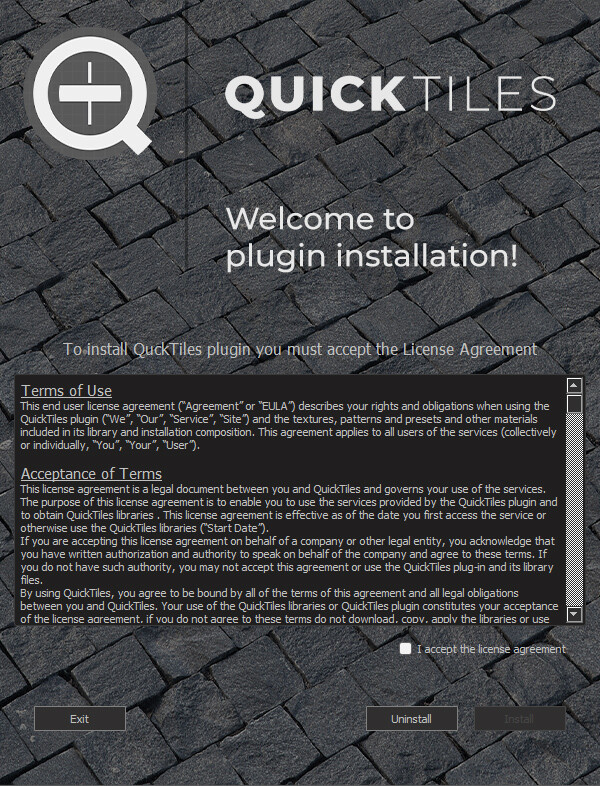
3. On the first screen, you will be asked to accept the license agreement. Also, you can proceed to uninstall the plugin.
4. On the second screen, you can select the 3d max versions for which the plugin will be installed. Also, you can change the installation folder for the library here.
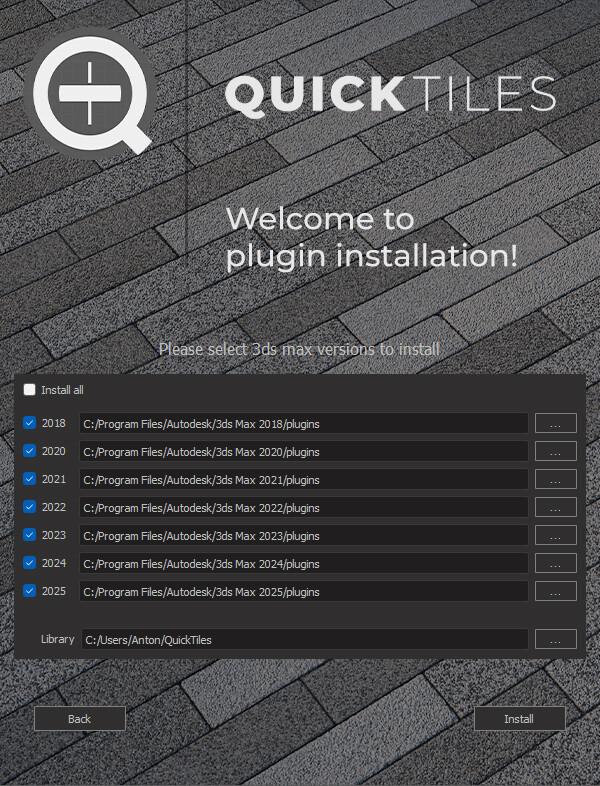
5. After selecting the versions, the installer will download from the server and install the latest versions of the plugin. It takes about a minute, and now everything is ready!
6. The plugin library is unpacked to the current user's folder, in the QuickTiles subcategory
(C:/User/QuickTiles ). All files are downloaded from the plugin interface. Libraries are updated once a week automatically, or at any time, manually, in the About section.
7. After installation, the plugin will appear in the list of textures, in the General tab
8. The free trial period is 14 days. No additional activation or registration is required
9. After 14 days, the plugin will stop working. This means that the test period (or paid subscription period) has expired and requires purchase and activation. Also in About section you can see "Subscription expired" notification
10. When purchasing a subscription on the site, BE SURE to provide a valid email address
11. After purchasing a subscription, click Activate in the About section

12. In the window that appears, enter the same email address that you used for the purchase and click Ok

13. Within a few minutes you will receive an email with a link to activate it
14. After clicking on this link, the plugin will be activated.
15 After restarting 3d max, the plugin will work correctly until the subscription ends.
16. 30 days before the end of the subscription period, the exact number of remaining days will appear in the About section
17. While the subscription is active, the Activation button is unavailable.
Re-activation
18. If you reinstall the plugin on a new computer or make significant changes to the hardware of the current one, perform the activation again according to the standard procedure. The plugin installed on the old computer will stop working.
19. There can be no more than 5 such re-activations for one year of subscription. If you have run out of activations, contact technical support (support@quick-tiles.net) and we will try to find a solution to this problem.
Uninstallation
1. If you decide to completely remove the plugin from your PC, run the installer again, and select Uninstall on the first screen
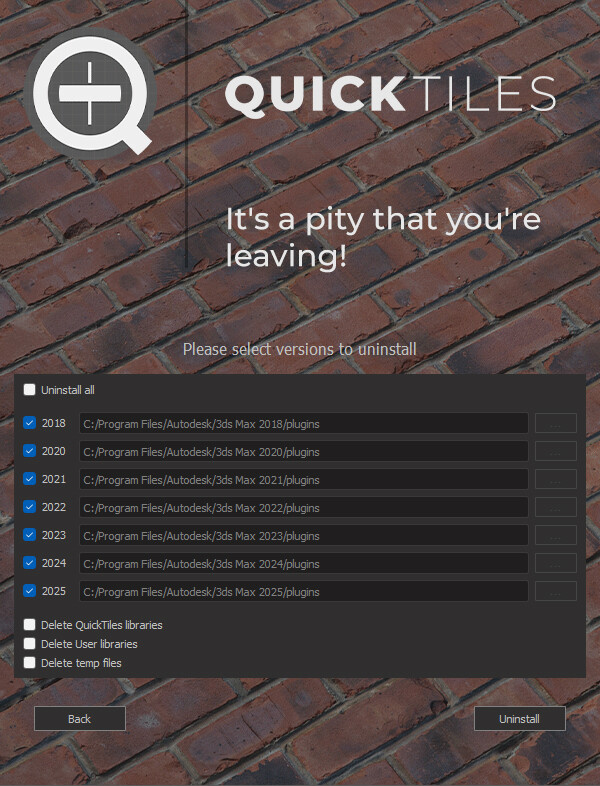
2. On the second screen, you can select the 3d max version from which you want to remove the plugin, as well as the options for deleting libraries and temp files.
Attention! If you decide to reinstall the plugin, DO NOT DELETE temp files and library files. This can cause brakes and crashes when you subsequently open projects that use QuickTiles
Simple material creation
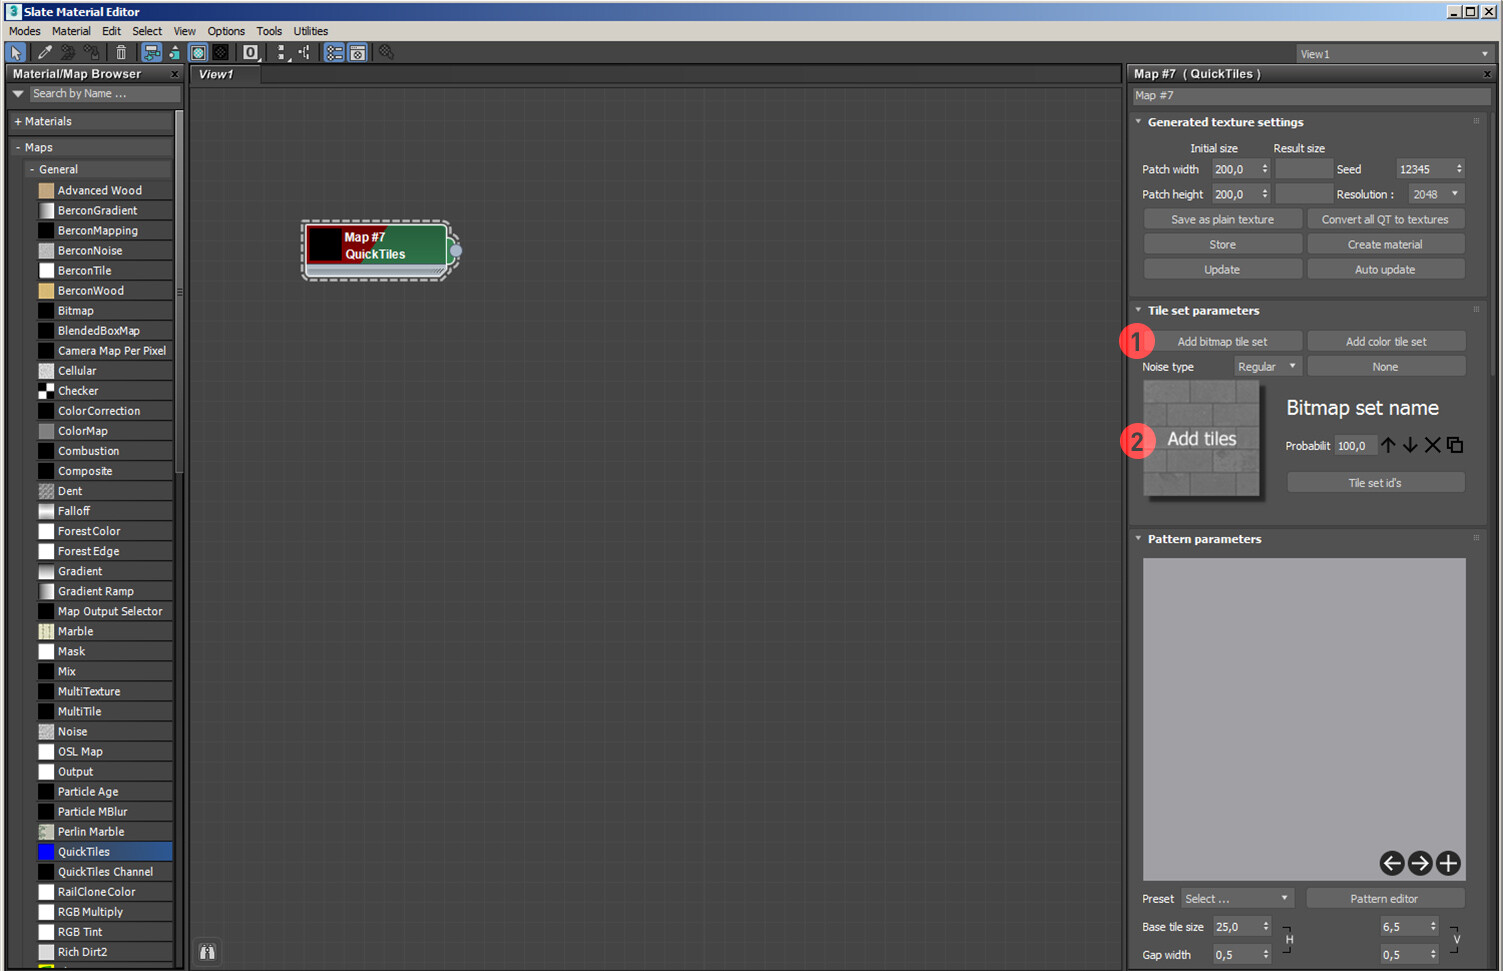
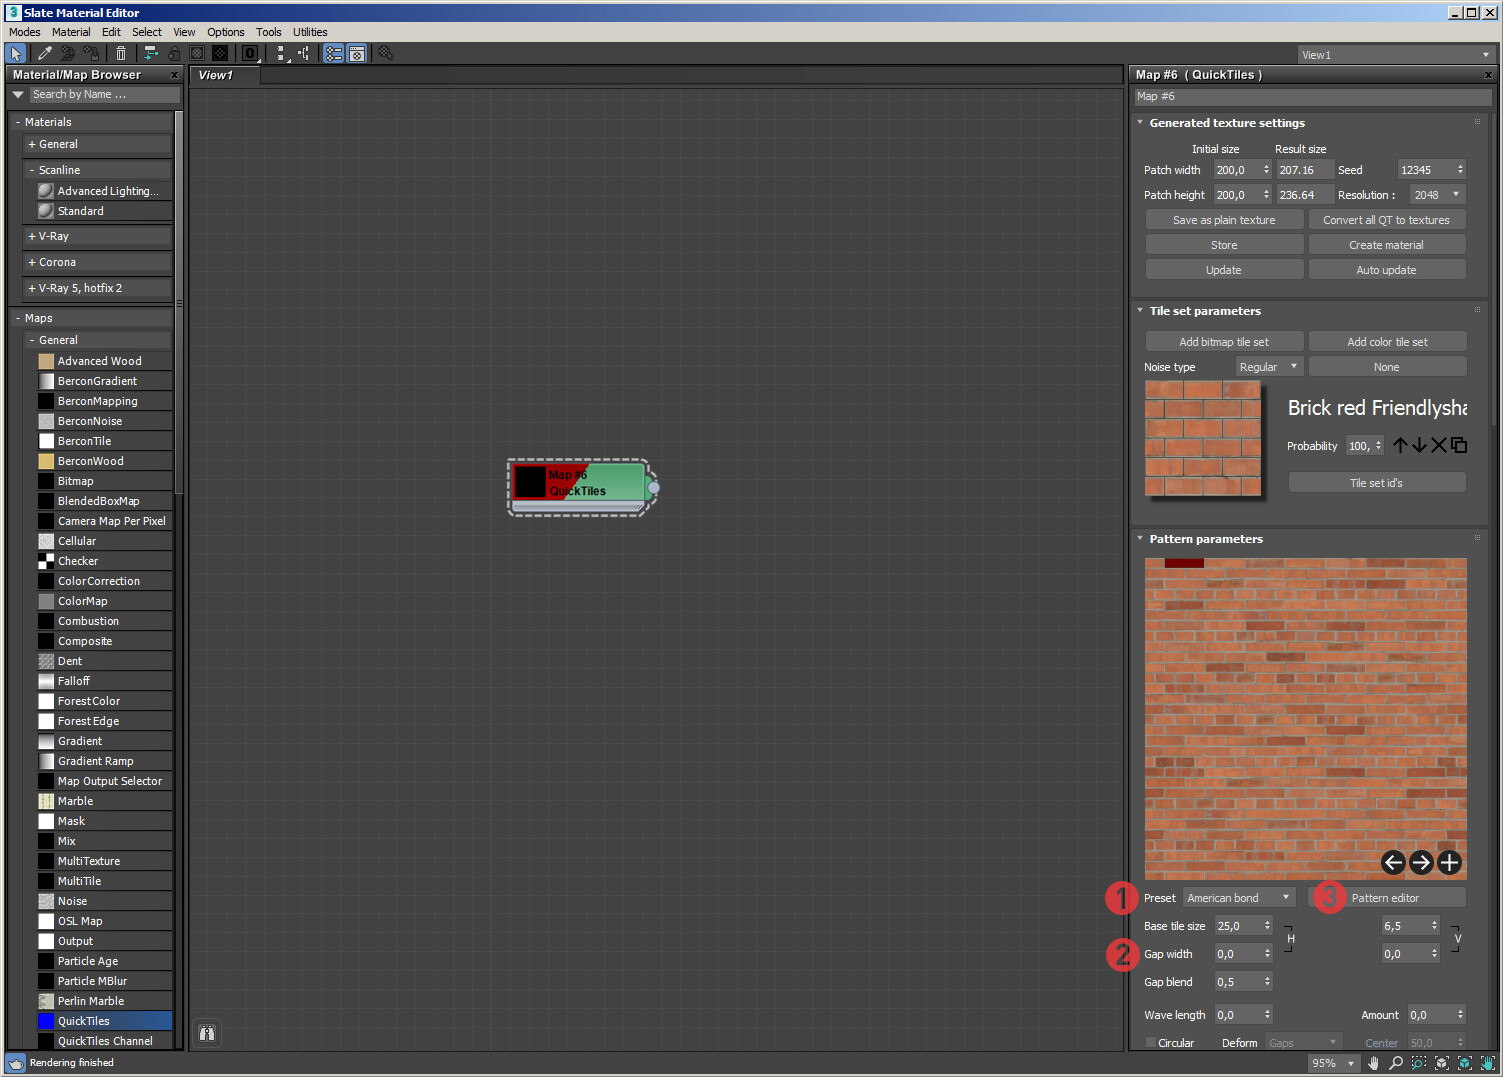
Setting up any material in QuickTiles starts with adding the QT node itself. It is available from the list of General textures (1-2) in the Compact and Slate material editor. You don't need to create the material and connect QT on any channel. Add it to any slot in the compact editor or any place in the slate (3).

Then we go to the QT itself. By default, the bets start parameters that are set. The first step in the setup is to add a set of tiles (1) and open the Slice Editor (2).
Slice Editor is a QuickTiles module in which you enter the original textures and specify the borders of the tiles (or that the texture is seamless). For more information about all the module parameters, see the Help section Slice Editor
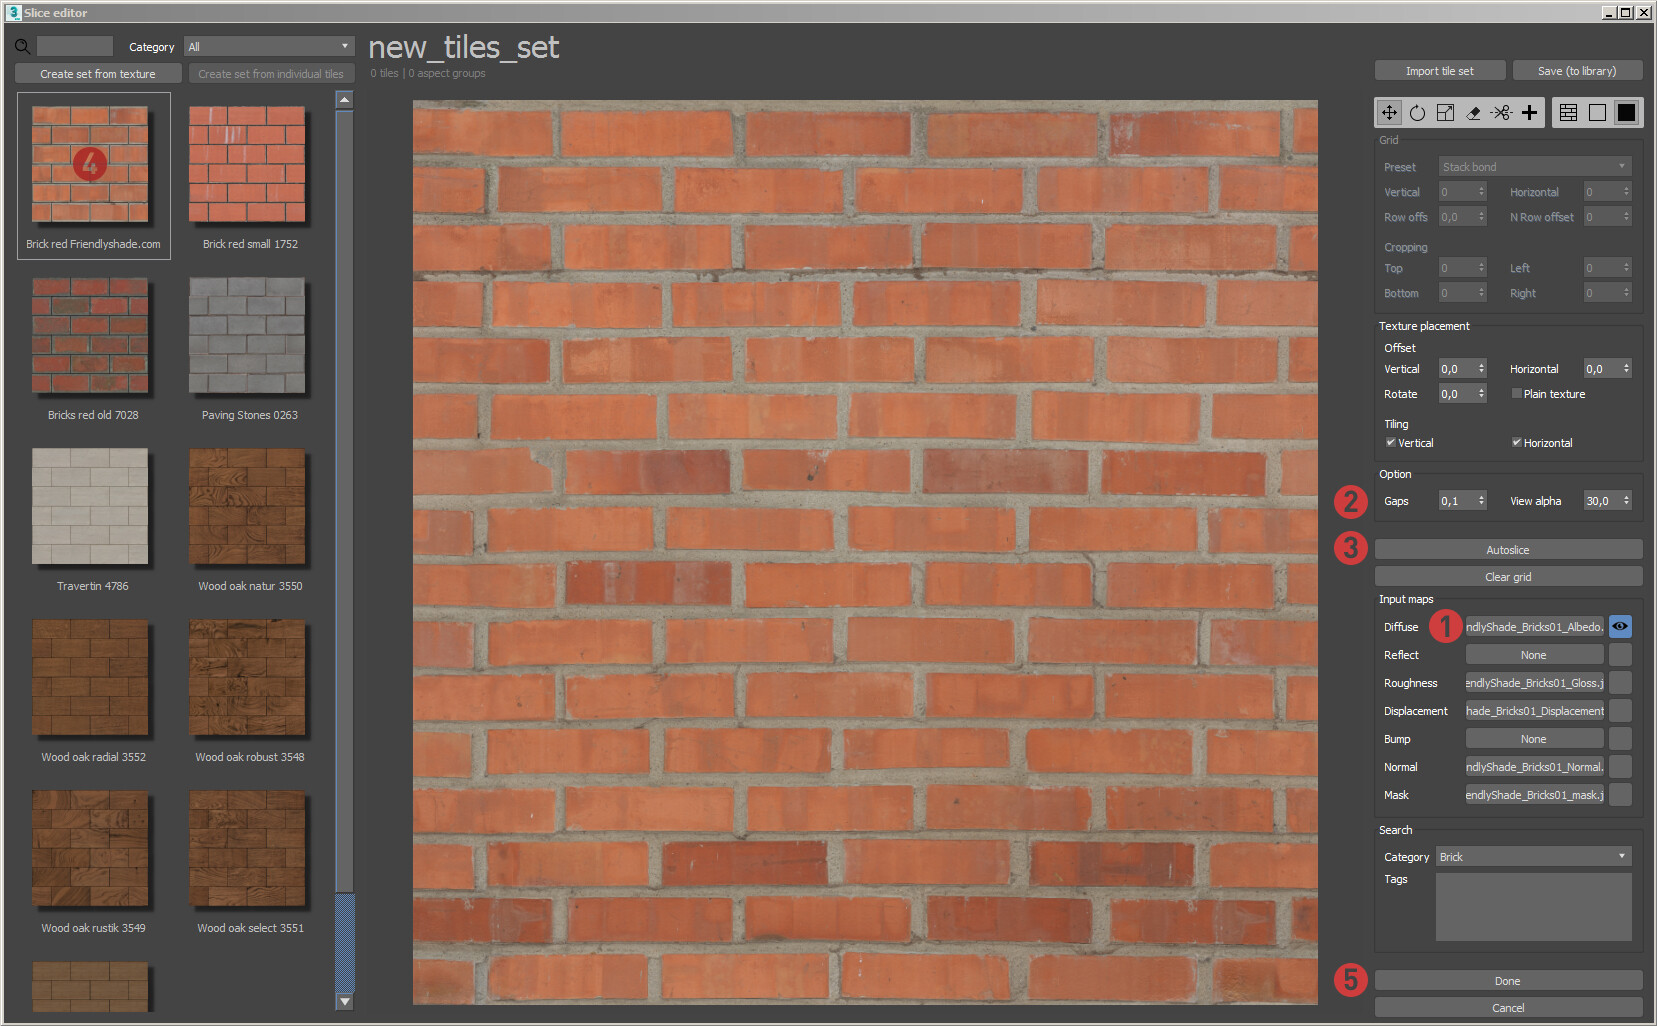
The input textures are entered in the Input maps zone (1). You need to select the Diffuse channel, and the other channels are recognized and loaded automatically. After that, you can mark up the tiles manually, or recognize them automatically (for more information, see the section Slice editor). We will show a more convenient path now and make recognition based on the Mask channel. Set the value of Gaps (2) to about 0.7 — this will indicate to the recognition module the approximate error when gluing the seams. And click Autoslice (3). Recognition by mask is almost instantaneous.
Also, you can select and add one of the already saved templates from the library (4). After completing the work, click Done (5). At this point, the texture is cut into tiles. The larger your sources and the number of channels, the longer the process will take.
The next step is to select the pattern. You can take one of the templates (1) from the Preset drop-down list, or open the Pattern editor (3) and create a new pattern. Also, for tiles that have original seams, set the width of the procedural seam to 0. This will disable the procedural seam and enable mixing of the original seams (2).
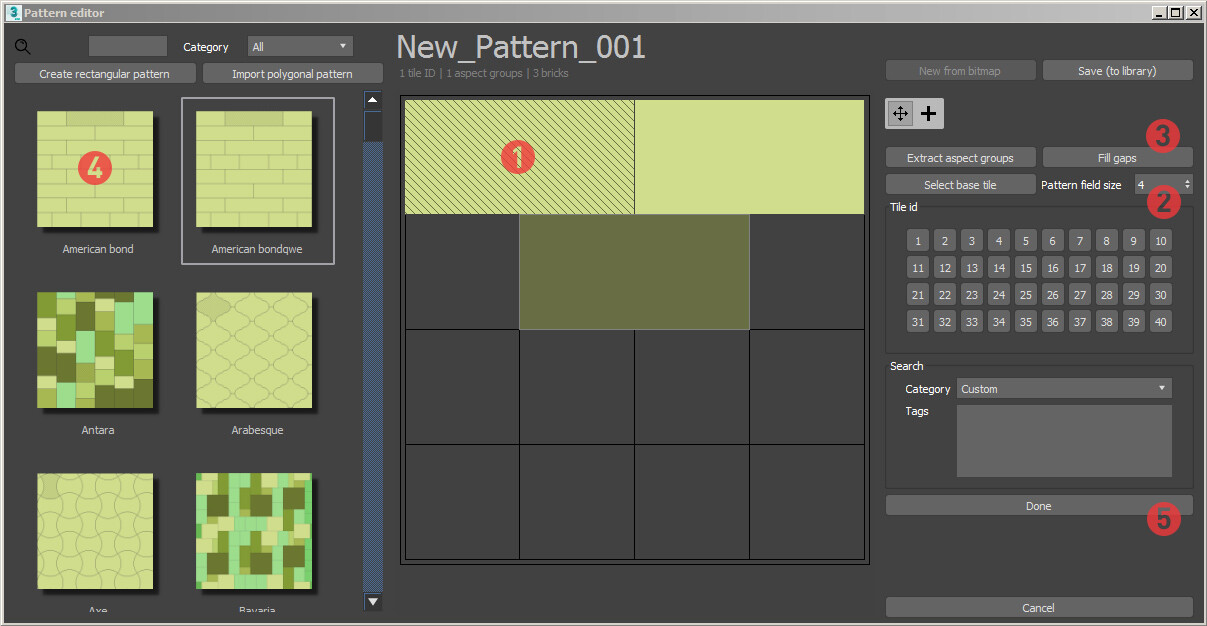
For example, let's create a simple pattern in the Pattern editor. Use the  tool to create several tiles (1). Do not forget to reduce the field to the minimum required size (2). After creating the base pattern, you can fill the repeating part with the Fill gaps button (3). You can also select any template from the library. When you finish, click Done (5).
For more the details of the Pattern editor, see the corresponding section.
In fact, our texture is ready. Now we can make various settings in the internal interface, set randomizations, etc. For reference, we have added a light preview of the texture.
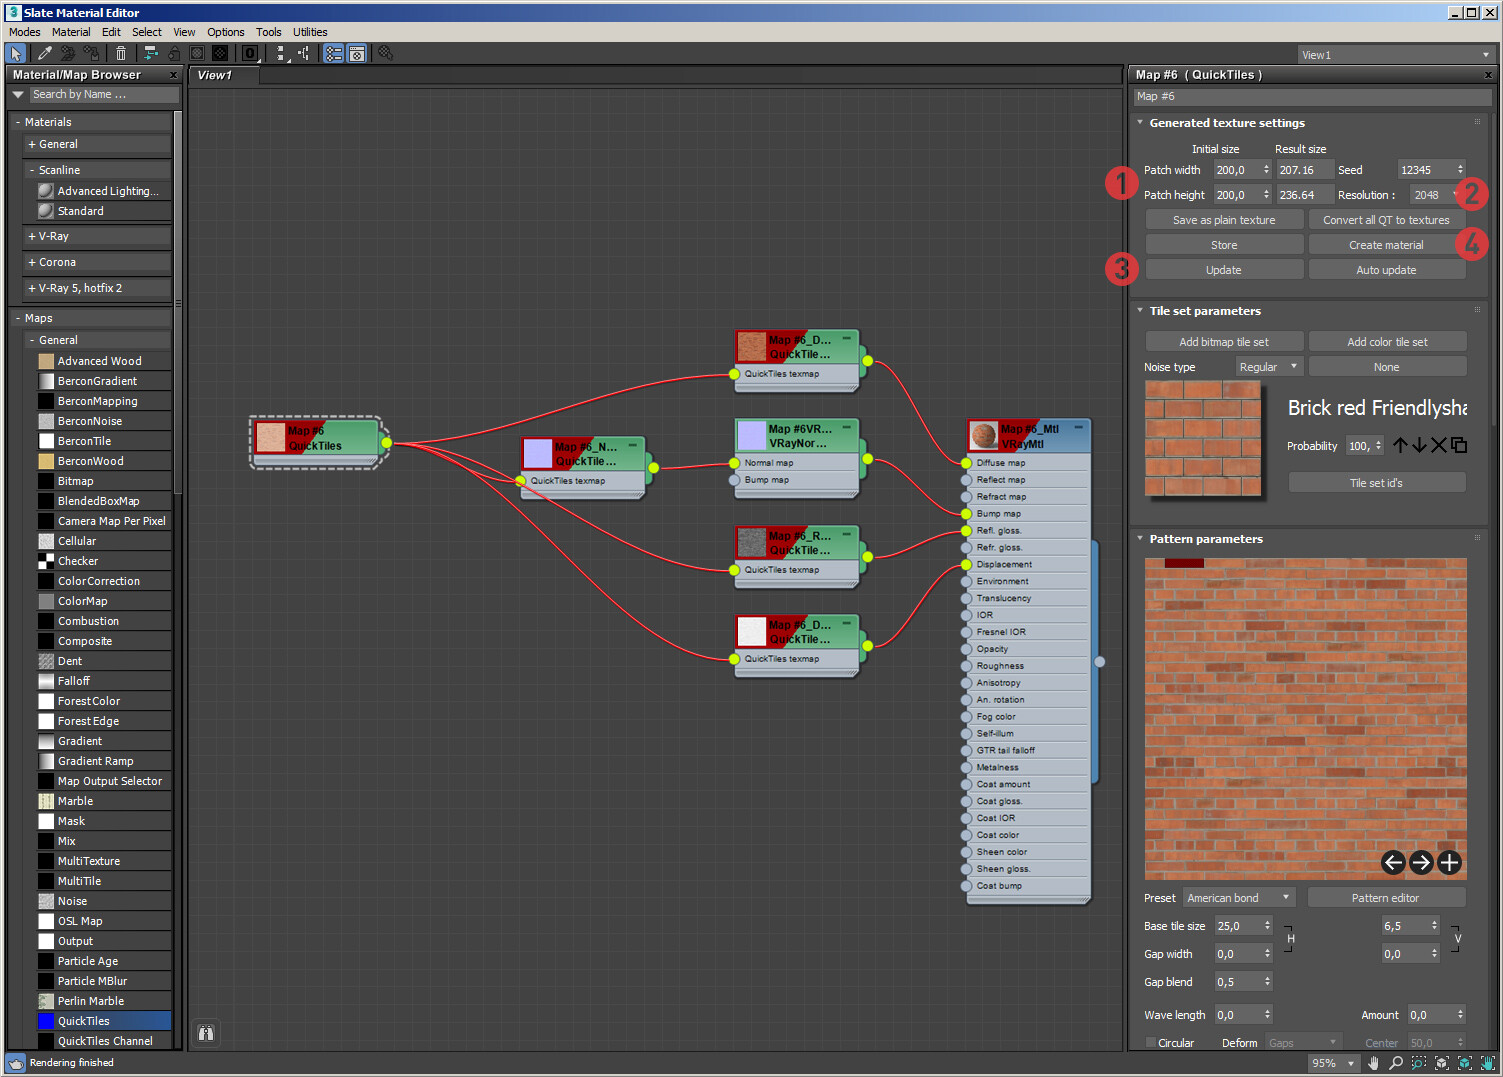
When everything is ready, you can set the size (1) and resolution (2) of the output texture piece. We recommend testing the settings on a small size (2x2 meters, 2048 px).
After that, click the Update button (3). At this point, the finished texture is built and written to temp. All changes in the material and on the render will appear only after clicking the Update button. The process of creating a texture can take 2-3 seconds on small resolutions, and 3-7 minutes on top sizes of 16-32K
After completing the process, click the Create material button. The plugin automatically recognizes your render engine (Vray, Corona, or Fstorm), and creates the appropriate material, with the correct configuration. Texture channels will be added according to the source texture.
Other render engines will be added later.
The algorithm for working with Fstorm is different from working with Vray and Corona. See Compatibility/ working with Fstorm
That's it! The material is created and ready for customization. QuickTiles works with interactive rendering in both Vray and Corona, so you can safely use it in the process. Be careful, if you click on Create material again, another material will be created.
Quick Tiles channel is an auxiliary texture that specifies which QuickTiles channel to feed to the material slot. The fact is that 3d max can't produce more than one output from a single texture. Therefore, in order not to generate and configure each channel of the material separately, we created a scheme in which the main QuickTiles texture feeds all the channels at once, and the QuickTiles channel nodes select and pass on only the necessary one.
The interface of the node itself is very simple:

In the material structure, it is located between the main QT node and the material. In its interface, there are only two parameters — a drop-down list with the names of channels to choose from, and a slot for connecting the main QT texture.
Attention! When connecting normal maps, you do not need to enable gamma correction, since QTC node automatically corrects the gamma.
Generated texture settings

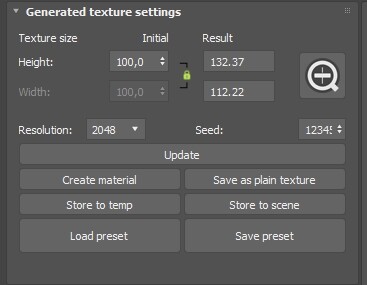
This tab contains technical settings that are responsible for the size and resolution of the created texture, as well as buttons for saving and updating textures.
Patch width — width of the created texture in scene units
Patch height — height of the created texture in scene units
Initial size — input for the desired physical size of the created texture
Result size — displays the resulting physical size of the texture. Works only when the enlarged preview is open.
Due to the complexity of the tiled texture formation mechanism and the desire to create a texture in which the tiles will be as close as possible to the size set by the user, it is impossible to accurately get into the size of the patch set by the user. For this purpose, fields of the desired and final size were created. Read more about this in the section "Texture formation mechanism»
The icon for opening the QuickITiles lister. In it, you can find a list of all the Quick Tiles nodes in the scene and perform batch operations with them. For more information, see the QuickTiles lister section.
Seed — randomization number. Changes the randomization version for the current settings.
Resolution — the resolution of the created texture in pixels.
Update — generates channel textures according to the QuickTiles settings
Create material — creates a material based on the loaded texture channels. The required material type is determined automatically for Vray and Corona.
For FStorm, separate bitmaps are saved and loaded onto the material. At the same time, the QuickTiles node remains in Mat. editor
Save as plain texture — saving the resulting texture to a regular Bitmap. By default, all channels are saved in JPG 8-bit, except for Normal and Displacement, which are saved in PNG 16-bit. To save the texture to a different format, select the desired option when specifying the name and location of the files to be saved.
Store to temp — saves the QT texture to a special temp file. The next time you open the scene, the texture is not generated, but is read from the file. This significantly reduces the opening time. In this case, the interface is locked — to unlock it, click the Store button again. The created temp file will be deleted.
The materials saved in this way will be rendered even without an active subscription.
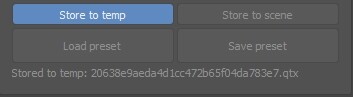
After activating the Store to temp function, the name of the file that was created in the folder (C:\User\QuickTiles\Temp) will appear at the bottom of the section
Store to scene — saves the QT texture to a scene file (.max). The next time you open the scene, the texture is not generated, but is read from the .max file. This significantly reduces the opening time. This operation increases the size of the scene. In this case, the interface is locked — to unlock it, click the Store button again. The material will be deleted from .max file.
The material saved in this way can be easily transferred from the scene to another computer, and it will also be rendered without an active subscription.
Load preset — load fully configured QuickTiles material from the Preset library
Save preset — save the current QuickTiles material settings to the Preset library
Scene units
Due to the complex technical features of Quick Tiles, we recommend that you work in it as if you are using centimeters as scene units. In this case, the appearance of the quick preview will be more correct.
For example, if you need to create a 2000x2000 mm parquet texture with a board size of 600x60 mm, set the values 200x200 for the Initial Patch size, and 60x6 for the base tile size. When applying to the surface, set the mapping to 2000x2000 mm.
Ready-made Presets library
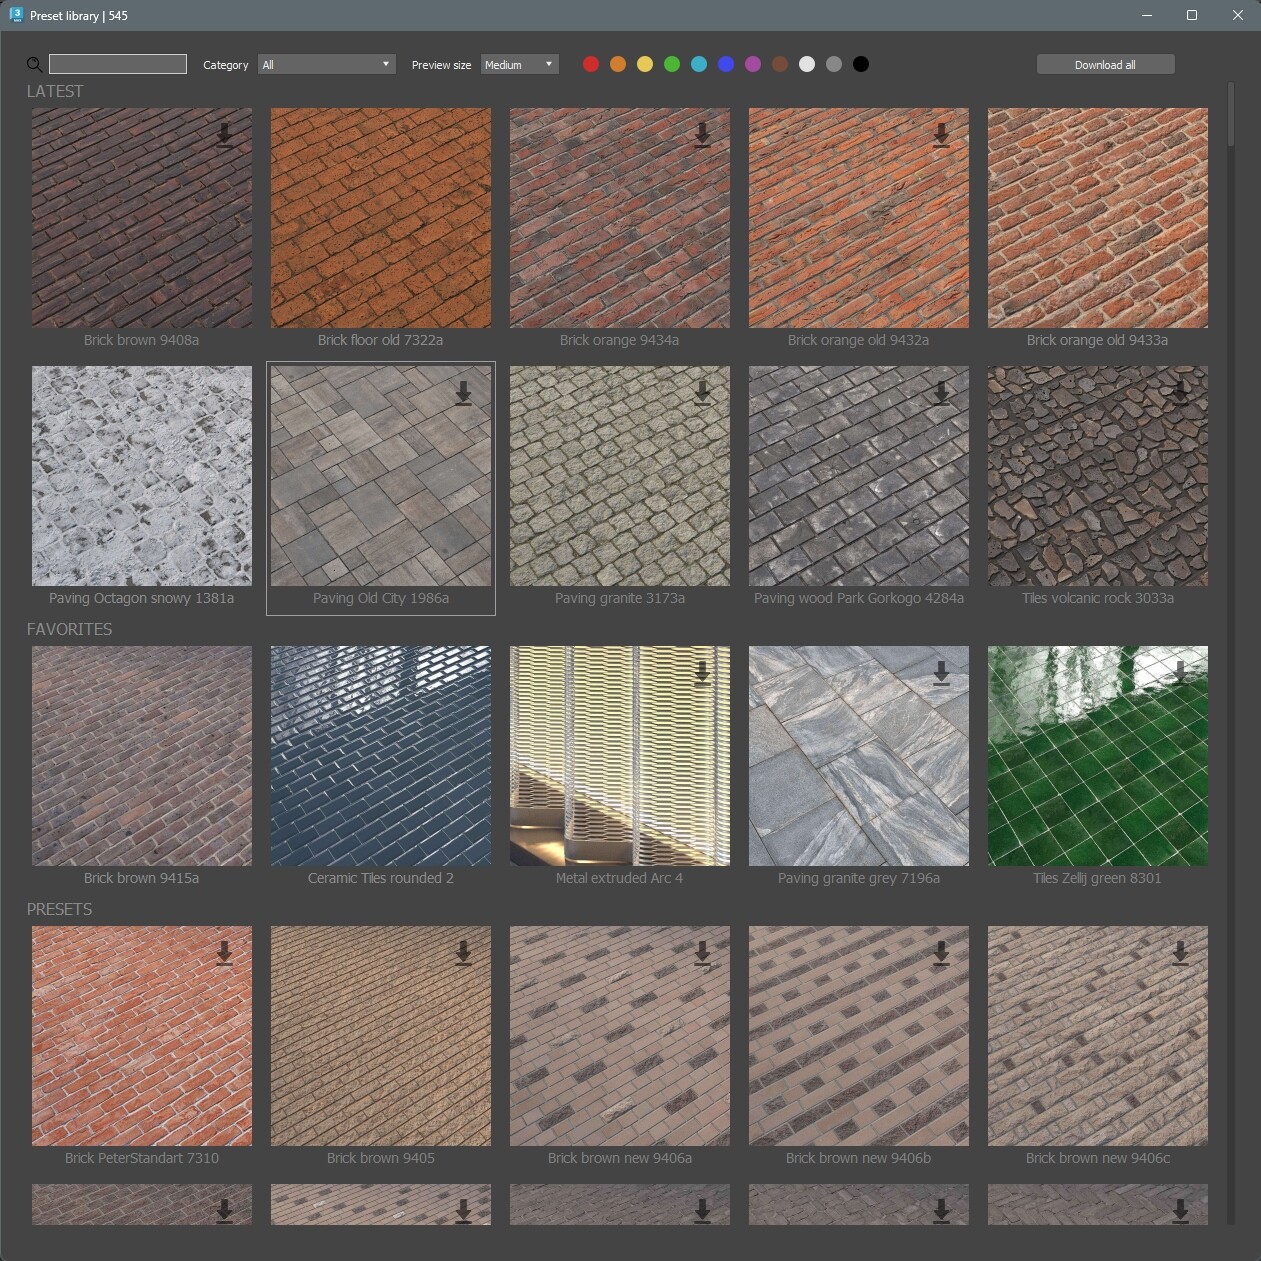
Together with the QuickTiles plugin, all users receive a free library of fully configured and ready-to-use Presets. It is available by pressing the Load preset button in the Generated texture settings scroll.
The library opens in a separate window. its interface consists of the following elements
1. The search box. Textures containing all the words entered in the string in the name or tags will be found.
2. Category — only those that belong to the selected category will remain in the list of textures
3. Preview icon size — choose the preview size that is convenient for you. You can view the preview in full size by holding down Ctrl and clicking on the right mouse button.
4. Color swatches — only textures with selected colors in the properties will remain in the list.
5. Download all — download all textures of the library. Attention! The entire QuickTiles library contains about 30 GB of textures and is constantly increasing. Downloading will take a considerable time. Do not close 3d max until the end of the process, otherwise it will be interrupted.
6. Latest — texture category filled in by the manufacturer. recently released textures appear here
7. Favorites — Favorites. The category to be filled in by the user. You can add your favorite textures here, which you often use.
8. Presets — all other textures in the library.
9. Preset icon. Shows the appearance of the material to be uploaded. There may be a loading arrow in the upper right corner. This means that the textures from this preset are not saved on your hard drive, and will be downloaded when you double-click on the preset. In addition, this may mean that the textures of this preset have been updated and refined, and will also be re-downloaded with the replacement of the old ones with a double click.
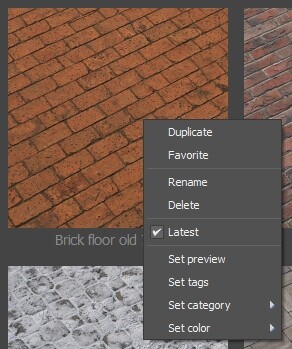
By pressing the right mouse button on any of the icons, you will open the context menu of the preset. The first two items (Duplicate and Favorites) are available for all presets. The rest are only available for custom presets.
QuickTiles lister

The QuickTiles lister is a list of all nodes inside the scene, and a tool for performing batch operations with them.
In the upper part of the interface there are buttons for executing commands:
1. Arrow icon — updating the list of nodes and their properties
2. Store to temp — save all selected nodes to temp
3. Store to scene — save all selected nodes to the scene
4. Select objects — select all objects on which the QuickTiles material is superimposed
*if the QuickTiles node is superimposed through a multimaterial, then all objects on which the entire multimaterial is superimposed will be highlighted
5. Update — update all selected nodes
6. List icon — select all nodes in the Lister
7. Import to SME — import the selected node into the material editor
8. Convert to JPG — convert all selected nodes to regular bitmaps, with automatic replacement of them in the material.
9. Delete — delete all selected nodes
10. Slice and Update — update selected nodes and slices inside them (useful when opening old scenes)
At the bottom of the interface there is a list of nodes inside the scene
1. The first column is the name of the node. A double click makes it possible to rename a node directly from the lister.
2. Store Status
3. Physical dimensions of the created patch
4. Resolution of the created patch
VG ColorPicker for QuickTiles
Starting from version 1.4.0.0, along with the QuickTiles plugin, an advanced Color Picker tool from our developer VG is installed in the system. By default, the Color picker is activated only in the plugin, but you can use it in any part of 3d max by setting it as default in Customize/ Preference/ General/ Color Selector/ VG Color Picker.
The Picker works under the plug-in license, so in case of termination of the subscription, it will also be deactivated.
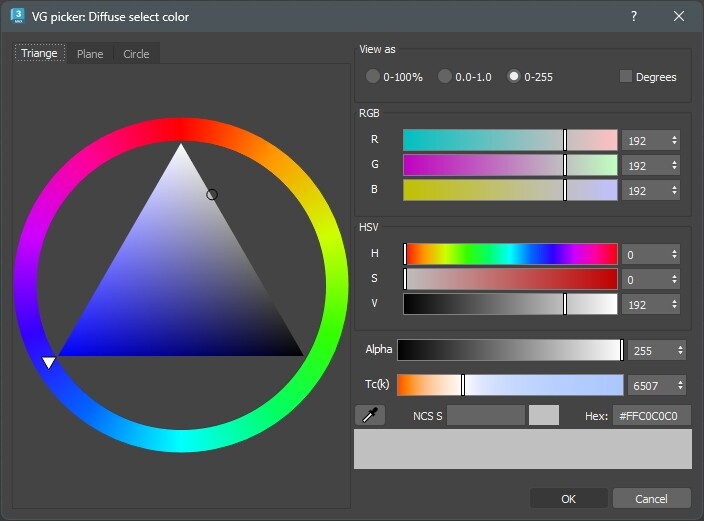
Triangle mode
The Picker has three main modes of the color selection field - Triangle, Square and Circle. Use the option that best suits your visual preferences. You can switch between the modes in the upper-left corner.
On the right side of the interface, the items are described from top to bottom.
View as - options for numerical color descriptions
- 0-100% - percentage display
- 0.0 - 1.0 - display in fractions of a unit from 0 to 1
- 0 - 255 - display in 8-bit gradation - from 0 to 255
- Degrees - switching the Hue component in the HSV panel from gradation 0-255 to gradation 0-360
RGB - displaying channels of the selected color in the Red Green Blue component system
HSV - displaying channels of the selected color in the Hue Saturation Value component system
Alpha - the ability to set transparency to a color. It does not work in all rendering engines
Tc(k) - is the temperature, in Kelvin. A scale for quick color selection in the classical system of shades of light sources.

The Eyedropper. Allows you to select any color visible on the screen.
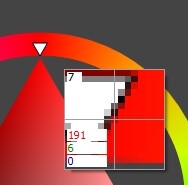
Additional Eyedropper color selection window.
- 7 - the degree of zoom. It is regulated by the mouse wheel
- 191 6 0 - seleced color, in the RGB component system
- the center of the crosshair is a color of selected pixel
For ease of use, common types of color libraries are built into our Color picker. Working with them is organized at the bottom of the Picker.

NCS S - selected color library option
1030-G90Y - name of the selected color. By pressing the RMB, you can select a color from the library.
When you select a color from the library, the Color Picker will automatically move the mouse pointer to the shade closest to the current color.
The small color window - the color from the library that is closest to the current shade. Click LMB to select as the current color.
HEX - HEX color code
Drop-down list (Caparol, Ceresit, etc.) - color library options
Hide name - remove the names of the palette colors.
S (upper right corner) - selection of a sub-variant of the color palette
Large color swatches - at the bottom of the Picker on the left, the current selected color, and on the right is the color that was used when the Picker was opened.
Distributed rendering
For distributed rendering:
1. Install the Quick Tiles plugin on all render nodes
2. Activation of the plugin on additional computers is not required.
3. Activate the Store to scene function in all QuickTiles materials
4. Done!
Tile set parameters
In this tab, you can add sets of tiles and adjust the parameters of their distribution.
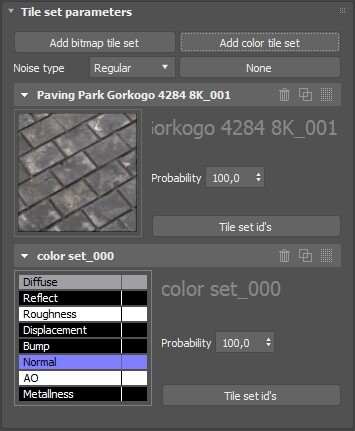
Add bitmap tile set — adds an empty set of bitmap tiles
Add color tile set — adds an empty set of single-color tiles
Noise type — choose between a simple uniform mix of tile sets and a custom map. (see examples below)
None field —adding a custom map for mixing sets.
Add tiles — opens the bitmap tile slicing editor (Slice editor, SE).
Bitmap set— here you can specify the name of the tile set selected in SE.
Probability — the frequency of appearance of tiles of this set in the final texture. Works if more than one set is added.
 — change the position of the set in the stack by dragging it . The order depends on the position when using a custom distribution map (see the examples below)
 — deleting a set.
 — duplicate the set.
Tile set id's — opens a window for selecting the ID numbers of the pattern tiles to which this set will be distributed. You can select one or more numbers.

For more information, see the section Tile ID
Сolor set — here you can specify the name of a single-color set.

Diffuse, reflect, roughness... — setting the colors or noise of the set channels. If you leave the color completely black, the channel will not be generated.
Examples of how to use custom maps of the distribution of a set of tiles
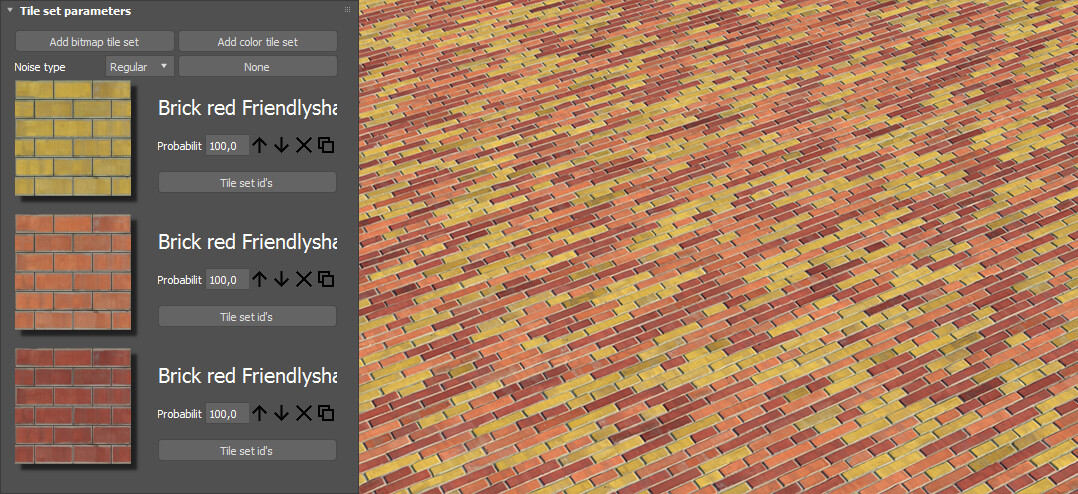
Example 1. Noise type — regular, three sets of bitmaps.
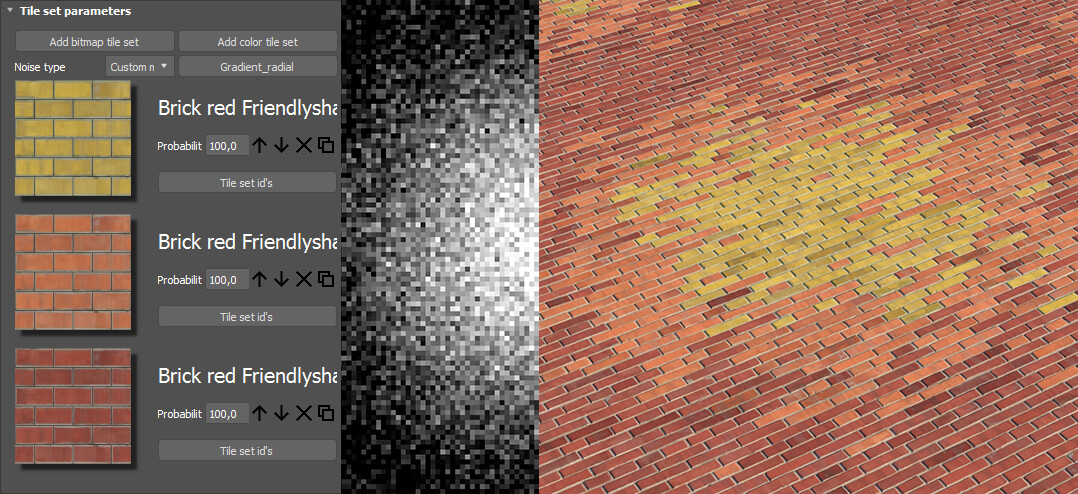
Example 2. Noise type — Custom map, Gradient, three sets of bitmaps.
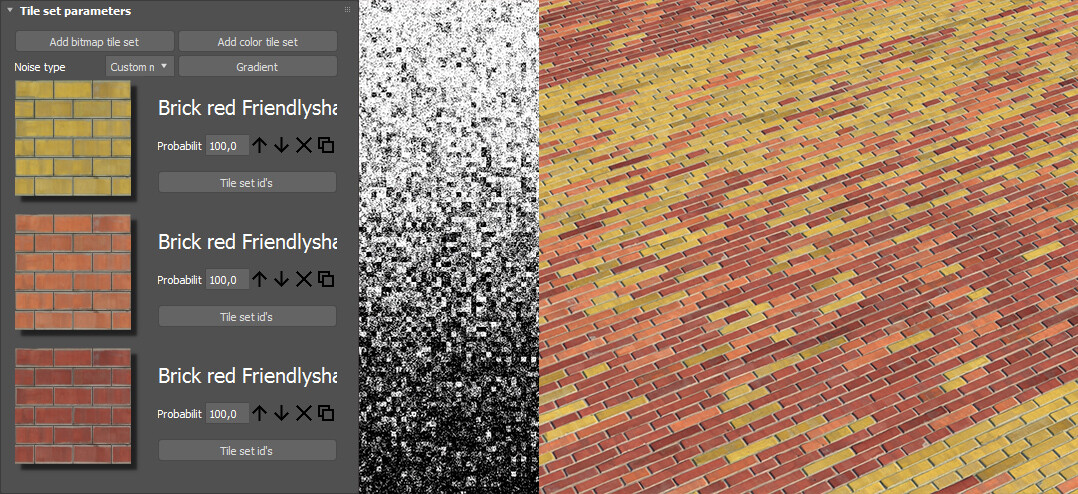
You can use any black and white image as a custom map of the sets distribution. In the final texture, the tile sets will be distributed over a range of grayscale colors according to their position on the stack. The lower the set correspond to the darker image area. And vice versa - the upper sets correspond to the light zones of the user distribution map. In the example, you can see that the yellow bricks located at the top of the stack appeared in the lightest part of the gradient.
Example 3. Noise type — Custom map, Radial gradient, three sets of bitmaps.
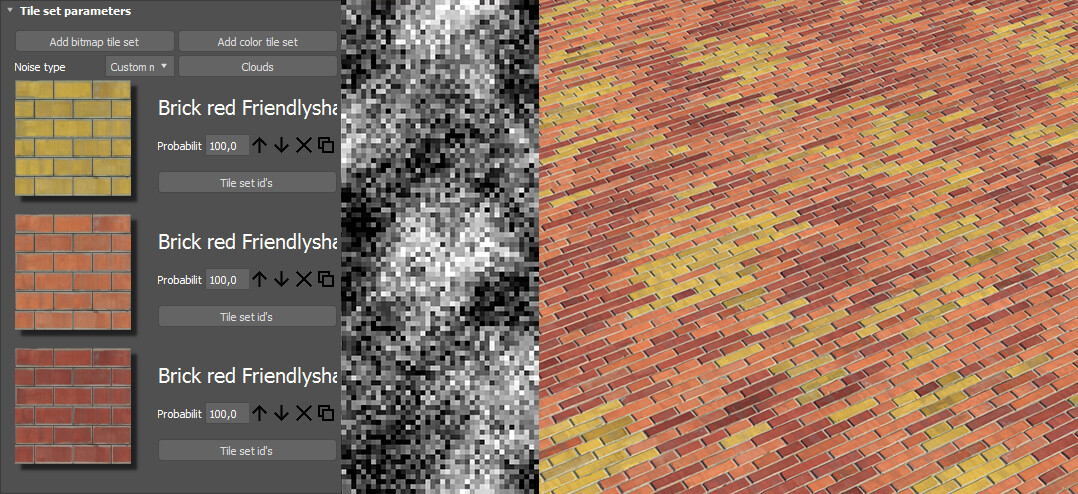
Example 4. Noise type — Custom map, Clouds noise, three sets of bitmaps.
Slice Editor

The entire process of working in QuickTiles can be divided into three parts: the first — adding the original textures, the second — creating a new layout pattern, and the third — setting up the details and randomizations of the layout.
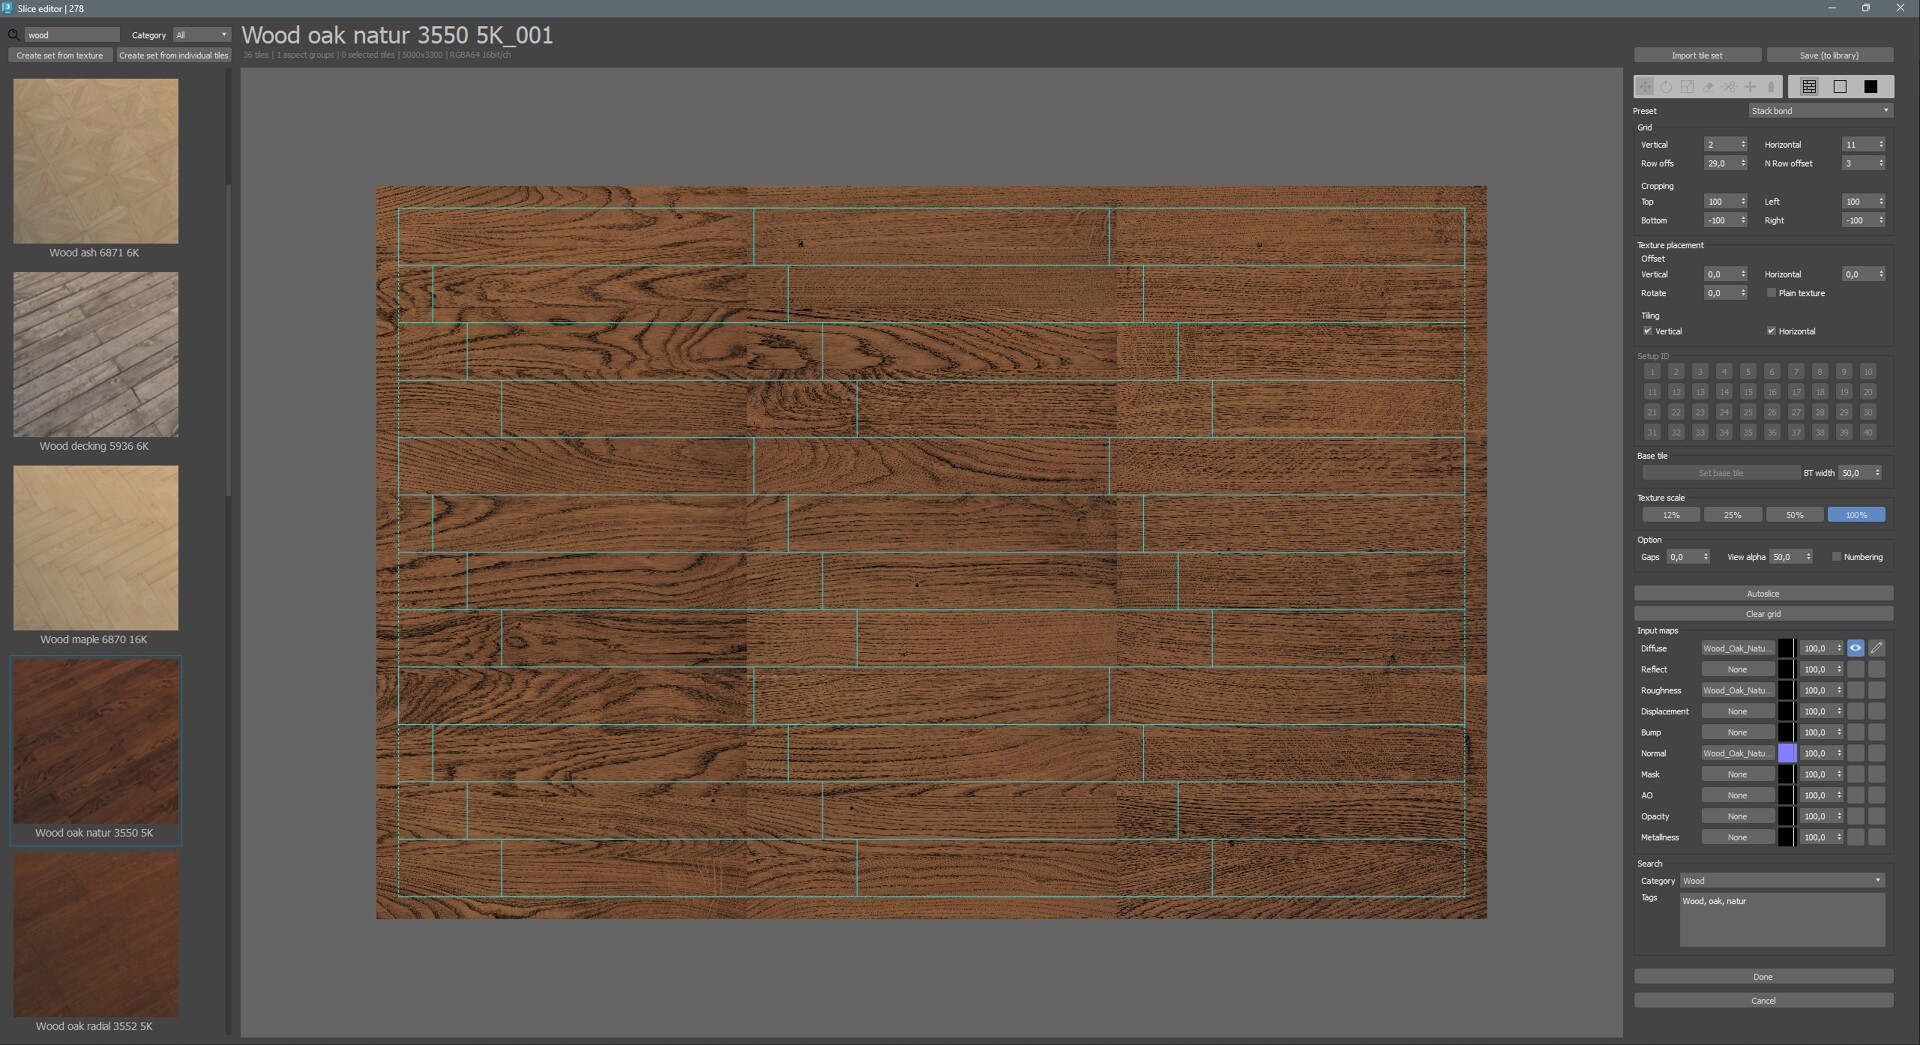
Slice editor (SE) is a small additional module in which the first stage of work is carried out — adding the original textures and cutting them into separate tiles. Here you can add or change sources, save or extract sets from the library, recognize individual tiles automatically or specify them manually, as well as edit the cutting. It is also possible to import or export the finished slicing
The SE consists of three sections. On the left, in the red zone, there is a library of cuts. Here you can see all the saved and imported cuts by the user, as well as the cuts supplied with the plugin.
In the center, in the yellow zone, is the viewport window, where the selected texture channel and the created slicing are displayed.
On the right, in the blue area, there are settings for slicing and the source texture displayed. Let's see the composition of all the elements in more detail.
Slicing Library
 — search by name and tags
Category — select the cut category
Create set from texture — create a new slicing from a solid texture. Resets the interface and all settings.
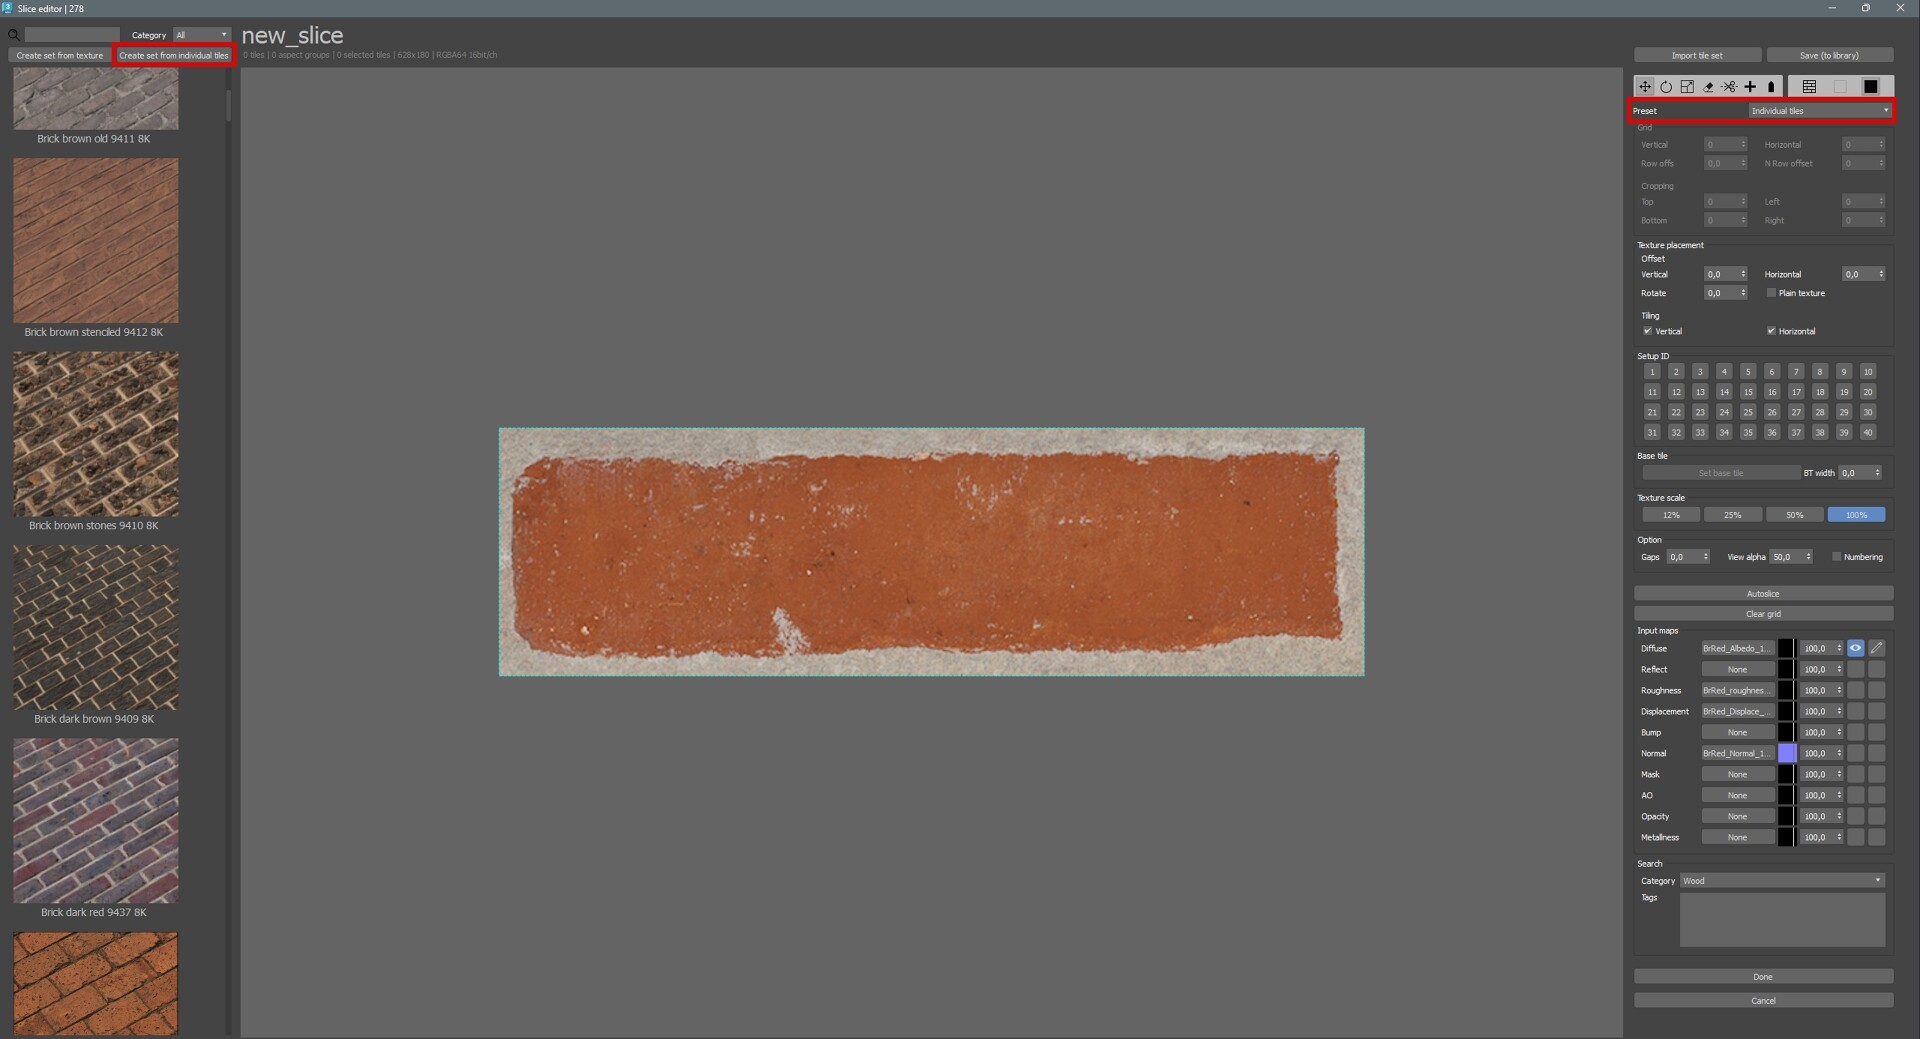
Create set from individual tiles — creating the cutting of already pre-cut tiles.
 Icon of the finished cut saved in the library.
Double-click on the icon - loads the slicing and all settings to SE. A right-click will open the context menu.
Duplicate — duplicates a set in the library
Rename — rename a set in a library
Delete — deleting a set
Save to file — export set (when you exporting the slice, the source bitmaps are written to the file, so you do not need to transfer them separately)
Set custom preview — set a custom icon for the selected set. You can use images of any format, the plugin will reduce it and trim to a square.
Set default preview — resets the custom icon to the standard one.
Slicing and source texture settings
Import tile set — import the ready slicing from a file. When importing, the source bitmaps saved in the slicing file will be unzipped into a folder C:\Users\your_user\QuickTiles\libs
Save (to library) — saving the slicing with the settings to the library. When saving to the library, the original bitmaps are not duplicated, and are loaded from the place where they were originally. Therefore, do not delete or move the original bitmaps used to create the slicing, otherwise the slicing will load empty.
You cannot save or change the source files of the library.
 — tools for creating and editing slicing
 — slicing creation and editing modes
 — Mode 1, the generation of the grid. In this mode, you can create a grid of lines that will be slice a texture and move it away from the edges. Tools and manual editing are not available here.
Preset — choosing a grid pattern — standard or herringbone
Vertical — количество вертикальных линеек
Horizontal — number of vertical lines
Row offset — the distance by which the row is shifted
N row offset — number of offset rows
Usually we need to slice a texture where the original tiles are not under each other, but are offset by a certain distance. For example, bricks are often laid off by 50% every second row, and laminate, with an offset of every second row by 1/3, and every third row by 2/3. The Row offset and N row offset functions allow you to create a grid for such layouts. If you set the offset to 66 and the row number to 2, you will get a grid like in the example. Every second row from the original row will be shifted by 66%, and every first row will be shifted by half of this distance.
Cropping — grid offset from the edges
Top — top edge offset
Bottom — bottom edge offset
Left — left edge offset
Right — right edge offset
 — The second mode is manual editing mode of the grid. In this mode, you can manually shift the slicing lines, adjusting to the imperfections of the texture. Some of the tools are available here.
 — Move tool. Shifts the horizontal rulers along the entire length of the grid, and the vertical ones in the limits of the two closest horizontal ones.
 — Erase tool. Deletes rulers. The horizontal lines are removed along the entire length of the grid, leaving the ones above as vertical lines.
 — Cut tool. Adds a new line. To create a horizontal slice, hover over the nearest vertical ruler and you will see a preview. To create a vertical slice, hover over the existing horizontal one.
Functions Preset, Vertical, Horizontal, Row offset, N row offset and Cropping are blocked in the second and third mode.
Returning to the previous mode from the previous ones will cancel all the changes made.
 — In the third mode you can edit individual tiles manually. Move the finished tiles, rotate them, remove , cut , etc. All the tools are available here.
Context menu of the tools:
Select smaller — selects all tiles of a much smaller size. Useful when cleaning after autoslice.
Select same aspect — selects all tiles with the same aspect ratio
Select same ID — selects all tiles in the same ID
Mark all — disable all tiles (only for the erase tool)
Unmark all — enable all tiles (only for the erase tool)
— Move tool. Offset the tiles. To select multiple tiles, use Ctrl. You can also use the keyboard arrows to move tiles.
 — Rotate tool. Rotates the tiles around the center.
 — Scale tool. Stretches the tile by the selected side. The rotated tiles will stretch in local coordinates.
— Erase tool. Turns off the tiles by marking them black. These tiles will not be used in the layout. They can be turned on at any time. Erase+Shift — complete removal of tiles. You can also delete a tile by pressing Delete.
— Cut tool. Cuts the tile vertically. Cut+Ctrl - cuts horizontally.
 — Create tool. Creates a new tile.
In this mode, copying tiles via Ctrl+C/Ctrl+V works, as well as steps back via Ctrl+Z.
 — Set orient tool. Allows you to set a custom tile orientation.
By default, the orientation of the tiles is set perpendicular to the long side of the container. When you click on the tile once, an arrow will appear showing the default direction.
To change the direction, move the mouse cursor with the left button pressed, just as if you wanted to rotate the tile. At the same time, the direction arrow will rotate in increments of 45 degrees.
To rotate at an arbitrary angle, hold down the Shift.
To align the arrow perpendicular to any face of the container — Alt+Click
To align the arrow in the direction of the specified vertex — Ctrl+Shift+Click
To align the arrow vertically — Ctrl+Click
To reset the direction to default, and remove the arrow — double Click
This function is useful when placing tiles of complex, asymmetrical shape, as well as in cases when it is necessary to observe a certain direction of the tile pattern.
The direction set in the Slicer will correspond to the direction set in the Pattern editor.
Orient tool contex menu
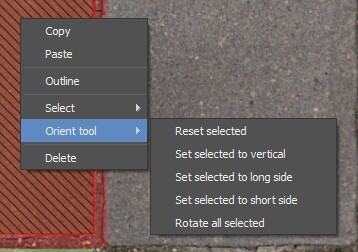
Reset selected — resets the direction of all selected tiles to the default one. The arrow is hidden.
Set selected to vertical — sets the direction of all selected tiles to strictly vertical.
Set selected to long side — sets the direction of all selected tiles at 90 degrees to the long side of the container
Set selected to short side — sets the direction of all selected tiles at 90 degrees to the short side of the container
Rotate all selected — rotates the direction of all tiles to a specified angle
*When using the function, it is often necessary to disable random reflection of tiles and switch to Stretch mode in the Bitmap-in-container section.
**After using the Rotate tool, you need to re-set the tile direction.

In the third mode, the drop-down menu works (right mouse button)
Copy - copy the selected tiles. You can copy from one set to another
Paste - paste the copied tiles
Outline - expand or reduce the selected tiles, together or separately in width or height.
Select all - select all tiles
Invert selected - invert selection
Select smaller - select all tiles significantly smaller in size than the current one
Select same ID - select all tiles in the same ID as the current one (same function - double click on the tile)
Select same aspect - select all tiles in the same aspect as the current one
IMPORTANT: create tiles so that the blue area overlaps the tile surface and does not go into the seam.
The following parameters are not dependent on the slicing mode.
Texture placement
Vertical offset — vertical offset of the texture
Horizontal offset — horizontal offset of the texture
Rotate — texture rotation
Plain texture — enable this option if you want to randomly distribute a texture inside the containers that initially has no seams, such as marble or granite slabs, concrete, stone, wood, etc.Other slicing settings are not required in this case and will be blocked.
Tiling vertical — indicates that the texture is seamless vertically
Tiling horizontal — indicates that the texture is seamless horizontally
Setup ID — here you can set the tile ID directly in the slicer. This is convenient for distributing complex sets with tiles of various shapes, colors and sizes, such as Origami, Trapeze or Tiara.

Double-click on a tile will select all tiles in the same ID
Base tile
Since version 1.3.0.0, QuickTiles has the ability to select a base tile in the Slicer and set its width. It is the width of the tile, located horizontally, that is taken into account, since you see it on the monitor. This activates the automatic optimization mechanism for the size of the sliced tiles.
For example, you have an initial texture in which each tile is approximately 500 px wide. You use it to create a texture in which there are 40 tiles in each row. At the same time, you set the resolution, 4K. That is, each tile in the final texture will be 4096/40 = 102 px in size, which is 5 times smaller than the source! In total, without optimization, the plugin will work with the full size, and only at the very end it will reduce the final texture. And with optimization, it will reduce it in advance, and the speed of operations will increase significantly.
Texture scaling
Reduces the original texture to 12%, 25% or 50%.
Often, a large size of the original texture is not required, and only slows down the plugin. This function allows you to reduce the size of the source files in the process of work, and does not require saving and storing separate sets of smaller textures.
Options
Gaps — specifies the width of the gripped seams. Set this value so that the red area of the tile slightly overlap the neighboring one, or less if you want to reduce the original seam.
In Mode 1 and 2, Gaps adjusts the width of the rulers. When switching to mode 3, gaps between tiles appear in the area captured by the rulers.
View alpha — setting the transparency of the preview of the finished tiles.
Numbering — puts a number on each tile. Helps to find and modify certain tiles in the final layout.
IMPORTANT: For the best construction of the final texture, QuickTiles uses mixing the seams of the source. The Gaps parameter controls the width of the captured seam, and at the same time the depth of the tiles overlapping each other. Therefore, it is very important to set the value of this parameter correctly. For more information, see the description of the Gap blend parameter, in the Pattern parameters.
Autoslice button — opens the automatic tile recognition window. Read more about this below.
Clear grid button — resets the grid settings in slicing mode 1 and 2.
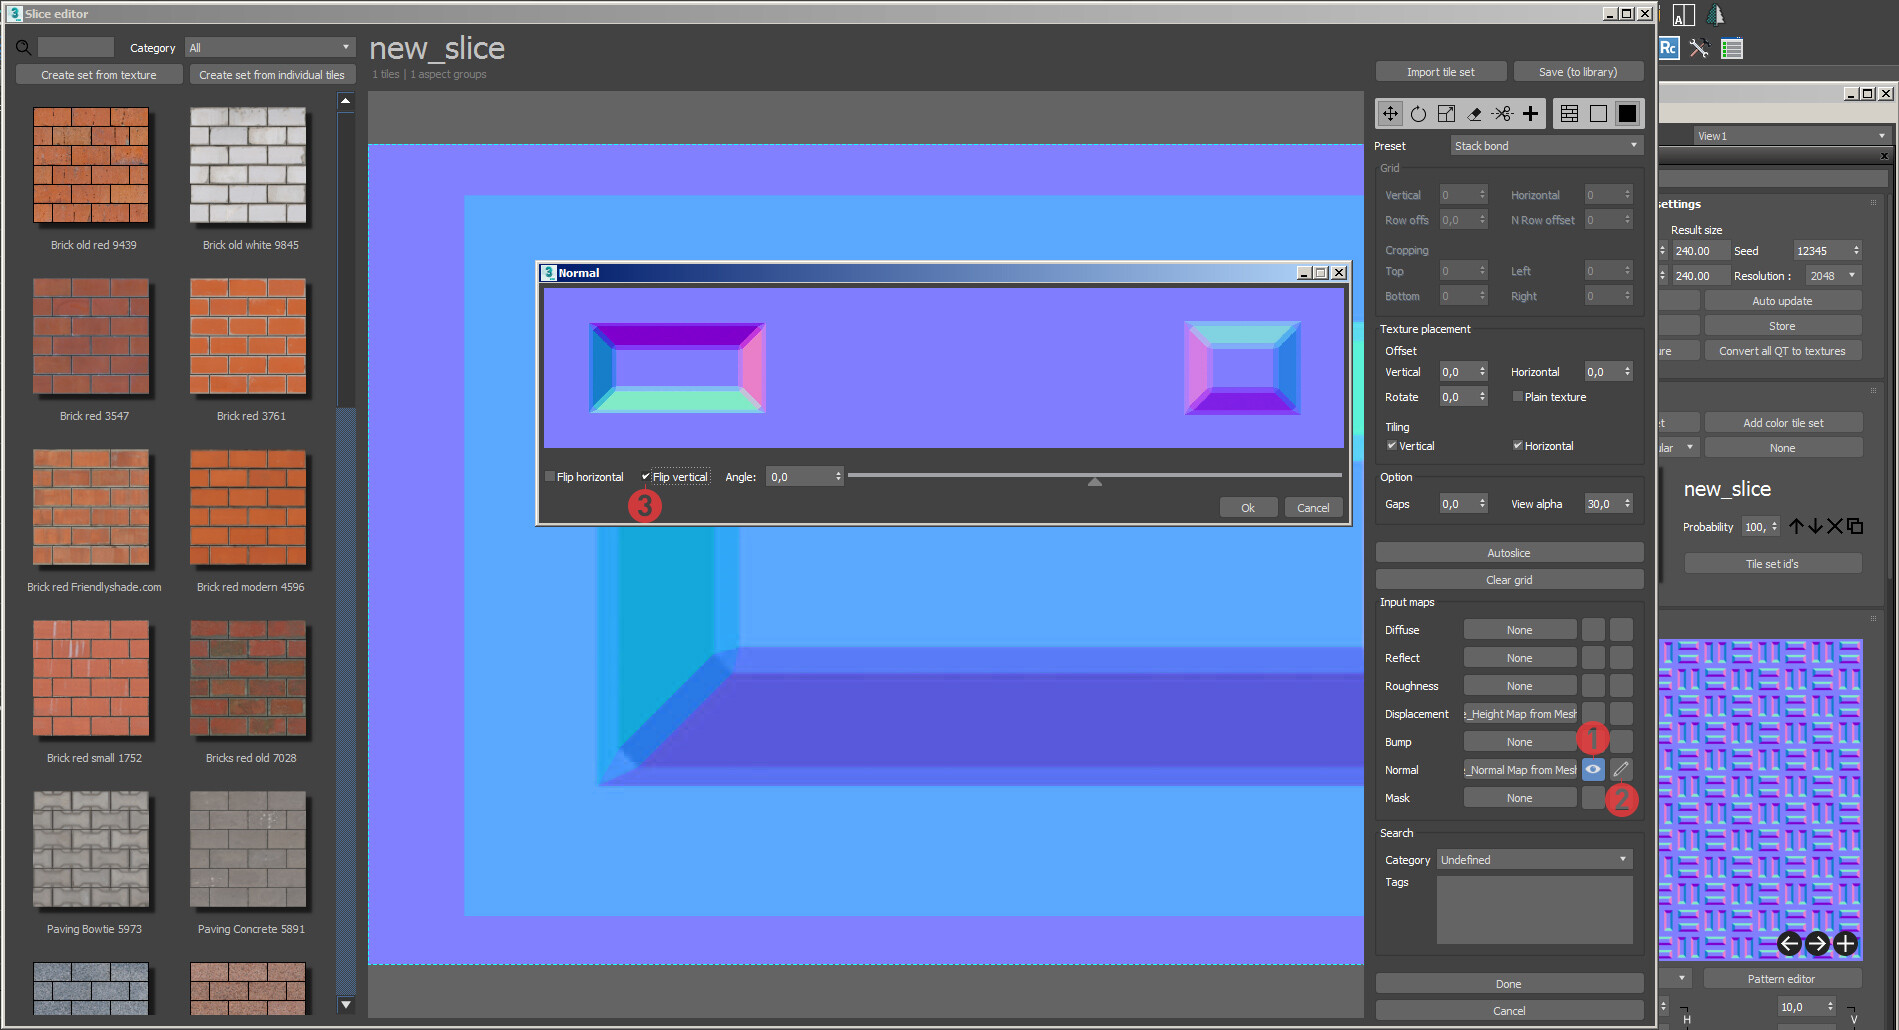
Input maps
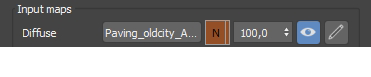
1. Names of the slots for adding a source of texture (drag-and-drop copying works)
Diffuse — a slot for adding diffuse texture.
Reflect — a slot for the reflection texture.
Roughness — slot for textures of glossiness or roughness of reflections.
Displacement — a slot for the height texture.
32bit .exr or .tif textures are recognized, but the plugin outputs 16bit anyway
Bump — a slot for black-and-white textures of small bump.
Normal — a slot for the Normal bump texture. In this slot, you should not install anything other than normal maps, since the plugin uses a very specific algorithm to work with normals.
Mask — a slot for the black-and-white mask channel. Tiles should always be white, seams — black. The texture from this slot is not passed directly to the material, but is used for automatic tile recognition, as well as for correct randomization of tiles inside QuickTiles, or for replacing the seam texture.
AO — Ambient Occlusion, dirt map. It is often present in sets of source textures, but not mandatory for use. The impact force can be adjusted by adding brightness to the HSV
Opacity — transparency map. Use this slot to add a transparency channel in perforated material
Metallness — Metallicity map. It is convenient for setting up mixed textures, where both metal and non-metal are present on the same map. For example, ceramic tiles with metal inserts, or mosaics.
2. Slots for adding a source of texture (drag-and-drop copying works)
To remove a texture from a slot, use right-click on the slot and select Clear
3. In the color picker to the right of the texture name, you can choose any color if you do not need a texture on this channel
4. On the right side of the color square, you can set up additional noise that will be imposed on the color or texture of this channel
By clicking on the right mouse button on this square, you can configure the blending option of the color and texture of the channel. This will help to tint or completely change the color of the original texture. We decided not to limit users, and added all the blending options we know, dividing them into basic and more rarely used ones.
5. In the next spinner, you can adjust the transparency of the main texture relative to a flat color background from 100 (the texture completely overlaps the color) to 0 (the texture is completely hidden, only the color is visible)
6. The eye, the symbol of the channel displayed in the viewport.
7. And when you click on the pencil, the texture color editing window opens.
By clicking on the pencil, in the Normal channel, you can adjust the angle of rotation of the normals, as well as invert the channels.
For example: you will need to invert the green channel if the original normals are made in OpenGL format. For more information, see Normals workflow.
Note 1. When adding a texture to the Diffuse slot, the plugin recognizes and automatically loads the other channels, if the textures are in the same folder, and have the same name as diffuse, and the corresponding channel label. For example: brick137_diffuse, brick137_glossiness, brick137_heigth.
Note 2. After the initial channel recognition, you can remove or replace any of the textures (even diffuse), re-recognition will not occur. To re-recognize the channels, clear all the slots except diffuse manually and add the texture to diffuse again
HSV window
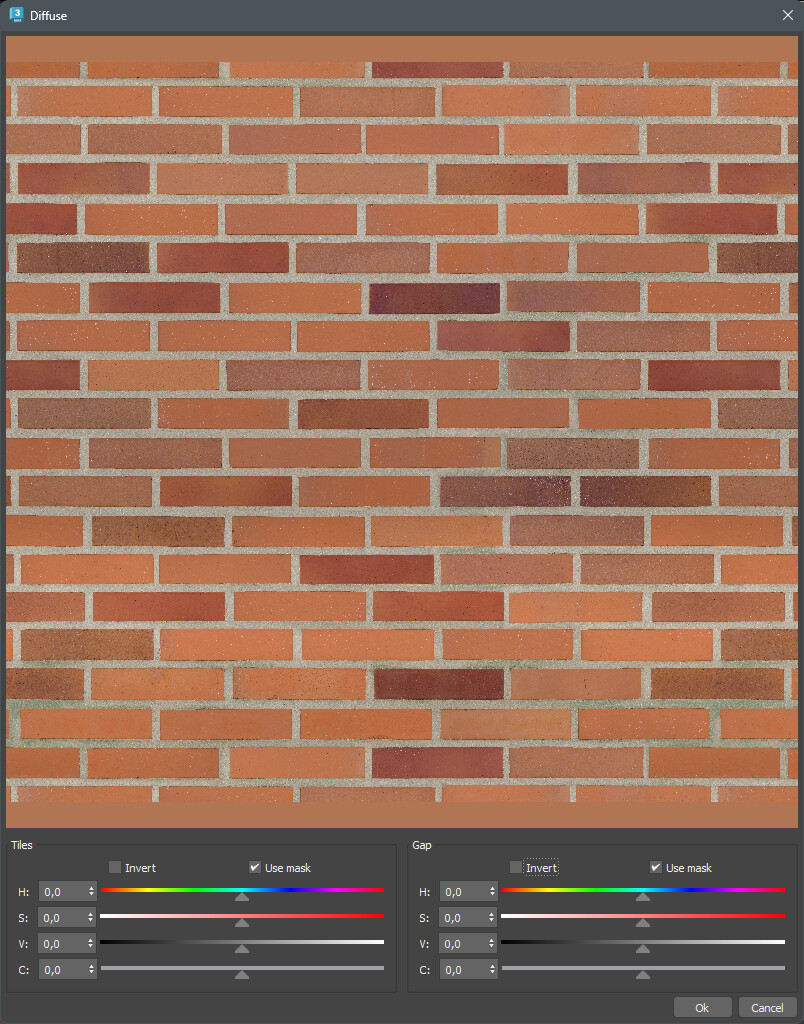
In the Slicer, you have the option to adjust the texture color for each channel. If a Mask has been added to a set of textures, editing will take place using the mask. You can separately change the hue, saturation, brightness and contrast of tiles and seams, as well as invert them.
The Use mask checkbox allows you to disable the effect of the mask on a specific channel or editable area.
Search — Slice library search options
Category — material category
Tags — any words associated with the stored slicing
Done button — accepting the slicing result and closing the slice editor window WITHOUT saving the slicing to the library. The slicing will be saved locally in this material. You can return to editing it at any time by clicking on its icon in the Tile set parameters section.
After pressing the Done button, the original texture is sliced, and the tiles are saved in RAM. The larger the source textures, the longer it can take. If you changed the original textures (for example, color, or brightness), in order for the changes to appear in QuickTiles, you need to open the settings of this set again in the Slice editor and click Done.
Cancel button — cancels the settings made. If you accidentally opened SE and did not make any changes, click Cancel. Then the window will close and the previous slicing will remain unchanged. This will be much faster than if you click the Done button.
Tiles auto-recognition
If there is a mask channel in the texture set, then when you click on the Autoslice button, the plugin will automatically cut the texture, without unnecessary questions.
By default, it will try to recognize the rotation of individual tiles. However, with square tiles it turns out badly.
If you don't like the result of slicing, press the Autoslice button while holding down Shift. The texture will be cut without taking into account the rotation of the tiles.
If there is no mask channel in the set, the plugin will try to create it from the channel in the viewport. In this case, it will offer you an additional window.
For gluing tiles that go beyond the edges, an error factor is used. It is installed in the Gaps spinner. The larger the texture and seams, the larger the value should be. All auto-recognition settings are saved, so if the extreme tiles are not properly glued together the first time, change the coefficient and try again. After recognition, adjust the Gaps parameter to match the width of the original seam.
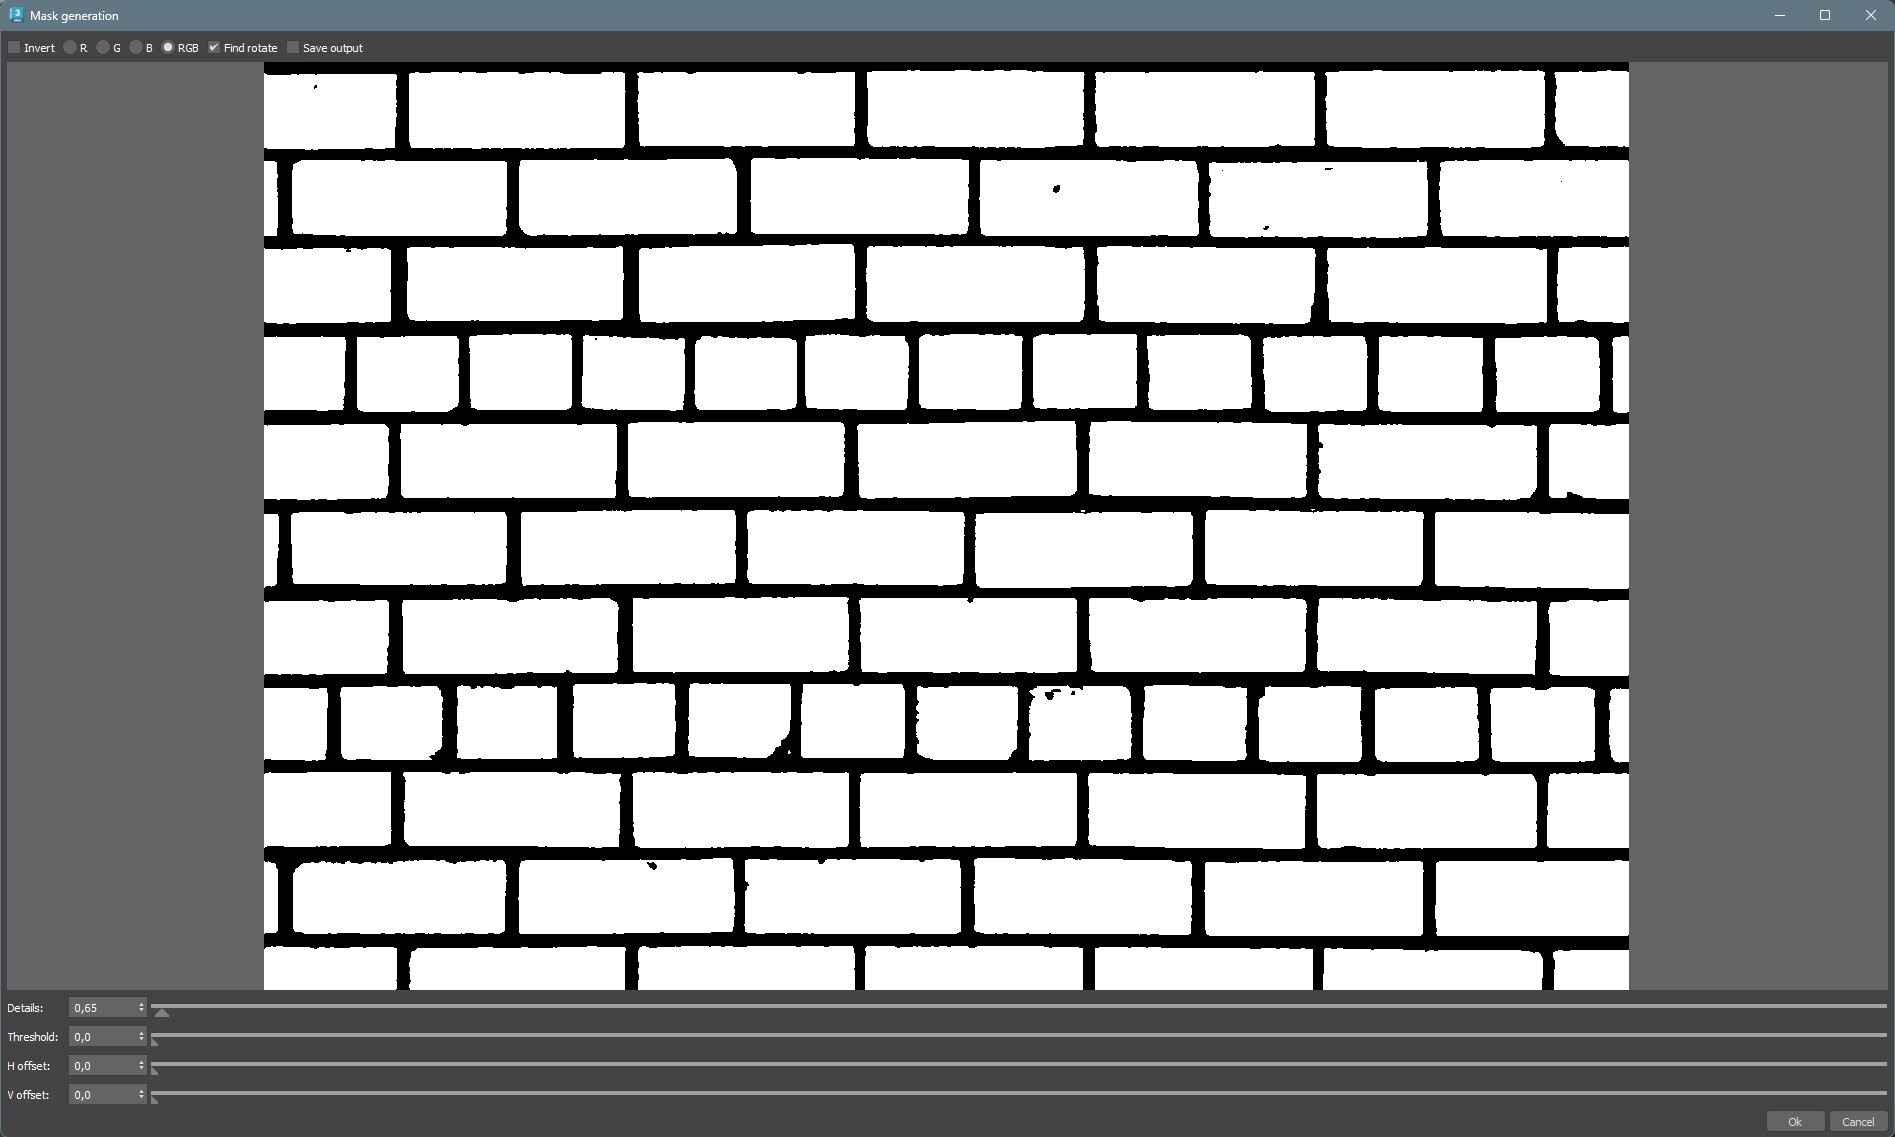
In this window, a black-and-white mask is generated based on the selected channel. The tiles should be white, the seams black. The mask should be as neat as possible in the area of the seams, but there may be some black spots inside the tiles, this will not affect the quality. As a result, the user's task is to bring the mask as close as possible to the state shown in the image.
Details — the level to which the texture details are smoothed. The lower the value, the less anti-aliasing, and the more original details remain.
Threshold — the brightness of the gray point in which all the brighter colors of the original texture will become white, and darker-black.
H offset and V offset - edge trimming. If the edge in the image is solid white, without gaps, this can cause a significant increase in the autoslice time. In this case, it is recommended to trim the borders to the seams.
Invert — inverting white and black. If the tiles are black and the seams are white, no recognition will occur. The tiles should always be white
R, G, B, RGB — when trying to recognize a colored texture, you can select a separate Red, Green, or Blue channel, or an RGB composite. When trying to recognize from the Normal Bump channel, it is best to select the Blue channel
Find rotate — an experimental function that forces recognition to find rotation of the tile. It is still under development and presented in the interface for tests.
IMPORTANT: Intersecting tiles are not recognized in this version of the plugin.
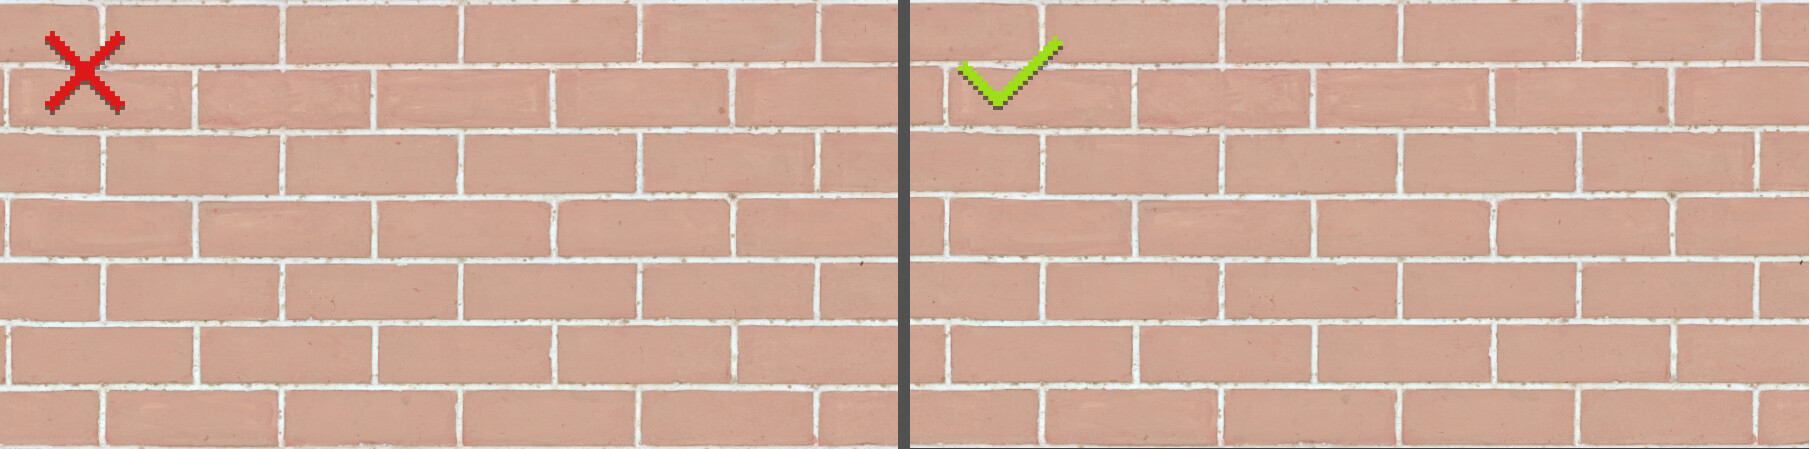
Tip: For maximum recognition quality, offset the texture so that there are no too small pieces of tiles on the edges. In the example above, the texture on the left shows small parts of the bricks sticking out in the left part of the viewport. To improve recognition, move the texture to the right so that the bricks are roughly divided in half.
Adding sets of individual tiles
In QuickTiles version 1.1.0.0, the function of adding sets of pre-cut tiles is greatly simplified. This feature will be especially relevant for interior visualization, where sets of individual floorboards are often used.
To add a set of pre-cut tiles, follow three simple steps:
1. Click on the Create set from individual tiles button or switch Preset to Individual tiles
2. Add the first tile of your set to the Diffuse channel
3. Add or drag the first tiles of the corresponding channels to the other channels
To correctly recognize the tiles of the set, two conditions must be met.
First: the files of each channel should be put in a separate folder. The plugin will lay out in one channel all the files that it finds in the specified folder.
Secondly: the beginning of the channel file names of the same tile should match, and the number should be at the end, for example BrickRed_dif_1 and BrickRed_bump_1, etc.
Viewport window
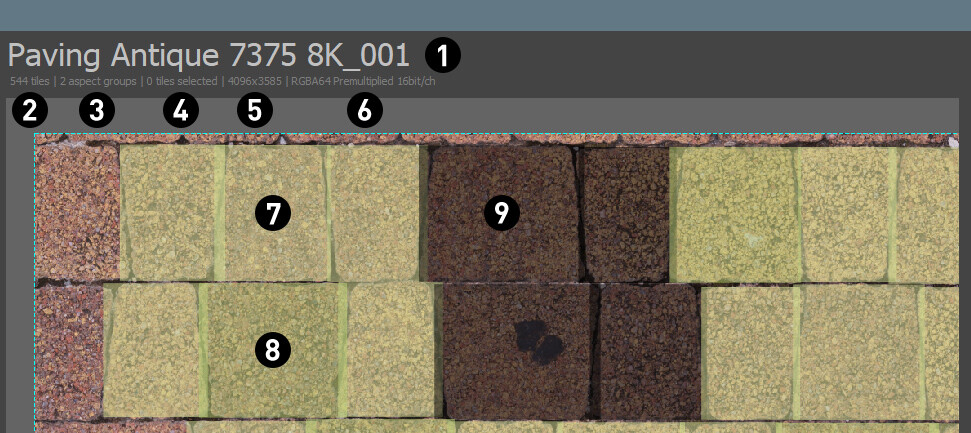
1 — name of the slice field. If you call slicing from the library, the name of the slicing will appear here with a different sequence number. This is done in order not to accidentally overwrite the slices saved in the library. If you want to save the slicing over the existing one in the library, just specify an identical name.
2 — number of tiles created
3 — the number of resulting aspect groups
4 — number of selected tiles
5 — texture size
6 — bitmap parameters
7 — the borders of the tile in which it will be placed in the container, ID1
8 — the borders of the tile in which it will be placed in the container, ID2
9 — disabled tiles are indicated in black
Normals workflow
Historically, there are two main types of normal maps: DirectX and OpenGL. At first glance, they are very similar, but there is one significant difference - the inverted vertical channel (Green). Compare two variants of a convex brick:
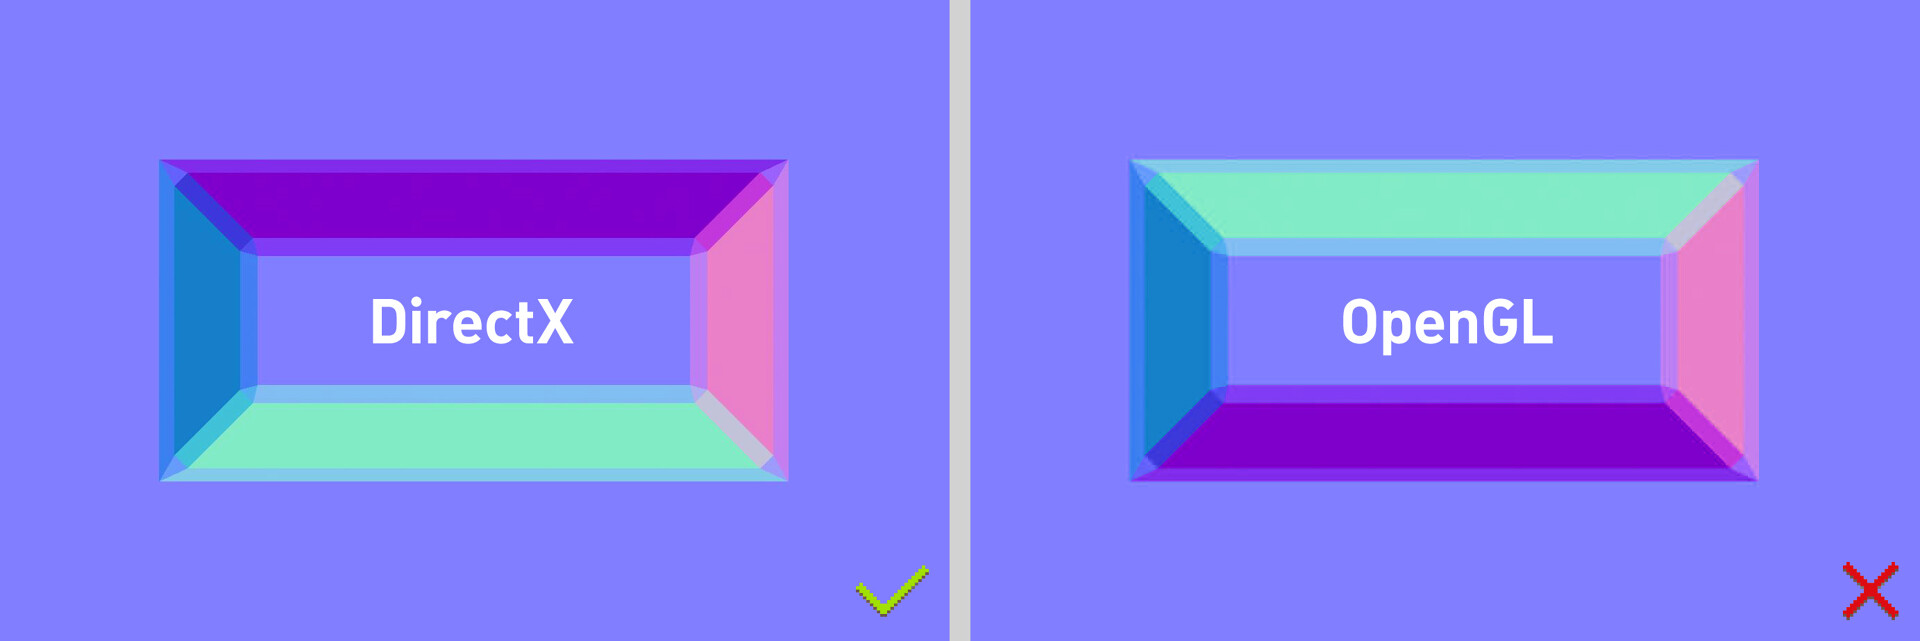
Different versions of normals are used in different software and render engines. Since 3DMax, Vray and Corona always use the DirectX version, QuickTiles is also adapted for them.
And this is a very important moment! The plugin performs a large number of transformations with normals, and they will be incorrect if you do not correct the source texture. Here's what happens if you use rotation and random reflection with normals in QuickTiles.
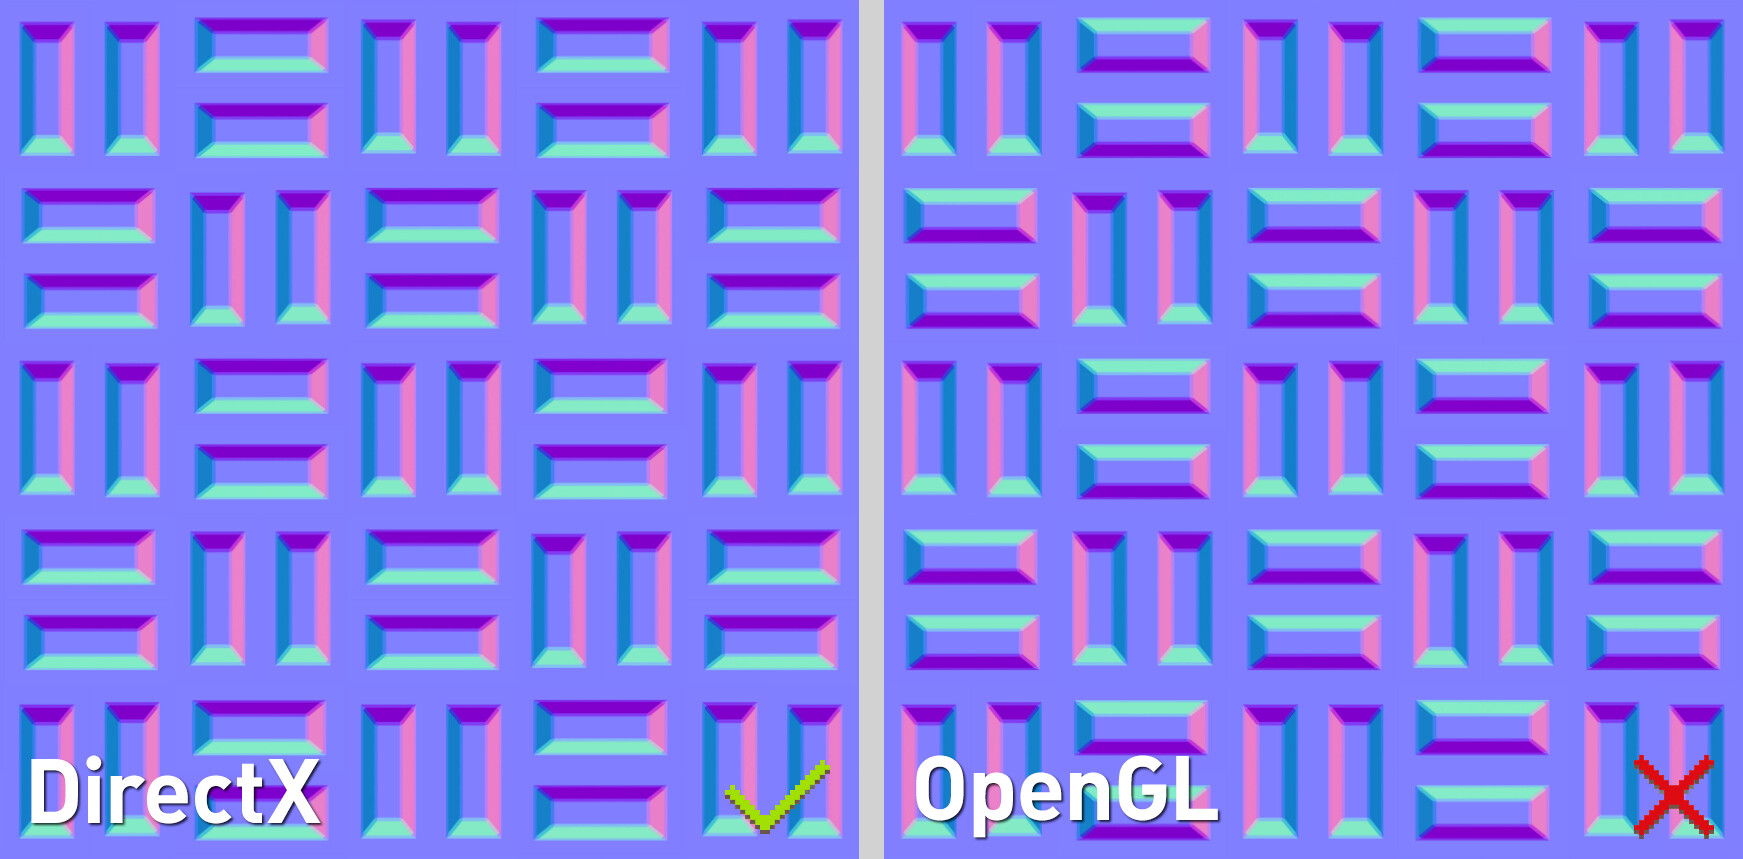
As you can see, the right version with the DirectX source texture looks correct, and in the left (OpenGL) part of the tiles seem to be turned inside out. To solve this problem, we have added to the Slicer the ability to invert channels or even rotate the normals by any angle (in the HSV dialog). Therefore, if you encounter the problem of incorrect generation of normals in the plugin, first of all try to flip vertical channel in the source texture.
Pattern parameters
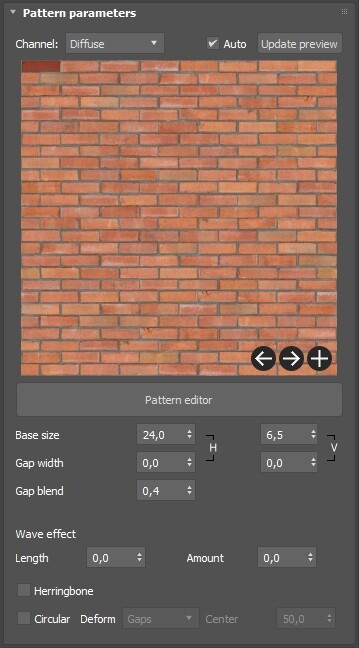
In this tab, you can select a pattern for the layout and configure its parameters.

The main element of this tab is a preview of the final texture. By default, the Diffuse channel is displayed. To speed up the work, the preview is made in low resolution and may produce artifacts or small errors that will not appear in the final texture. The base tile is marked in red.
 - choosing a channel for previews
 - disabling automatic preview updates
Turning off autoupdate previews SIGNIFICANTLY speeds up the setup of the material.
 - manual preview update button
 — switching preview channels (Ctrl+Shift+PageUp/PageDown)
 — opens a large preview (Ctrl+Shift+P)
 — selecting one of the simple presets
Pattern editor button — opens the window of the additional module for creating and editing patterns (see the section Pattern editor)
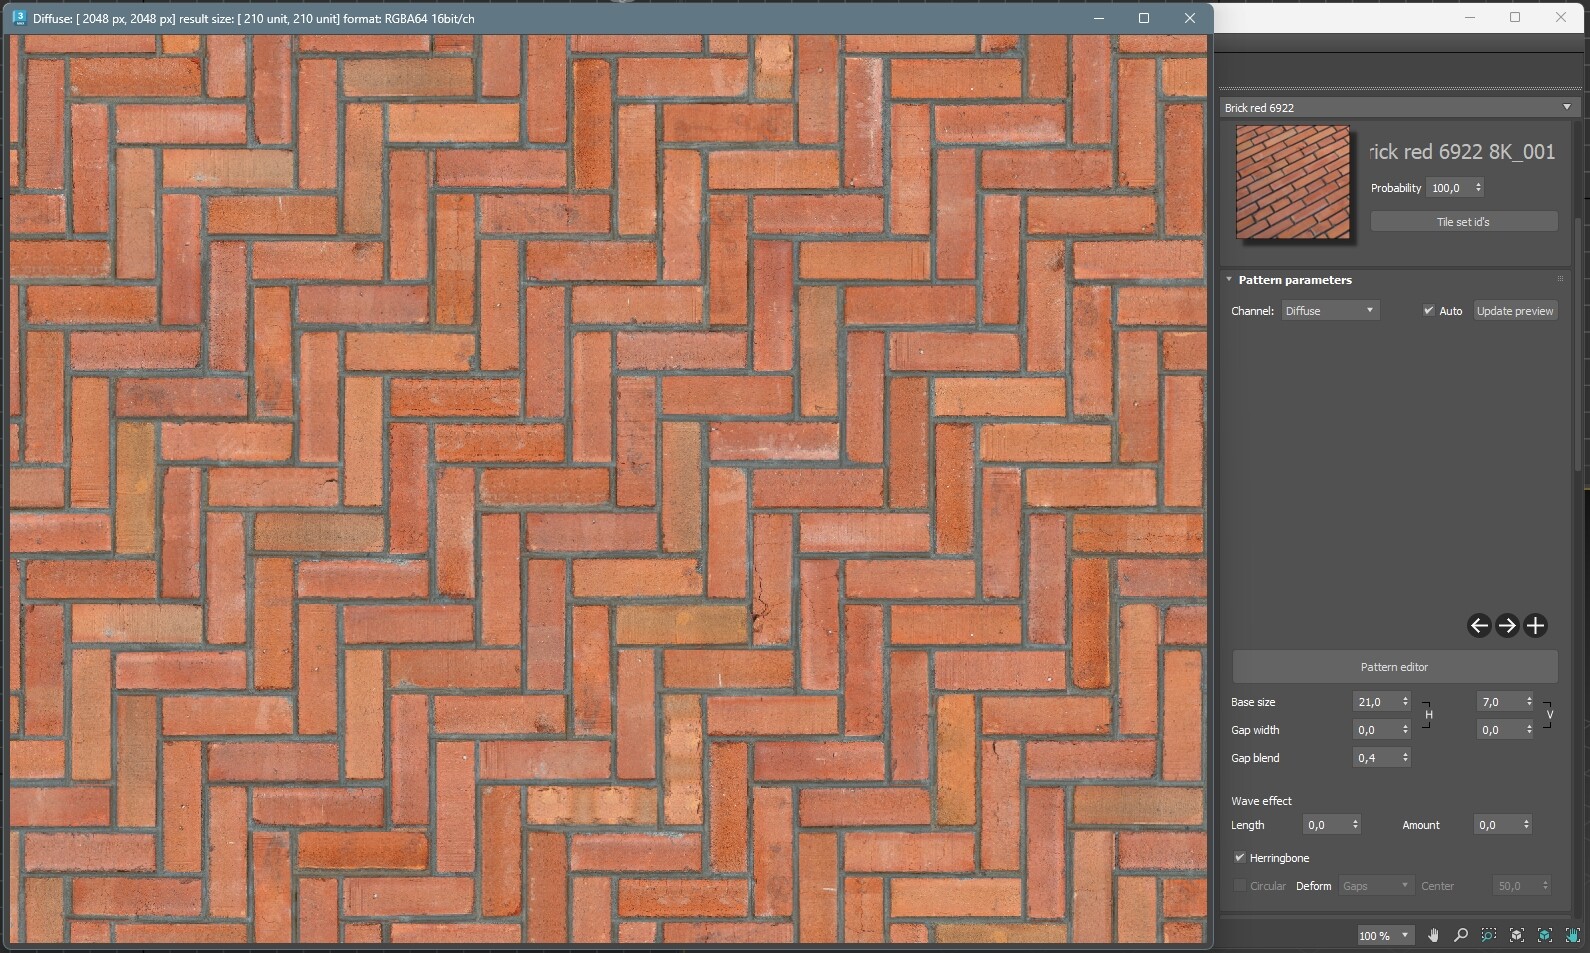
Base tile size H — width of base tiles
Base tile size V — height of the base tiles
Gap width H — horizontal width of the procedural seam
Gap width V — vertical width of the procedural seam
To save the original seam, set the size of the procedural seam to 0.
When working with polygonal patterns, only the Gap width H parameter works, which in this case is responsible for the width of all seams.
The most important point of working in Quick Tiles is to understand the formation of the size of the pattern. The layout of the bricks can be absolutely various, and it is absolutely impossible to set the size of each brick. Setting the size of the entire pattern at once is also extremely inconvenient, since we usually know the size of individual tiles. Therefore, in QT, the size of all bricks is calculated based on the size of the Base tile. In the Pattern Editor, you can assign a Base tile yourself, and the plugin will automatically calculate the size of all the other tiles based on its size and the width of the seam.
 и
и  — includes a proportional change in the size of the tile and seam
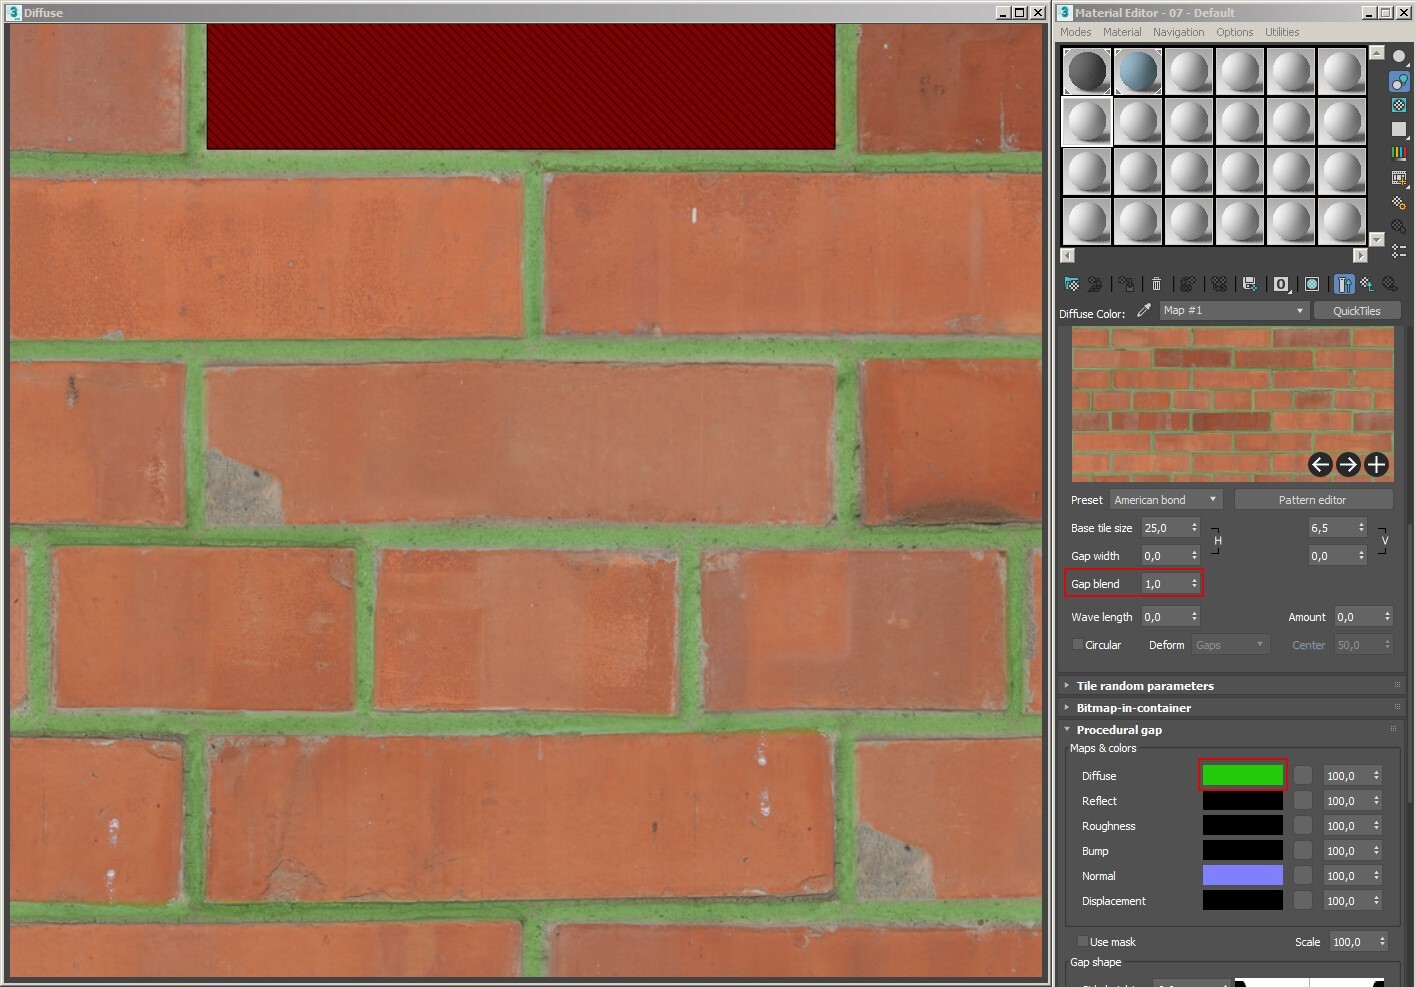
Gap blend — original gap mixing depth
To preserve the maximum quality of the created textures, QuickTiles not only captures the original seams (see Slice editor), but also mixes them with a small gradient. To enable mixing, the size of the procedural gap must be equal to 0.
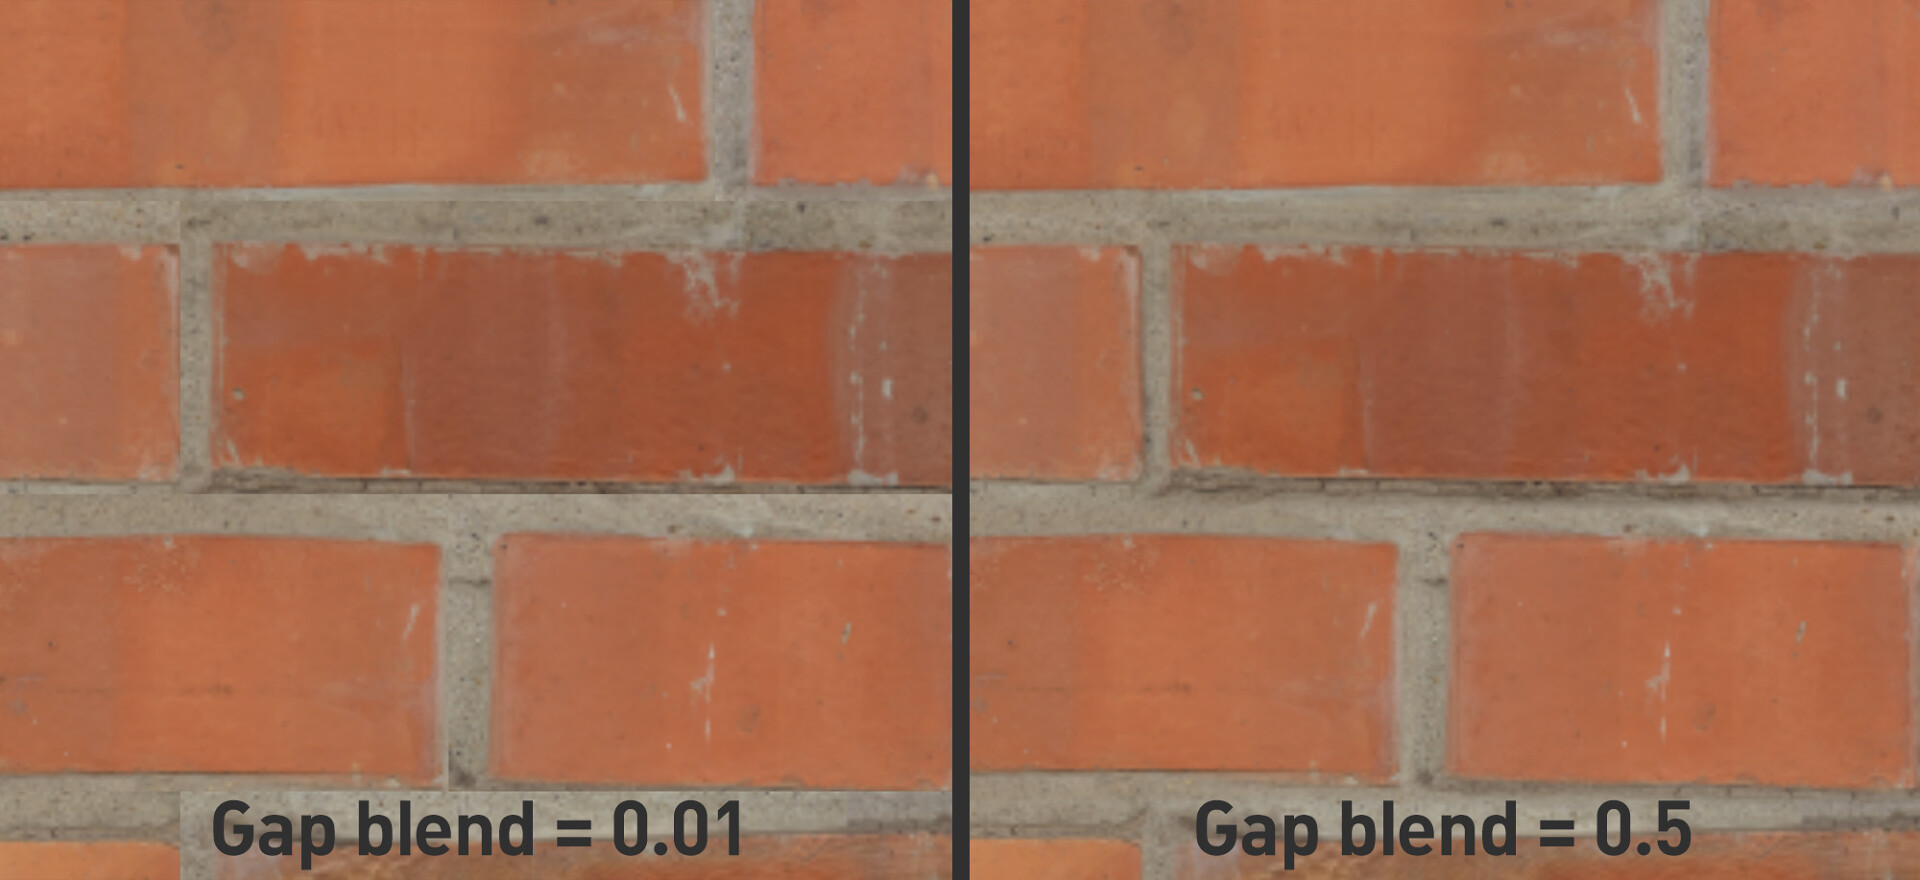
If the Gap Blend values are too large, the substrate may appear due to the original seams. To fix this, either reduce the strength of the Gap Blend, or set the color/texture of the substrate (see Procedural gap section) close to the color of the seam. This must be done on all generated channels.
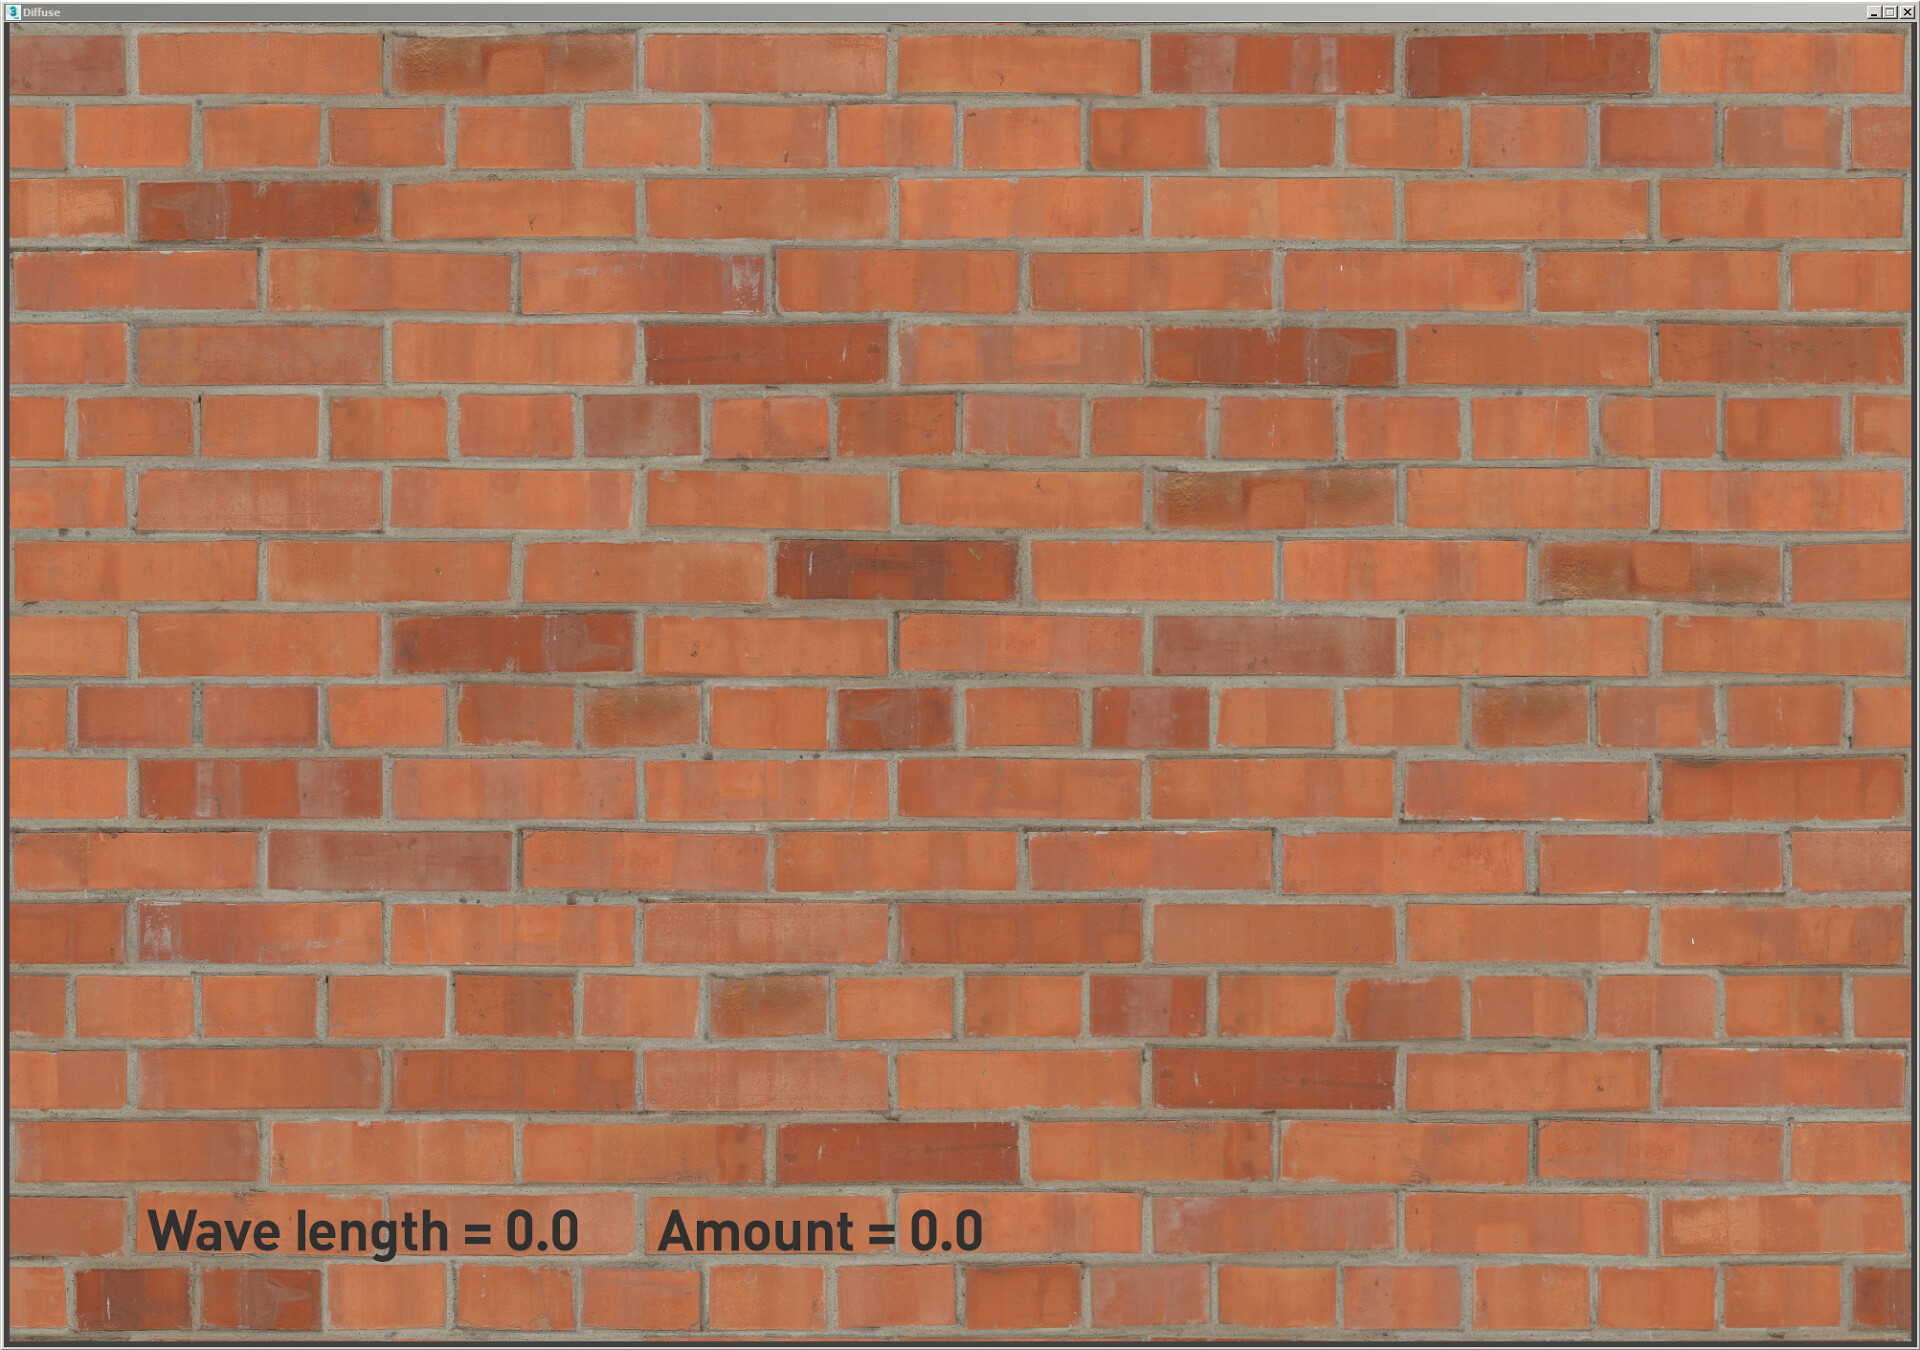
Wave length — the length of the pattern wave effect
Amount — the strength of the pattern wave effect
Tiles often do not lie perfectly flat, especially for floor coverings. This effect adds a large wave that is common to all elements.
Herringbone — activates interactive generation of the Herringbone pattern. For proper generation, the width of the base tile must be a multiple of its height.
Circular — the inclusion of a circular layout. Plugin will arrange the tiles in a circle, observing the selected pattern as much as possible. However, due to the different length of the lines, there will still be an offset.
Deform Gaps — plugin will try to arrange the tiles in a circle, deforming the seams and keeping the tiles rectangular, just like in real life.
Deform Tile — the plugin will try to arrange the tiles in a circle, deforming the tiles themselves as if they are rubber. This feature is experimental, and it doesn't always work perfectly.
Center — the size of the central layout area where the regular layout will be used
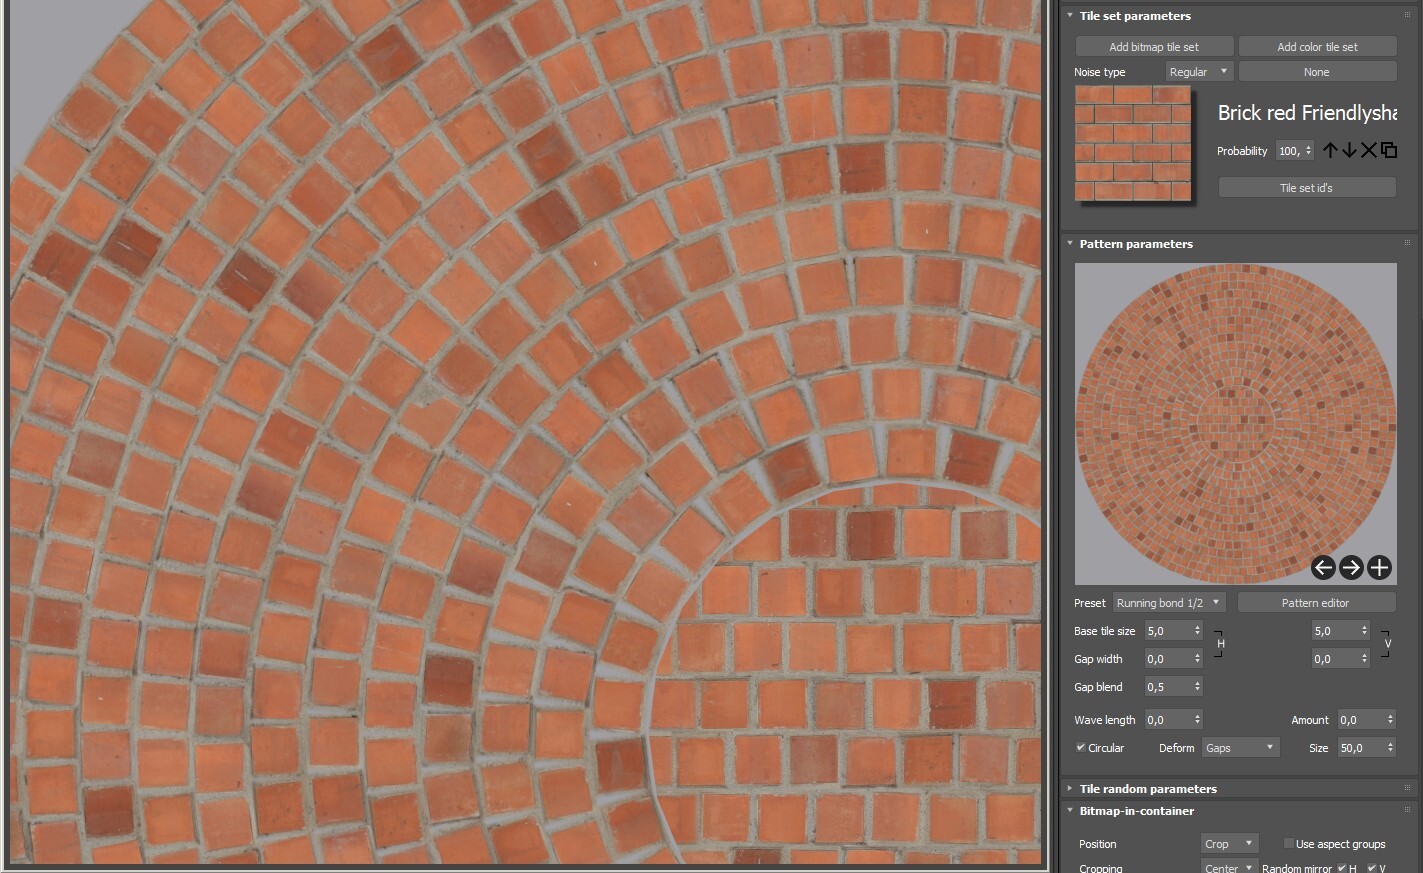
Pattern editor
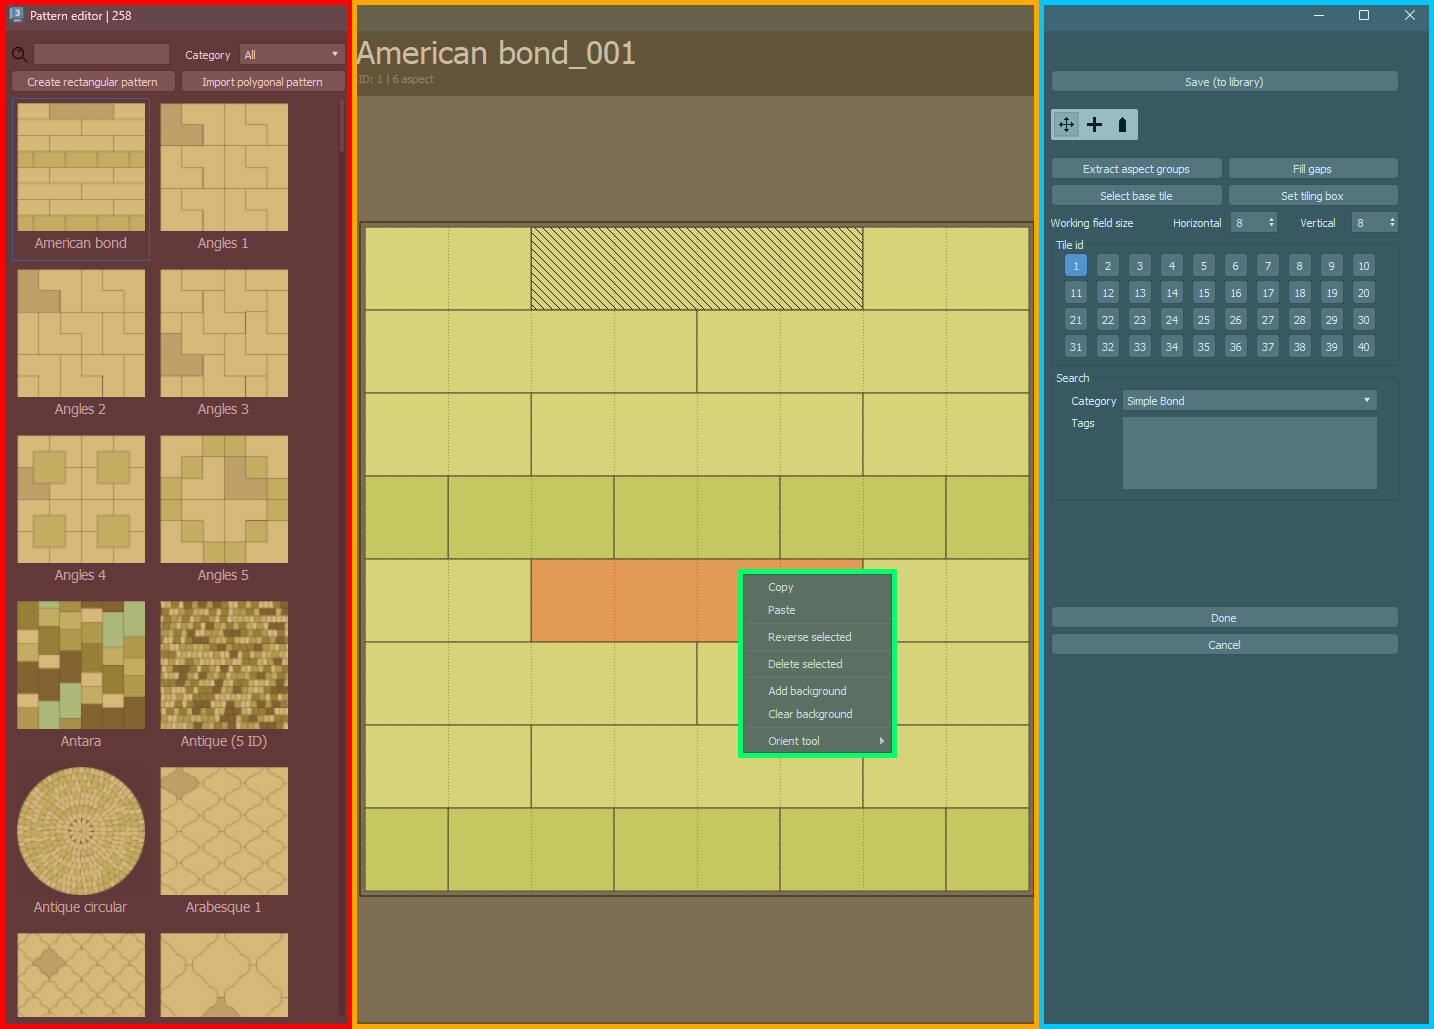
Pattern editor (PE) is a small additional module in which the second stage of work in QuickTiles is carried out — setting and editing the pattern of the tile layout.
The PE consists of three sections. On the left, in the red zone, there is a pattern library. All the patterns saved and imported by the user, as well as those supplied with the plugin, are displayed here.
In the center, in the yellow zone, is the viewport window, where the current pattern and its settings are displayed.
On the right, in the blue zone, there are the pattern settings and auxiliary functions. Let's analyze the composition of all the elements in more detail.
Pattern library
— search by name and tags.
Category — select pattern category.
Create rectangular pattern — clears viewport to create a new rectangular pattern
Import polygonal pattern — importing a polygon pattern (for more information, see the section with the same name)
 Icon of the pattern, saved in the library.
Double-click on the icon loads the pattern and all its settings in PE. Right-click will open the context menu.
Duplicate — duplicates the pattern in the library
Rename — renaming a pattern in the library
Delete — deleting a pattern
The patterns included with the plugin cannot be deleted
Pattern Settings
New from bitmap — not active in the first version. This feature will be implemented later
Save (to library) — saves the created pattern to the library
You cannot save or change the source library files
Move tool — moves selected in the viewport tile. It impossible to overlay tiles.
Create tool — creates a new tile by stretching. The tile is created in the selected ID. By default — ID1
Set orient tool. Allows you to set a custom tile orientation.
By default, the orientation of the tiles is set perpendicular to the long side of the container. When you click on the tile once, an arrow will appear showing the default direction.
To change the direction, move the mouse cursor with the left button pressed, just as if you wanted to rotate the tile. At the same time, the direction arrow will rotate in increments of 45 degrees.
To rotate at an arbitrary angle, hold down the Shift.
To align the arrow perpendicular to any face of the container — Alt+Click
To align the arrow in the direction of the specified vertex — Ctrl+Shift+Click
To align the arrow vertically — Ctrl+Click
To reset the direction to default, and remove the arrow — double Click
This function is useful when placing tiles of complex, asymmetrical shape, as well as in cases when it is necessary to observe a certain direction of the tile pattern.
The direction set in the Slicer will correspond to the direction set in the Pattern editor.
*Using this tool is especially useful when working with polygonal patterns of complex shape, where the plugin may mistakenly determine the "direction" of tiles.
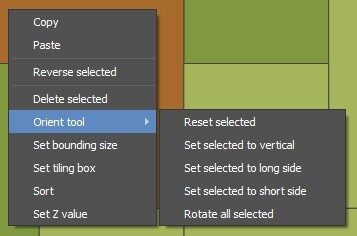
Reset selected — resets the direction of all selected tiles to the default one. The arrow is hidden.
Set selected to vertical — sets the direction of all selected tiles to strictly vertical.
Set selected to long side — sets the direction of all selected tiles at 90 degrees to the long side of the container
Set selected to short side — sets the direction of all selected tiles at 90 degrees to the short side of the container
Rotate all selected — rotates the direction of all tiles by a given angle
Extract aspect groups — opens the slicing library (Slice Editor) and creates several tiles of the same aspect (with the same aspect ratio) as the tiles in the selected slicing
This feature is very useful when you need to create a wild stone texture from a particular source, where the aspect ratios of the tiles are very different
Fill gaps — the plugin fills an empty viewport area by copying an already created template. All non-multiple zones are filled with 1x1 cell tiles
Select base tile — assigns a base tile for calculating the size of the pattern.
Size H и Size V — the number of viewport cells (the pattern may be non-square)
Set tiling box — set the tiling point for the polygonal pattern. It is located at the intersection of the horizontal and vertical repetition lines of the pattern (see the video in the Polygonal pattern import section)
Tile ID
 Assigning tile IDs (for more information, see Tile ID)
Search — search parameters for a pattern in the library
Category — pattern category
Tags — any words associated with the stored slicing
Done button — accepting the result and closing the pattern editor window WITHOUT saving the pattern to the library. The pattern will be saved locally in the material. You can return to editing at any time by clicking the Pattern editor button again. Be careful. If you select any of the simple pattern templates in Mat. editor, the created pattern will be deleted.
Cancel button — changes the settings you made.
Viewport window
When working with complex patterns, it can be useful to add an image of the desired pattern to the background, and simply outline it over. In the Pattern Editor, this can be implemented through the context menu of the viewport.
Add background — select the image in the explorer.
Clear background — clean the background to the default appearance.
The added image will be on the background until the Pattern Editor is closed.
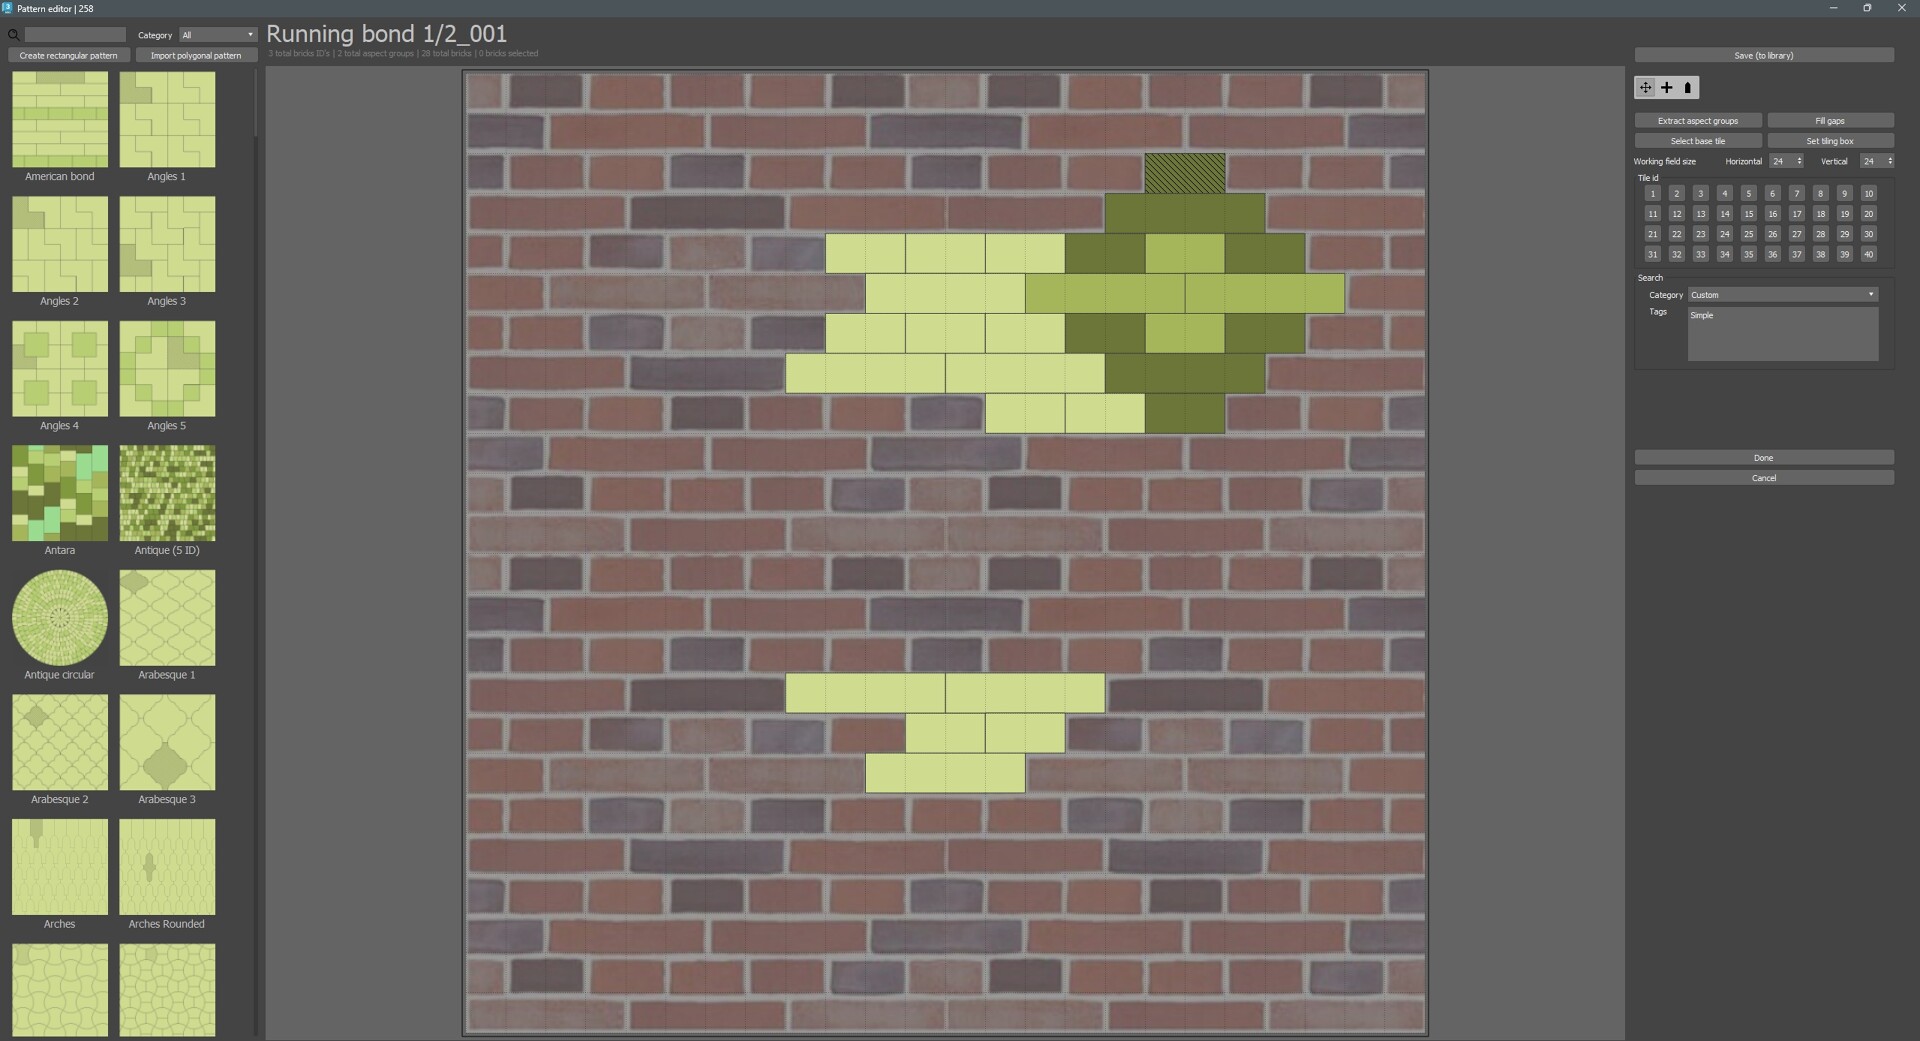
Adding a background image
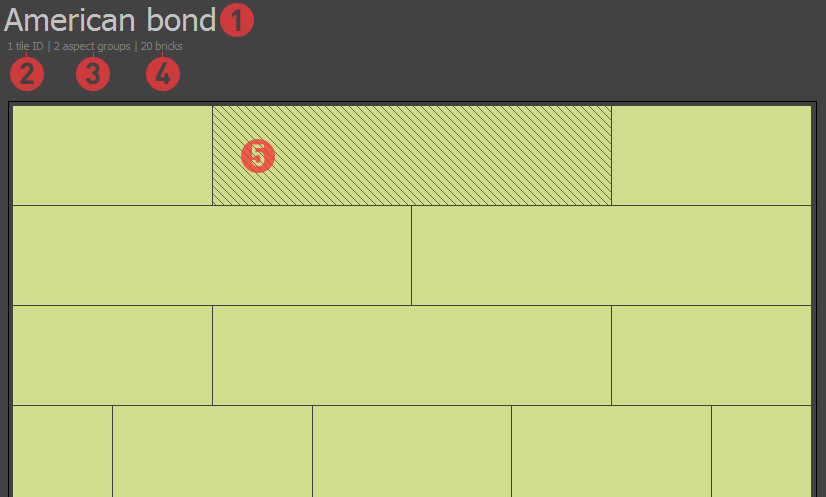
1 — field for setting the pattern name. If you call a pattern from the library, a name with a different sequence number will appear here. This is done in order not to accidentally overwrite the patterns saved in the library. If you want to save a pattern on top of an existing one in the library, just enter an identical name.
2 — number of tile IDs in the pattern
3 — number of resulting aspect groups
4 — number of tiles in the pattern
5 — base tile is marked with hatching
Polygonal pattern import
With the help of the Quick Tiles plugin, you can distribute sets of tiles into patterns of any shape. You can create rectangular patterns directly in the Pattern editor, and import patterns of more complex shapes.
We didn't create the polygon pattern editor in the plugin itself, because we still wouldn't be able to give you the full power of the tools of 3d max, or any other vector editor.
This short video shows the import method in version 1.1.0.1.
The old export/import method is suitable for more complex patterns where the tiling point does not coincide with the edges of one of the tiles.
The old import algorithm (described below) is available via Click+Shift.
1. Create a small piece of the desired pattern. It should be a flat Editable Poly, with no internal mesh.
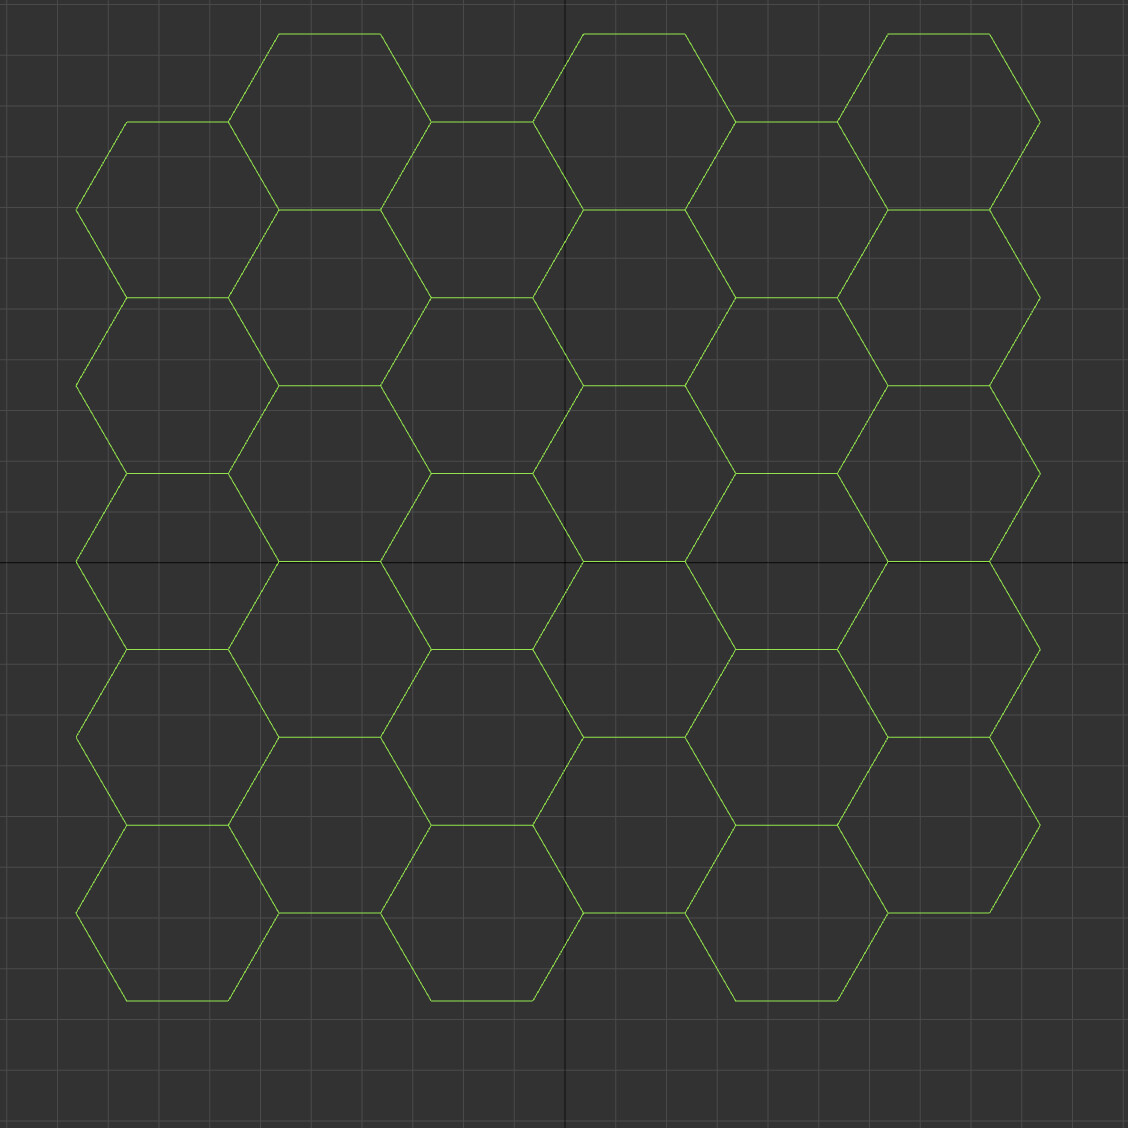
2. Find the seamless part of your pattern that suits you according to the number of tiles. This area should be close to the square shape. In the example, I highlighted it with a red rectangle. Four hexagons in height and width will be enough for me.
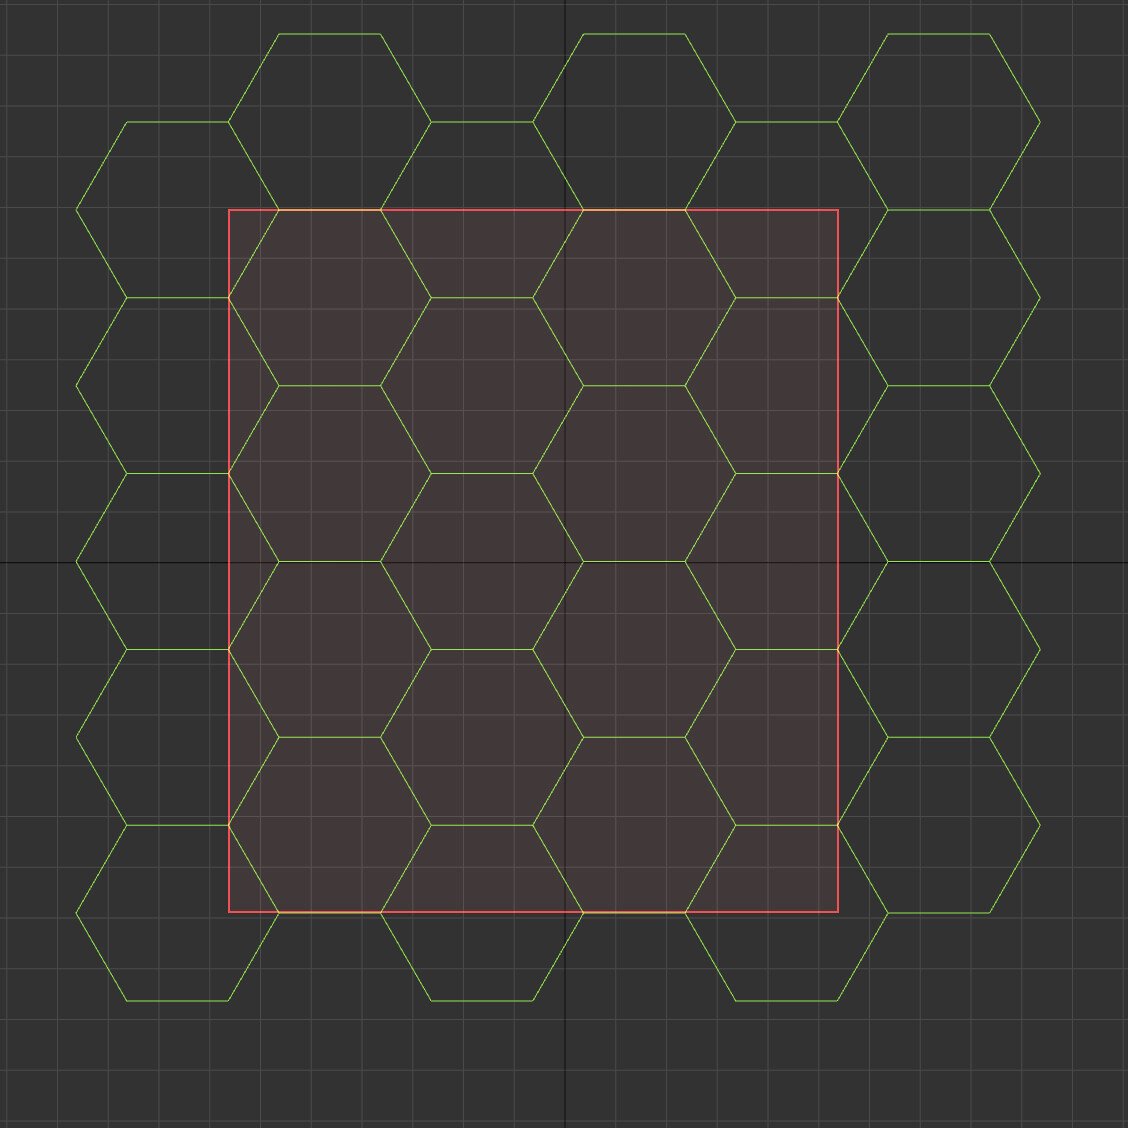
3. Remove all the excess, not cutting the whole shapes, but allowing them to go beyond the boundaries of the area.
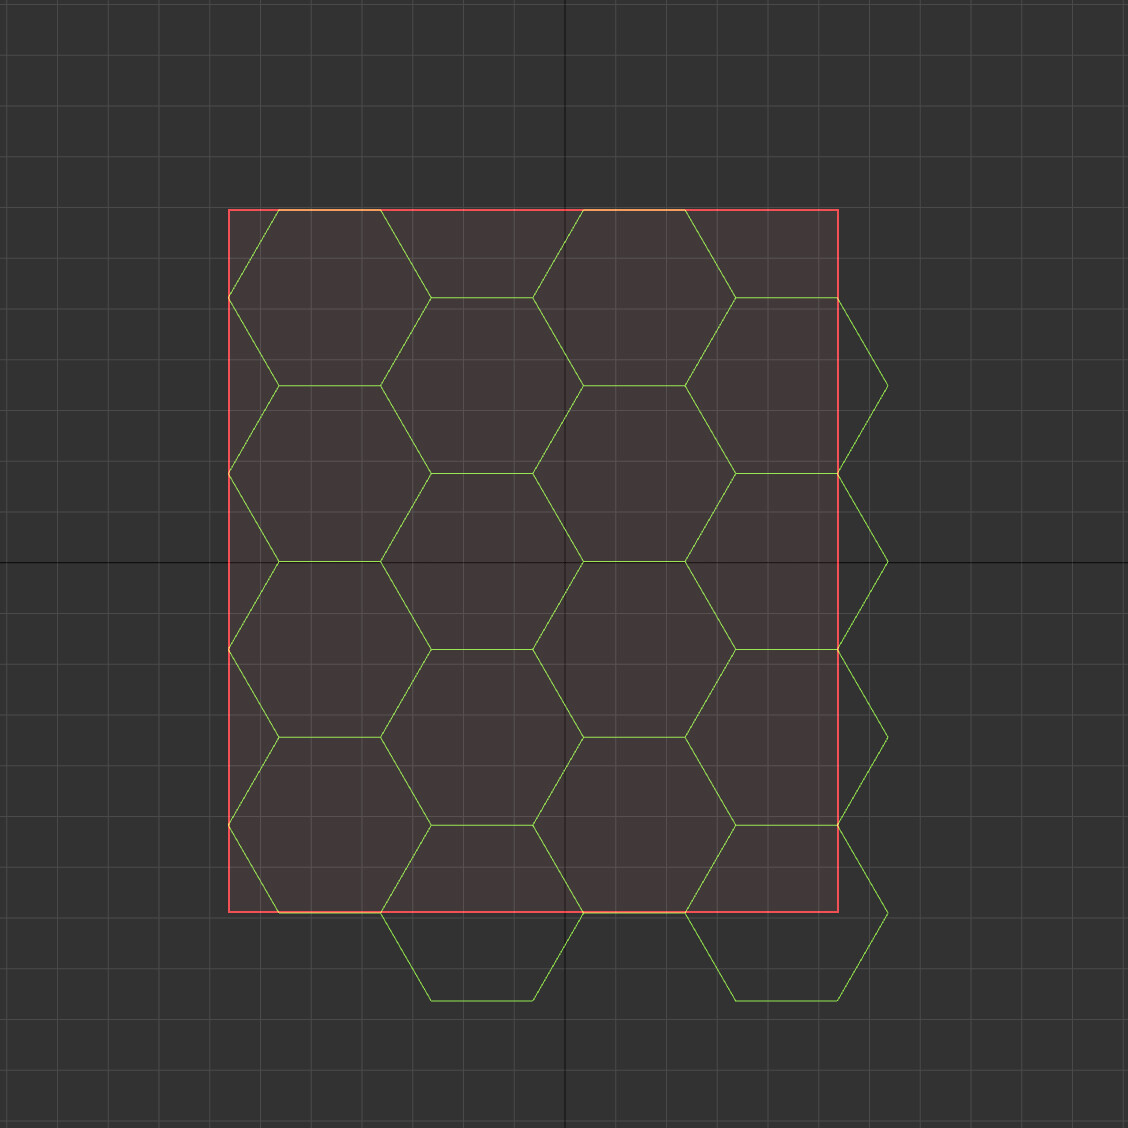
4. The resulting pattern should be seamless.
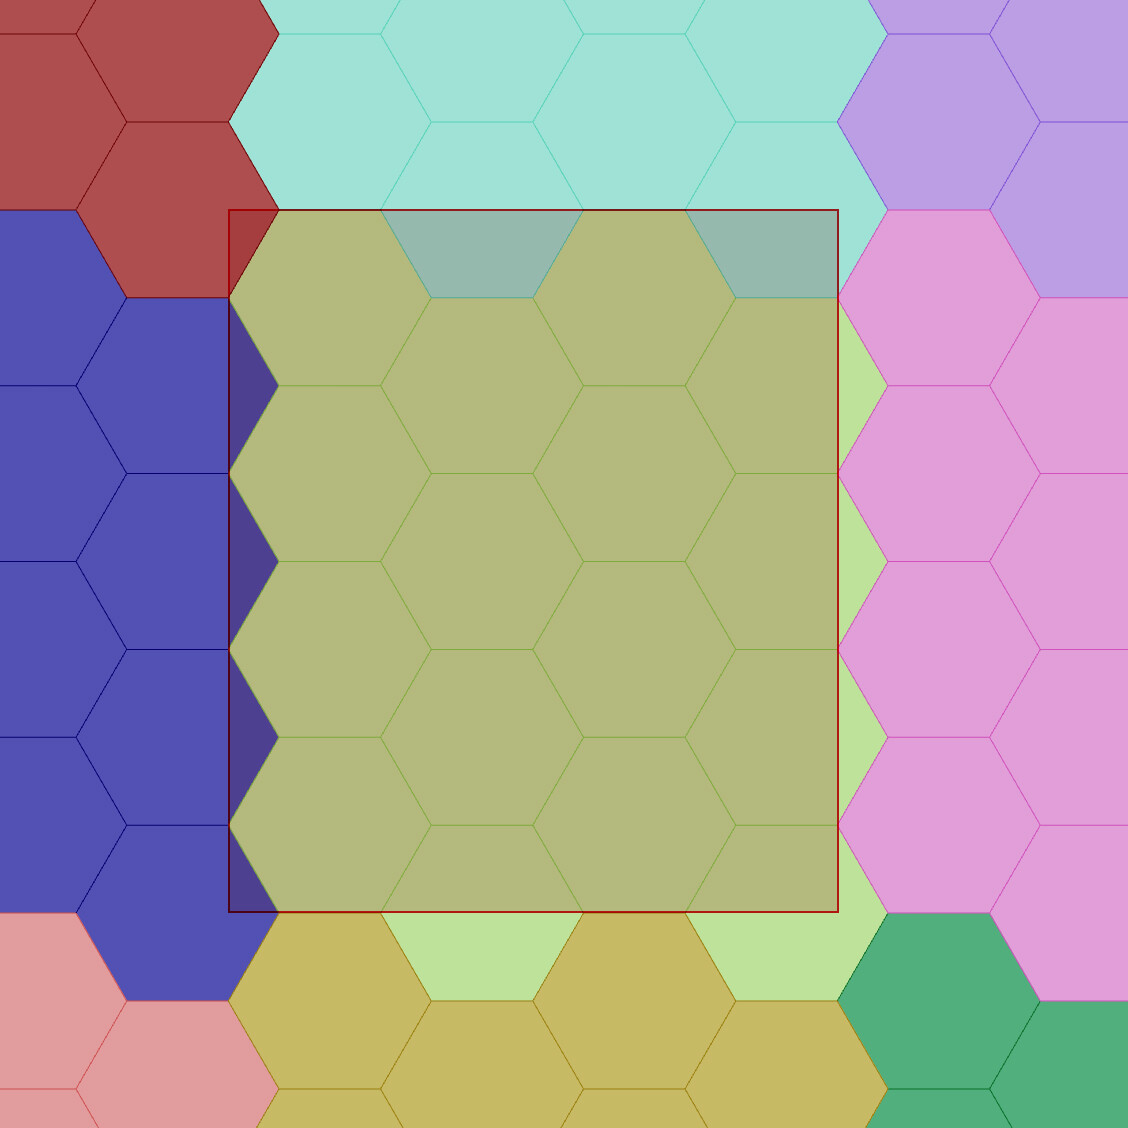
5. Now create a Plain, without additional edges, and align it to the left, upper edge of your pattern. It should overlap the pattern tiling zone, as in the example.
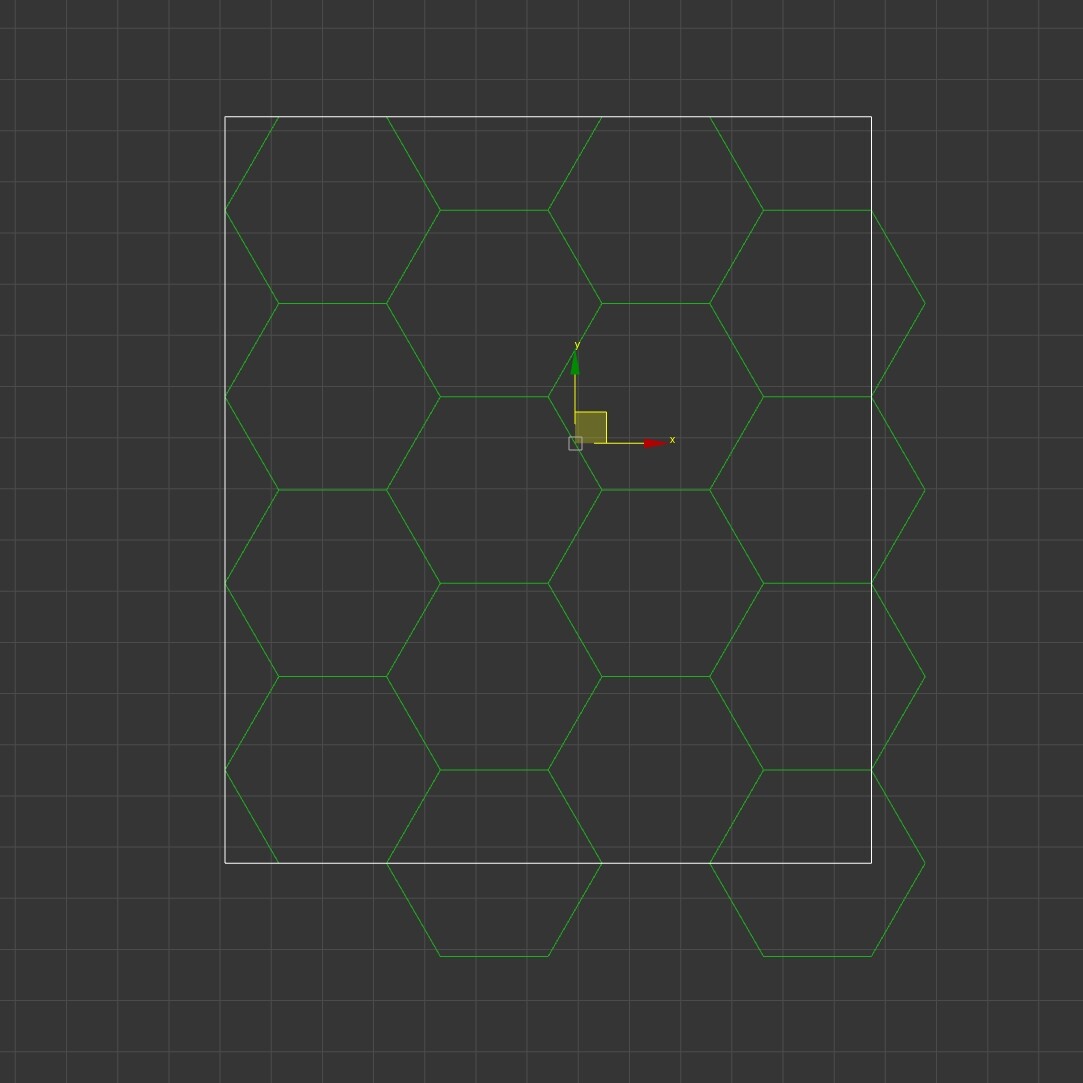
6. Attach your pattern to this plain.
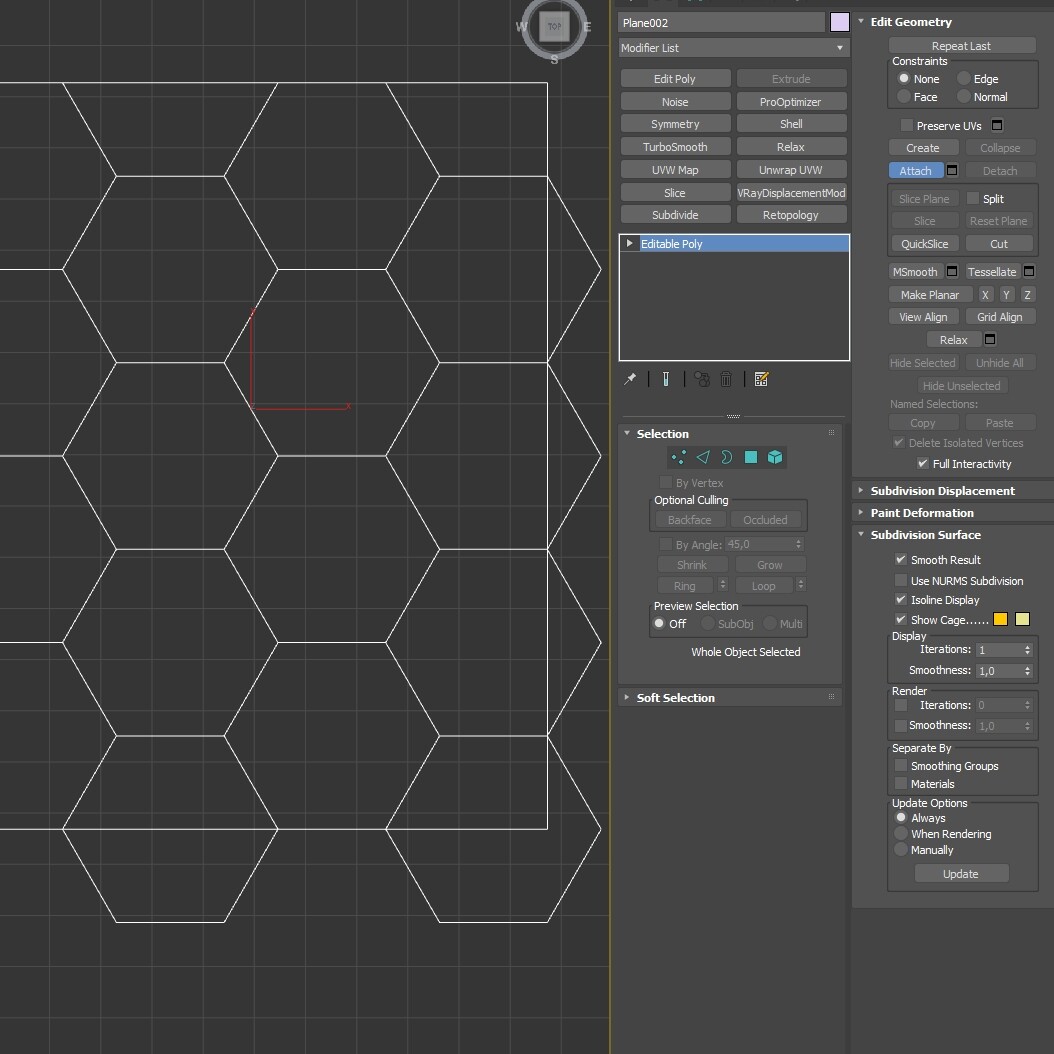
7. All done! Export your pattern — File/Export/Export selected. Имя файла не имеет значение. Save as type: QuickTiles pattern (*.qtp)
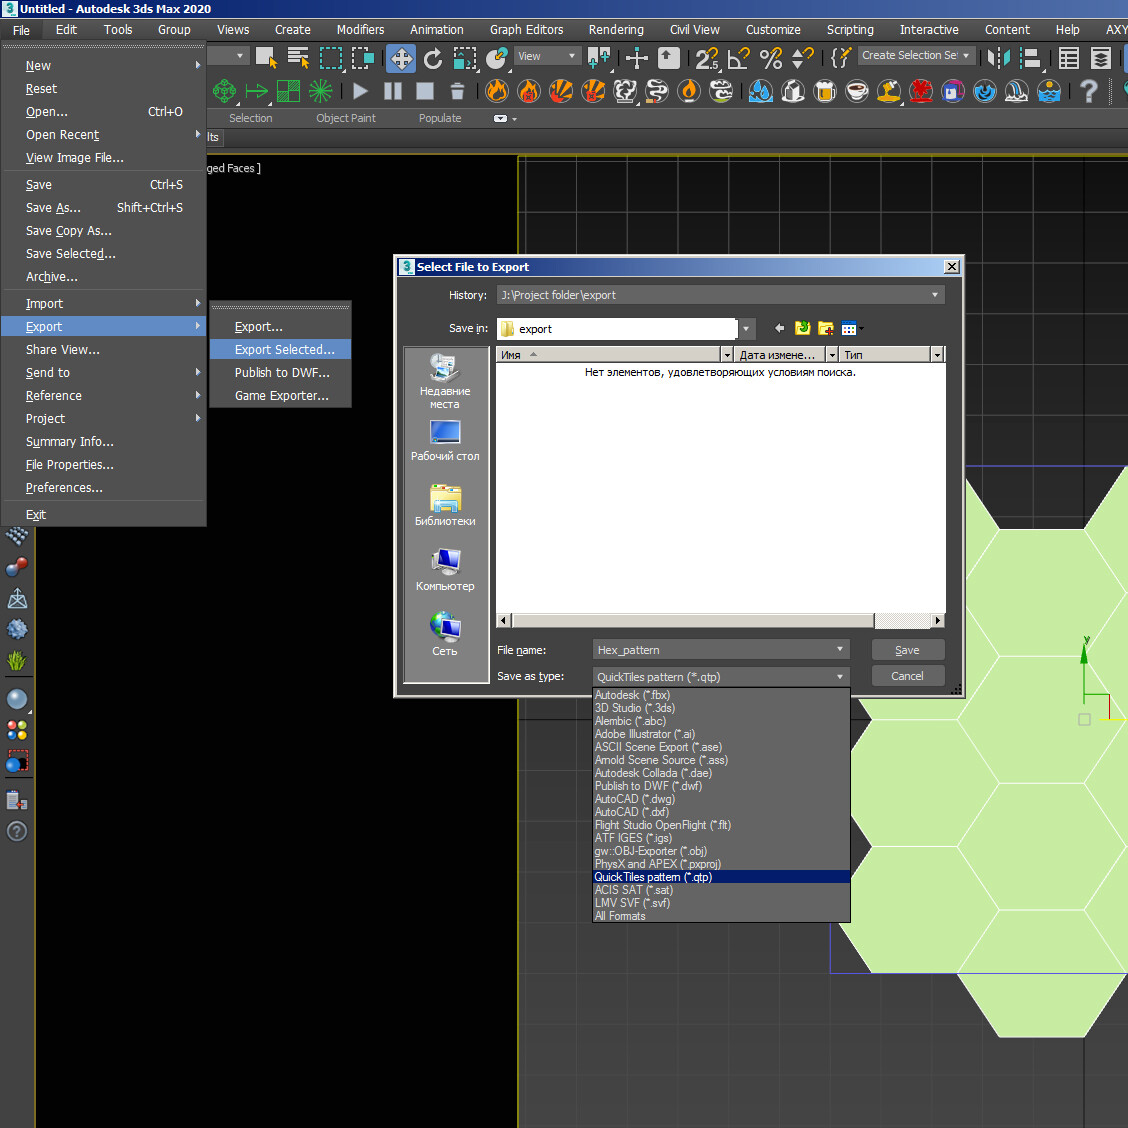
11. Open the Pattern editor and click Import polygonal pattern button. In the window that opens, select your pattern.
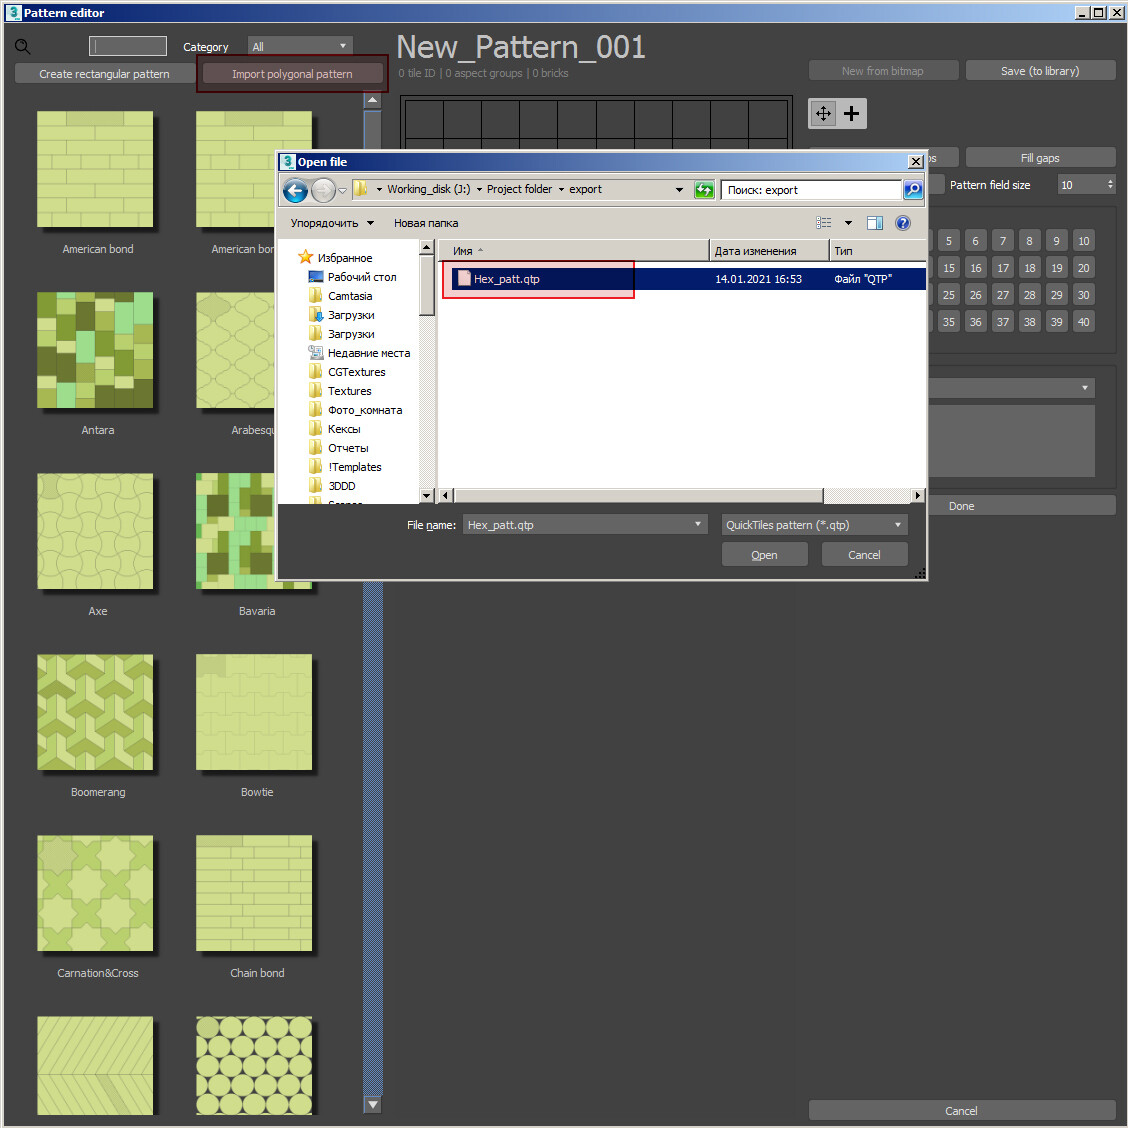
12. As a result, you will get a completely seamless pattern of any shape. You can configure the options you need in the menu on the right.
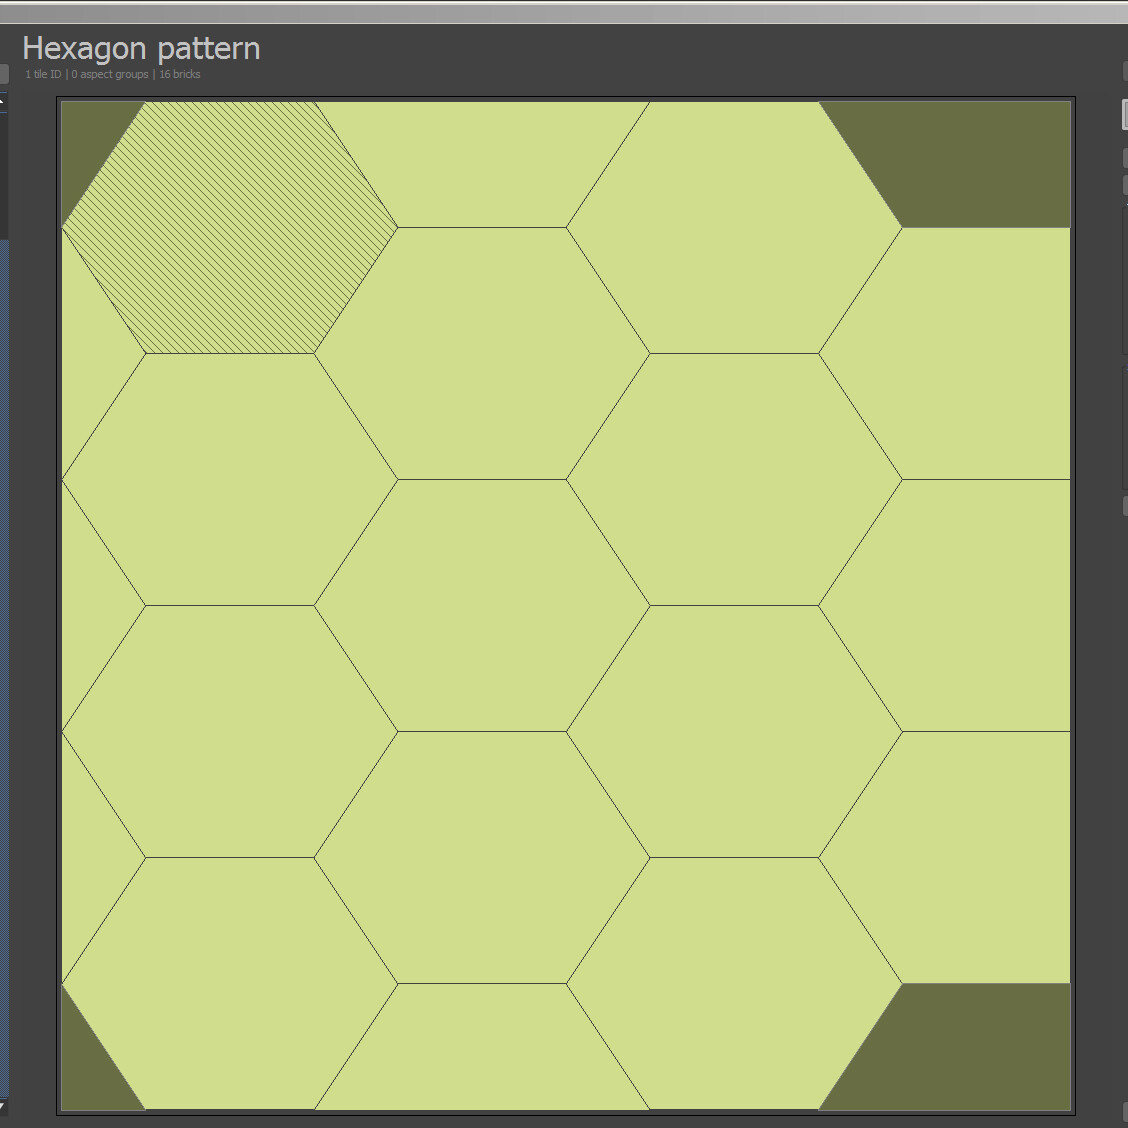
Texture formation mechanism
In this section, we talk about the internal mechanisms of texture formation in QuickTiles, and why it is often not square.
As you already know, the texture formation in QT is based on the size of the base patch (1), the pattern (2), the width of the base texture tile (3), and the seams (4).
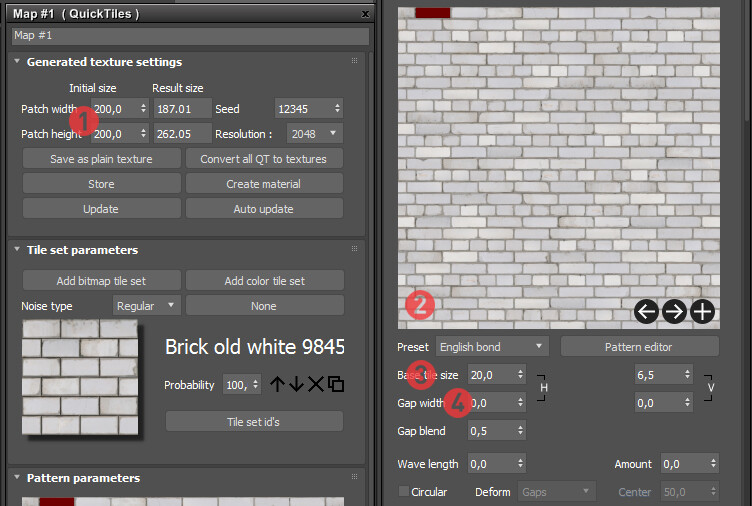
However, due to the fact that the tiles in the pattern can have any size, and the seams must be the same everywhere, and it is also necessary to correlate the size of the base tile (3), seam (4) and patch (1), it turns out that it is impossible to get exactly to the specified size and at the same time generate a seamless texture. You will either have to make the base tile smaller, or change the final size of the texture piece.
And since the exact size of the brick and the gap seems more important to us, we added a "Resulting size" column, in which QT shows what size of a piece of texture will be obtained with the corresponding pattern, as well as the size of the seam and the base tile. The final size always tends to the specified size, as well as to the square shape. However, this does not always work.
Why isn't the texture square?
When creating a texture, QT works in the following sequence.
1. First of all, it takes a given pattern. The pattern is always taken as a whole piece, the one that is set in the Pattern Editor.
2. After that, the plugin calculates the size of the pattern horizontally and vertically, taking into account the size of the base tile, seams, and all the specified randomizations.
3. Last of all, QuickTiles compares the resulting pattern size and the desired size, and repeats the whole pattern as many times as it can fit into the specified size.
It is important to understand that any pattern is square. But it can change its shape to a rectangular one if the aspect ratio of the base tile of the pattern and the base tile set in Mat.editor differ.
For example: we have a simple pattern with a base tile size of 1:2. With the same aspect ratio in the base texture tile, the final patch will be square.

However, if we set the size of the base tile in mat.editor to a wider size, for example 1:5, together with the base tile, the entire pattern will stretch and become 2.5 times wider.
If such distortions are insignificant, QT will give a high-quality result without any problems. However, if the base tile of the pattern is vertical, for example, in the aspect ratio of 3:1, and the base tile of the texture is horizontal, 1:6, the resulting pattern will be too elongated, and errors will appear. Therefore, in such cases, we recommend making a more similar pattern.
Well, in the end, due to the fact that the pattern itself is repeated in the patch only in its entirety, and often has a non-square shape, the final patch also ceases to be square.
Suppose the size of the pattern is 123x87 cm, and the desired size of the patch is 500x500 cm. The width of the whole pattern will fit (500/123 = 4,065) 4 times, and the height (500/87 = 5.74) 6 times. Therefore, the size of the final patch will be 492x522 cm (123*4 = 492 and 87*6 = 522).
Tile ID
Tile ID is a technology for implementing tile sets into certain pattern containers.
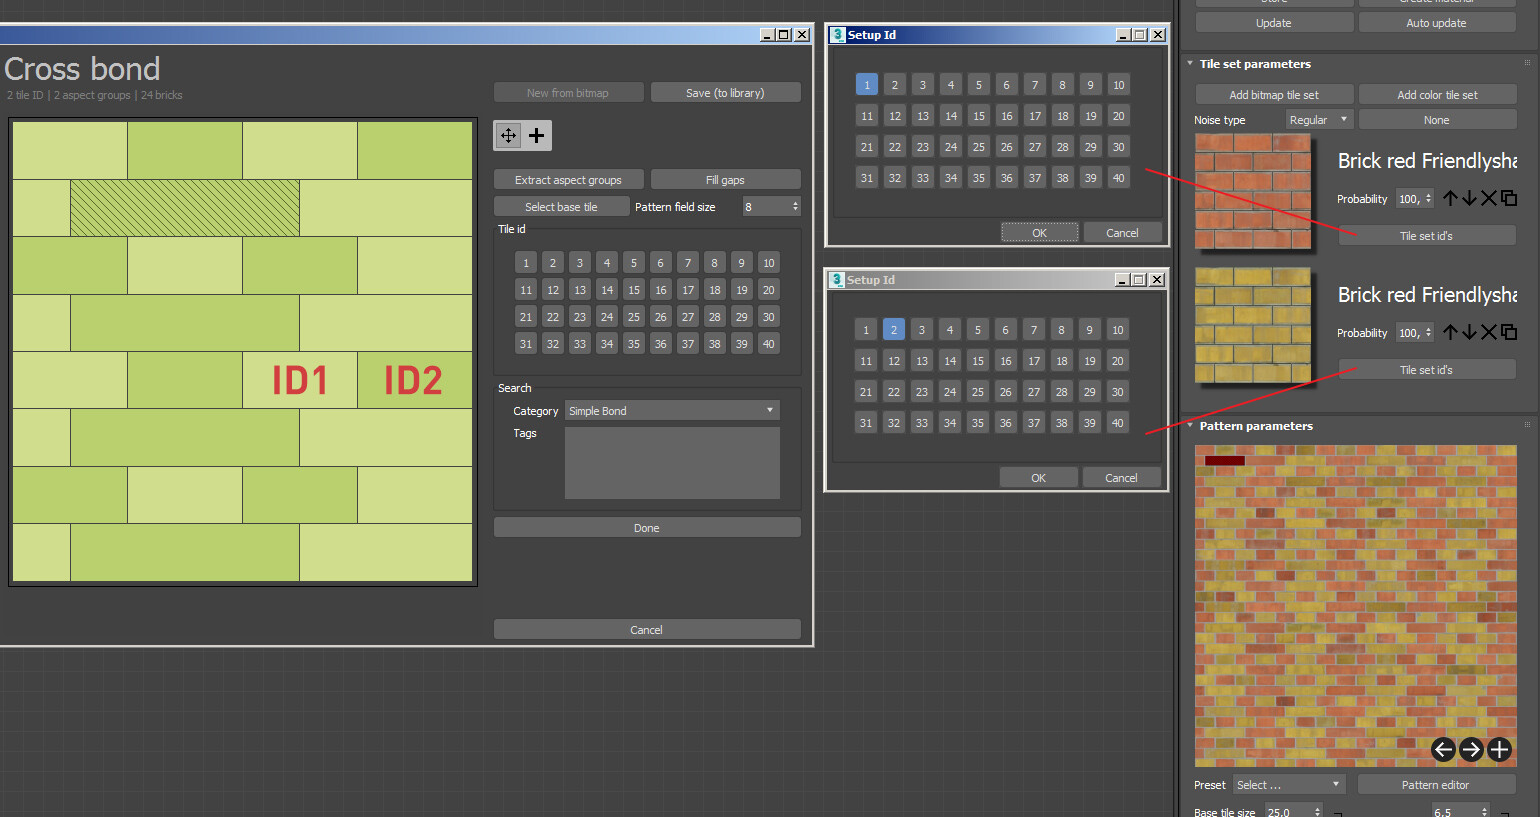
Each tile in the pattern and each set of tiles in the Tile set parameters section has a Tile ID number. By default, ID 0 is assigned in the pattern, and the default set is distributed to all IDs at once. To set the exact match, just set the necessary IDs for the tiles in the pattern, and then for the sets. A total of 40 IDs are available.
In addition, you can assign an ID for each tile separately inside the set directly in the slicer. This greatly simplifies the work if you have several tiles of different sizes or colors on the original texture.
The general ID of the set is the dominant one, and when assigned, it will overwrite the IDs of all tiles assigned in the slicer.
One set can be distributed to several different IDs at once. And one tile in the pattern can have only one ID.
ID0 — white tile — universal ID. Any other ID will be allocated to it.
Tile randomization
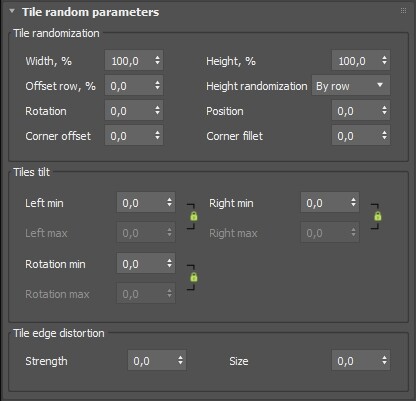
In this section we have the containers’ shapes randomization parameters.
Width % — minimum tile width (as a percentage). Maximum is the base tile size.
Height % — minimum tile height (as a percentage). Maximum is the base tile size.
Offset row, % — the tile rows random offset, in % of the row width. It only works for linear patterns
Height randomization by tile — sets a random height value to each tile
Height randomization by row — sets a random height value to each row
Rows’ height randomization only works with linear patterns. This means that all tiles of a patter’s row initially are the same height.
Rotation — random tile rotation
Position — moves tiles to a random distance in a random corner
Corner offset — random offset of tiles’ corners. When used with polygonal patterns, it offsets each vertex used while generating that template
Corner fillet — softens the corners. When used with polygonal patterns, it softens each vertex used while generating that template. If some vertexes are places to close too each other, the effect will be removed from all corners
Tilt parameters
The Tilt group of parameters tilt tiles in a horizontal plane. These only work with the Displacement map.
Left min — minimum left tile side tilt
Left max — maximum left tile side tilt
Right min — minimum right tile side tilt
Right max — maximum right tile side tilt
Rotation min — minimum tile tilt rotation
Rotation max — maximum tile tilt rotation
*Tilting values fall within the range from 0 to 100, where 0 is an absolutely black color, and 100 — absolutely white. If you apply tilting to an existing Displace map, we recommend you use 50 as an initial value, and then buildup your tilt by changing this value. For example, to make your tiles randomly tilt a little bit, you need to set the values in the range from 40 to 60.
*Tilting is applied softer, with translucency (by Overlay), to an existing Displace map. This is why its efficiency depends a lot on the source map’s brightness.
*The effect is absent if all group parameters are set to 0. In case any of the parameters is more than 0, the effect is enabled, and all the other parameters set to 0 will be shown as black.
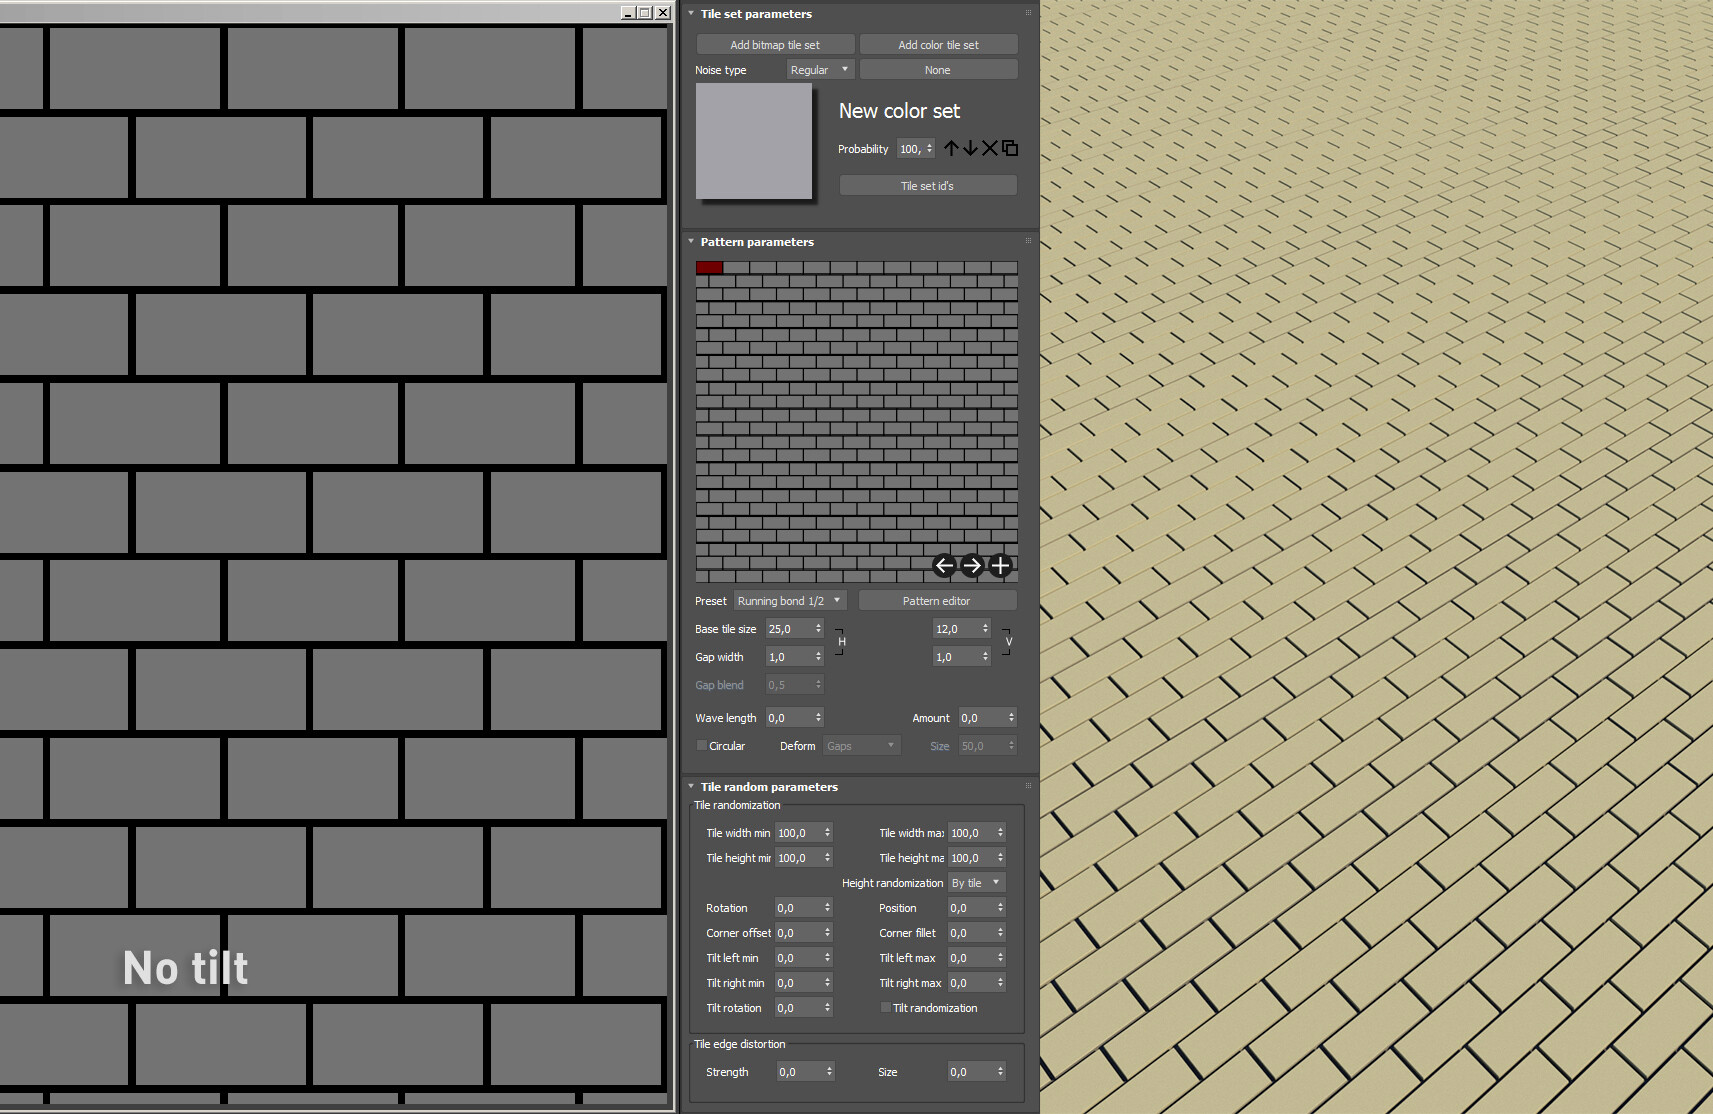
Edge distortion
In this section, we have the uneven edge effect settings.
Strength — the strength of unevenness
Size — the size of unevenness
Be careful when using this effect, an insignificant size of unevenness can reduce the system’s productivity a lot.
Bitmap-in-container
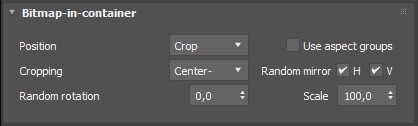
This section contains settings of the bitmaps inside containers behavior.
Position Stretch — plugin embeds a tile into a container by stretching
Position Crop / Cropping Side — plugin embeds the tile in the container on the short side with clipping the edges that protrude beyond the container border
Position Crop / Cropping Center- — plugin embeds the tile in the container on the short side with the preservation of the seams, cutting out the center of the tile (set by default)
Position Crop / Cropping Center+ — the plugin embeds a tile into a container on the short side while preserving the seams, cutting out the center of the tile if the container is shorter than the tile, and adding parts from other tiles in the same ID if the container is wider than the original tile.
The Crop/Center+ settings option allows you to create long tiles from short sources, without visible artifacts. The main thing is to set up the ID groups so that the tiles are similar in color and height, otherwise artifacts may appear.
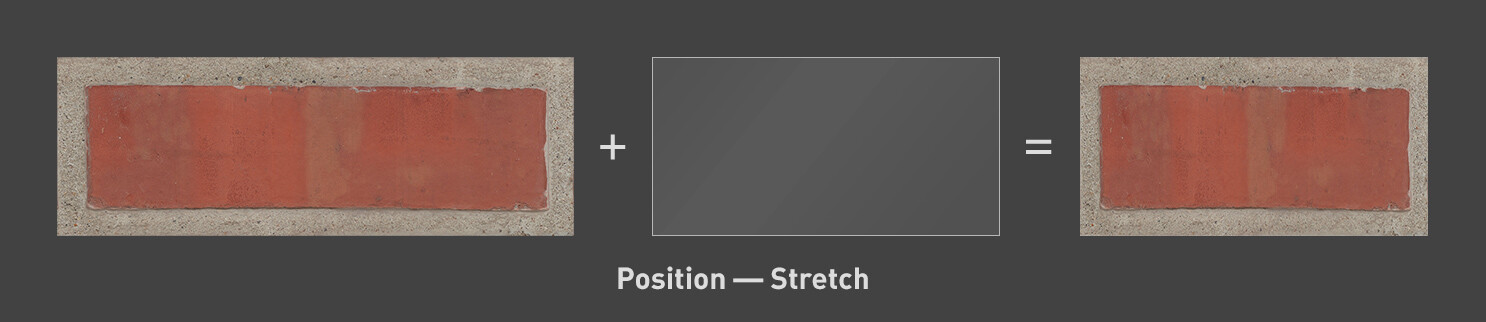
If the original tiles and containers are close in aspect ratio, you need to switch the setting to Stretch mode. Otherwise, artifacts may appear.
Use aspect groups — turn on the distribution of the tiles of the original set in the pattern, according to the aspect groups (aspect ratio).
Aspect groups — groups of tiles united by a similar ratio of the length of the horizontal and vertical sides. Aspect groups are calculated by default for patterns and sets of bitmap tiles.
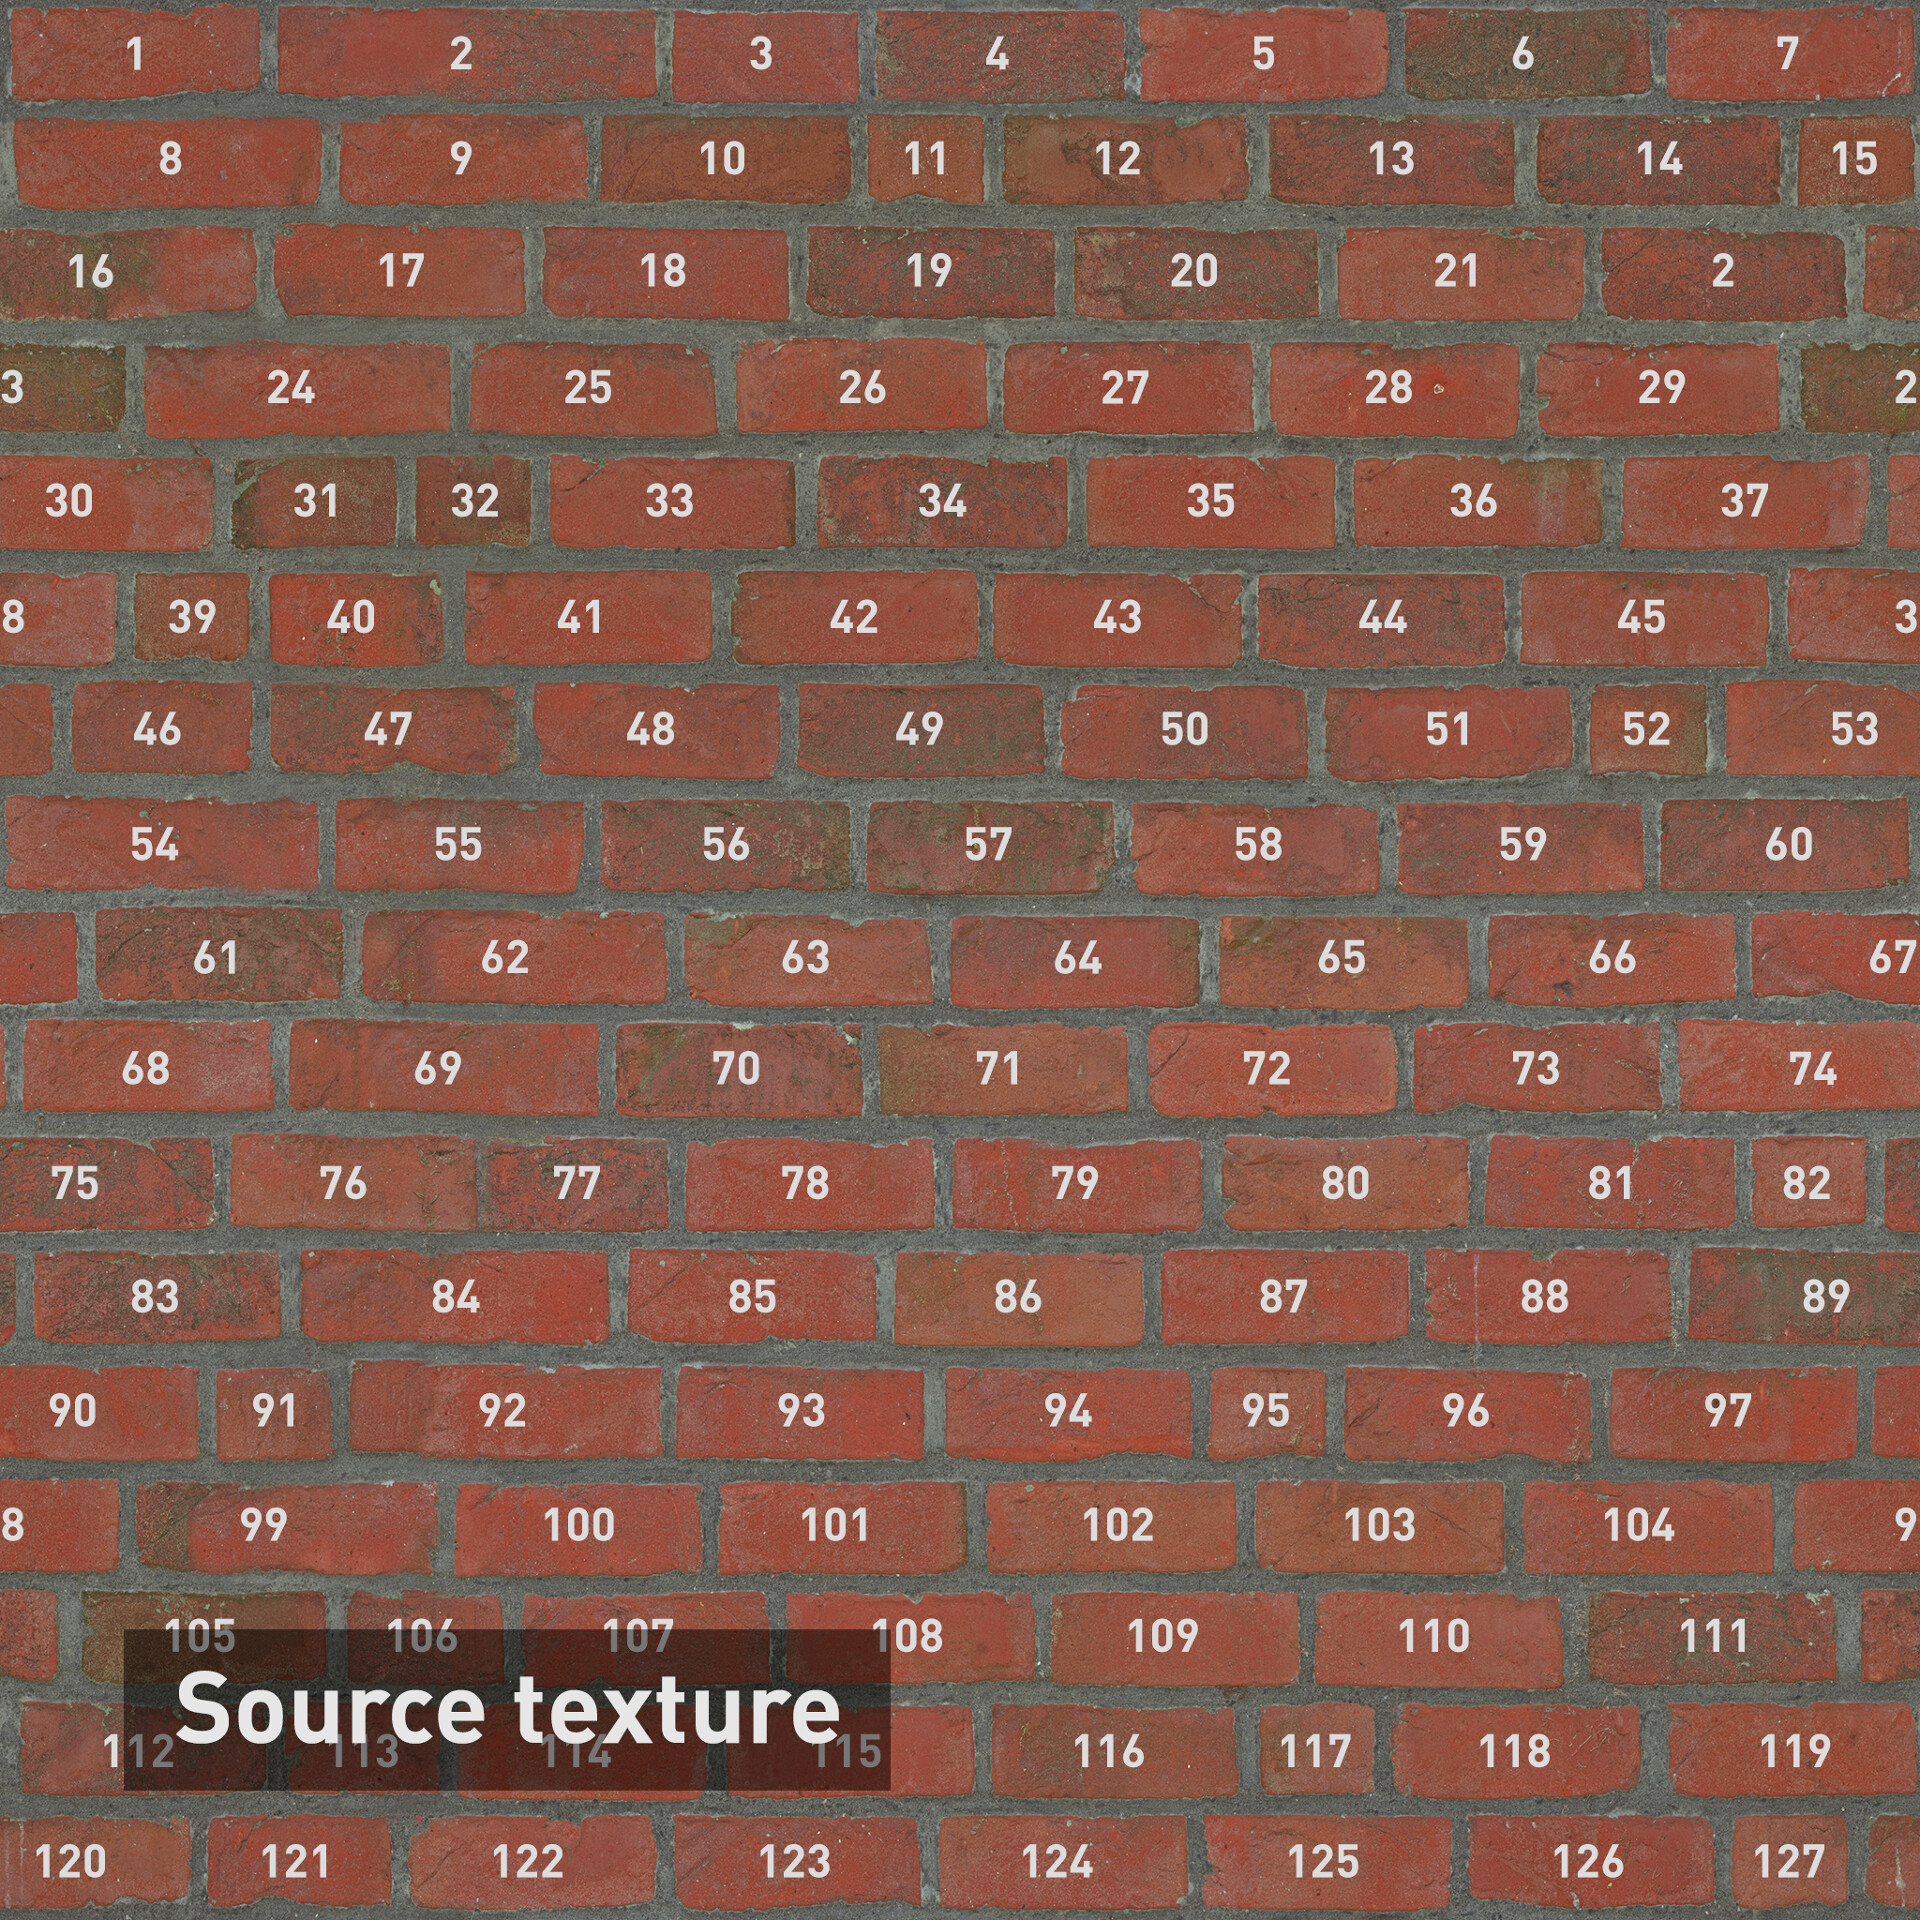
Random mirror H — random display of bitmaps horizontally
Random mirror V — random display of bitmaps vertically
Random rotation — random rotation of bitmaps in the container
Scale — bitmap scale in the container
Procedural gap
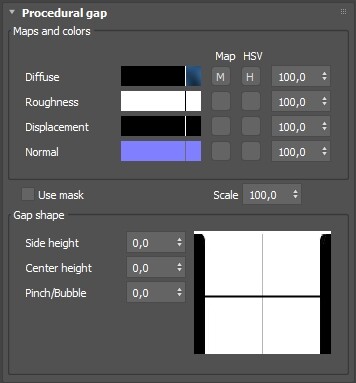
In the Maps & colors section, you can load a bitmap or set the color that will be displayed on the procedural seams and the gaps between the tiles.

1. The substrate channel name
2. LMB— Channel color picker, RMB — bitmap and color blending option
3. Noise overlay parameters
4. Loading the bitmap
5. Adjust the Hue, Saturation and Value of the substrate
6. Transparency of the bitmap relative to the channel color
Hue, Saturation and Value window
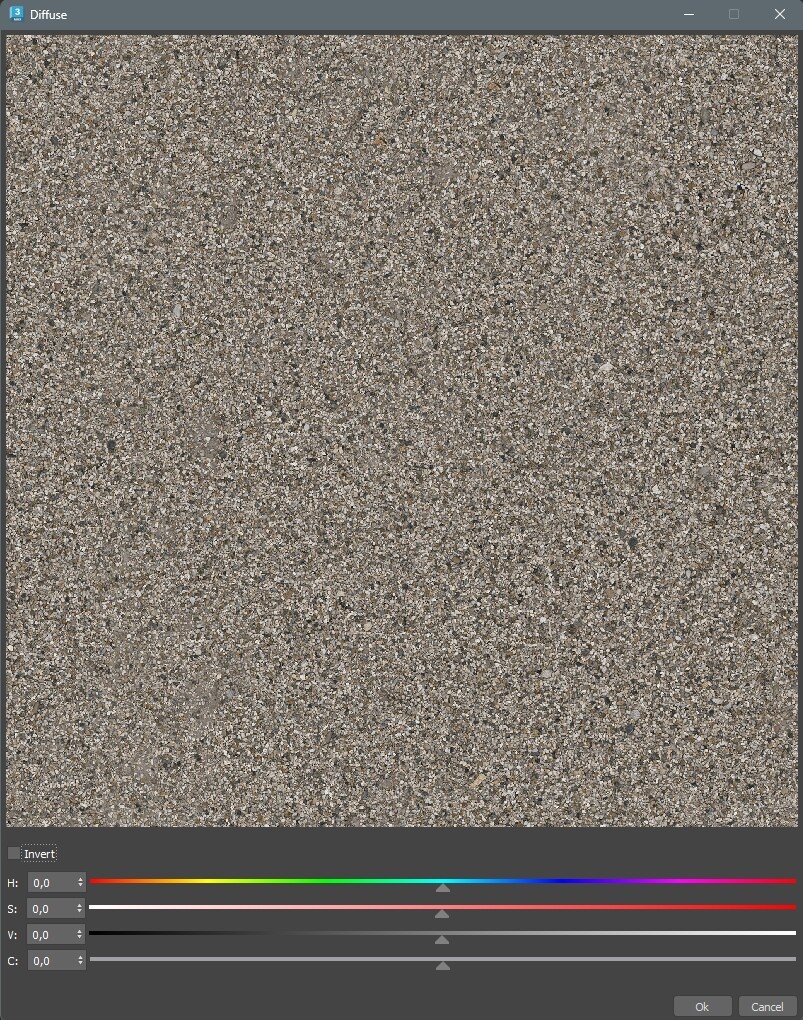
In version 1.3.0.0 and older, the user has the opportunity to adjust the shade of the substrate when working with seams. Moreover, the action of HSV will extend to all parts of the substrate - bitmap, color and noise.
Use mask — applies a tile mask, removing the original seams
Scale — the scale of the bitmap of the substrate
Gap shape — parameters for adjusting the shape of the procedural seam
Side height — the height of the seam at the edges of the tiles
Center height — the height of the seam in the center
Pinch/Bubble — changing the shape of the seam curve
The shape of the procedural seam is applied on the Displacement, Bump, and Normal channels.
When you enable the shape parameters of the procedural seam, it overlaps the substrate.
With different widths of the horizontal and vertical seams, the shape of the procedural seam will be generated based on the minimum width
If the resolution is too low or the seam size is too small, artifacts may occur.
If the final seam size is less than 5 px, the shape is not generated
The parameters of the height of the edges and the center are relative, so it is recommended to configure them with the enlarged preview enabled on the corresponding channel.
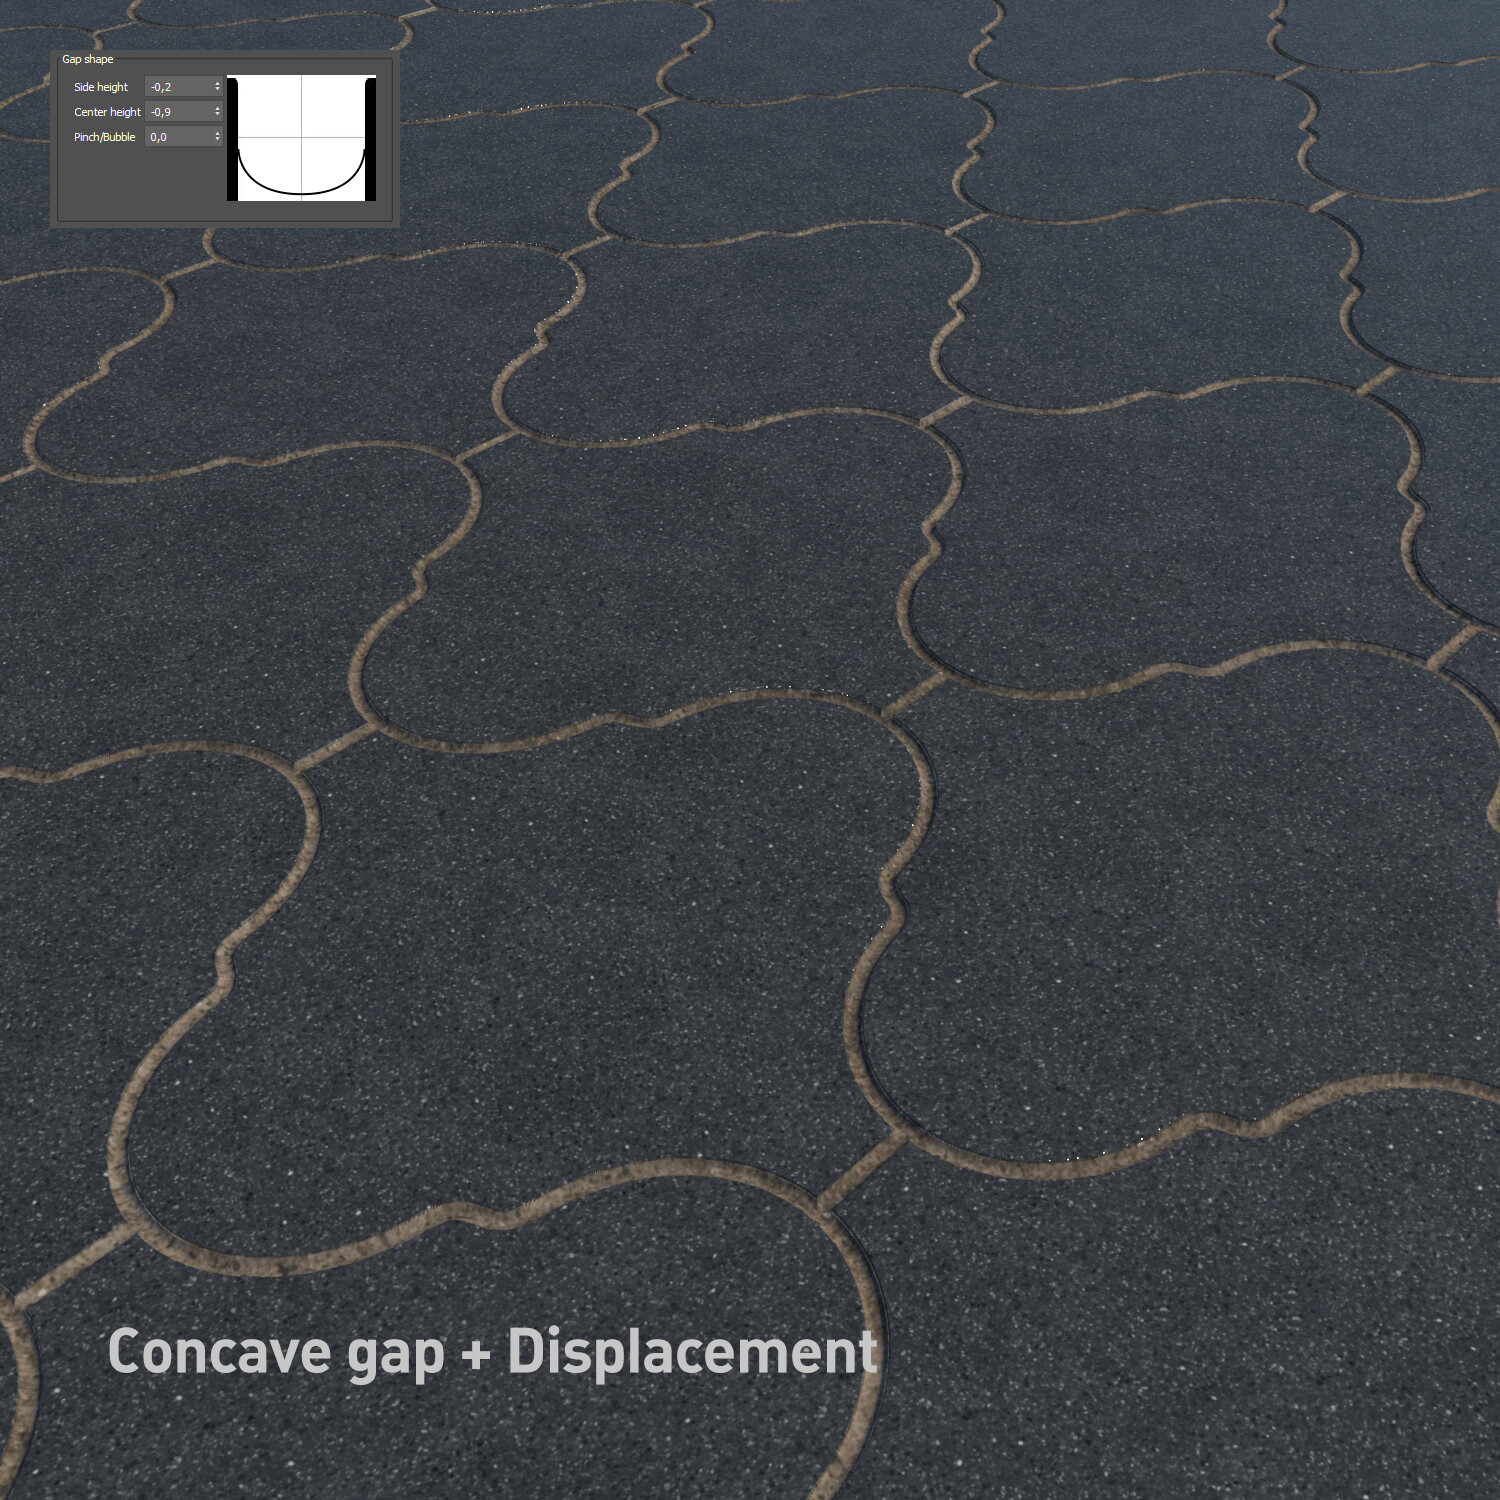
Tile channel settings
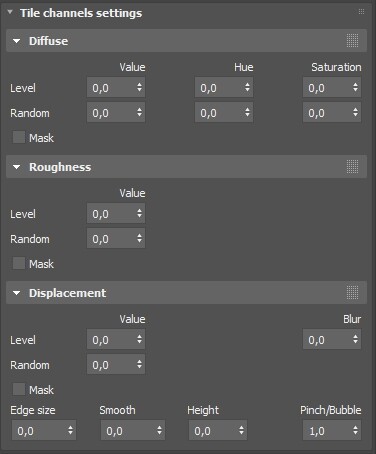
This section is responsible for randomization settings and editing the color of the tile texture. Only channels for which textures or flat color have been added are displayed here.
Identical for all channels settings:
Level — uniform change the level of all channel tiles
Random — random change the level of all channel tiles
Value — changes brightness of tiles
Hue — changes color of tiles
Saturation — changes saturation of tiles
Mask — enables the use of a mask. When this option is enabled, QuickTiles will change or randomize only the white areas of the mask (i.e., the tile area, no seam)
Settings unique to Bump (Grey) and Displacement channels:
Texture blur — blurs the tiles texture
Edge smooth — applies a smooth gradient to the edge of the tile to create a rounded shape.
Experimental function. Artifacts are possible.
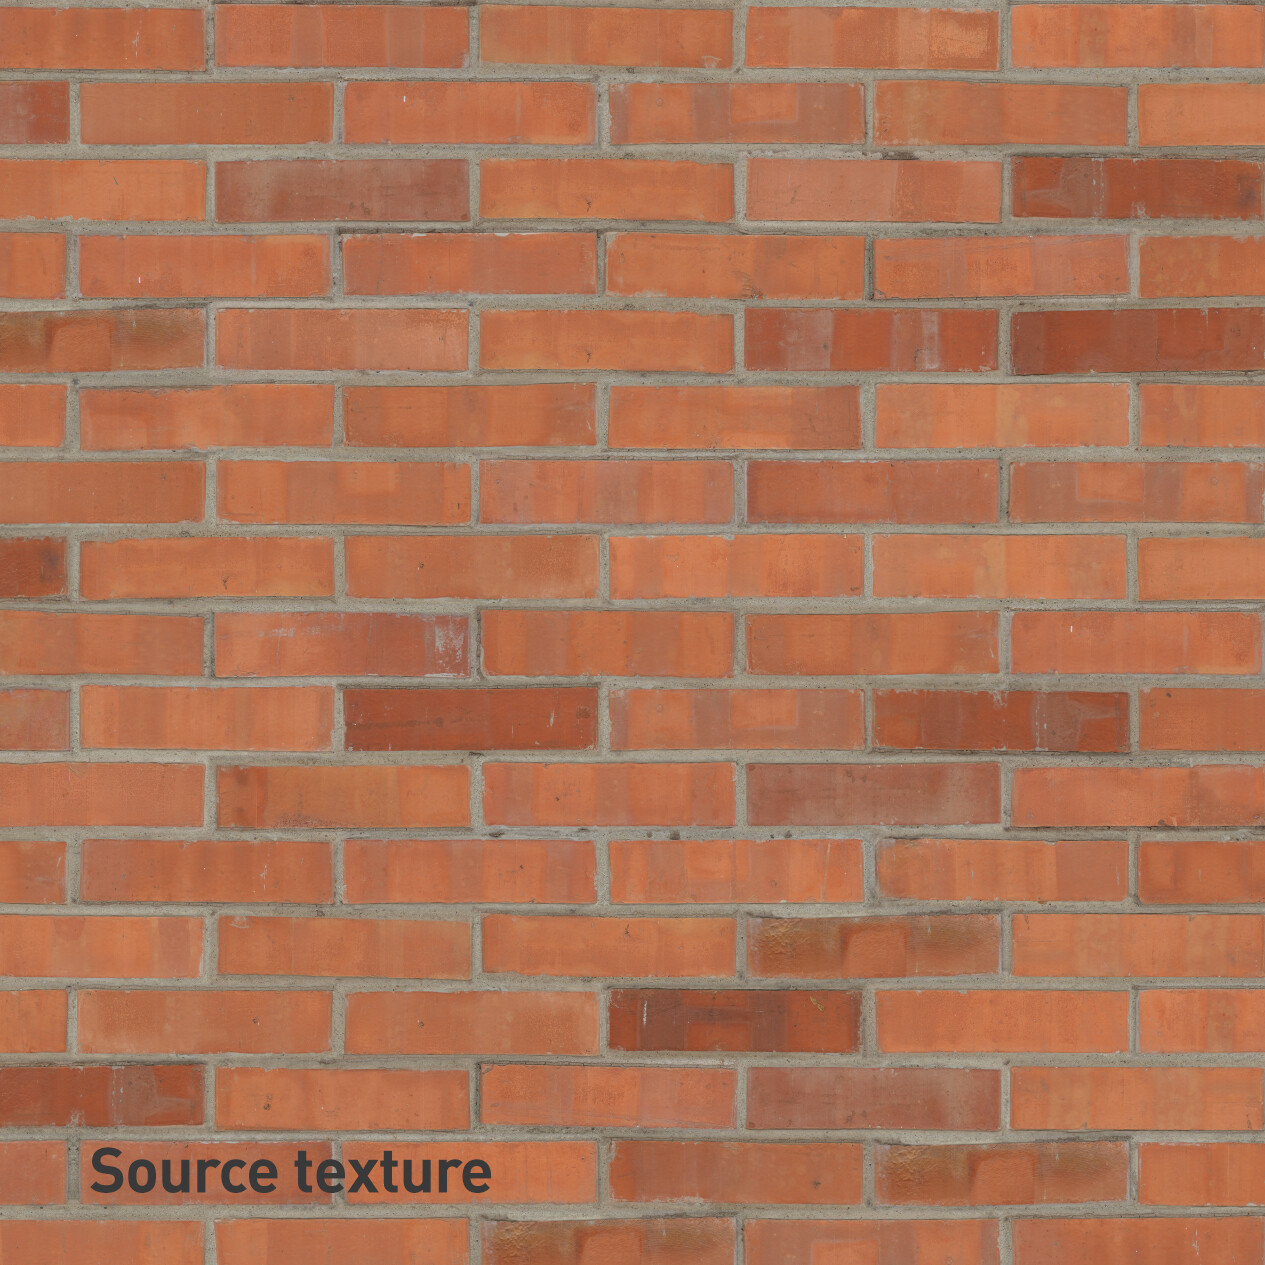
Settings unique to Bump (Grey) and Displacement channels:
Texture blur — blurs the tiles texture
Edge size — depth of the beveled edge
Smooth — blurring of the beveled edge
Height — height of the beveled edge
Pinch/Bubble — edge shape:
1 — flat edge
less than 1 — convex edge
more than 1 — concave edge

Edge size = 50
"About" rollout
This section contains various technical settings of the plugin, as well as background information, important links and activation of the plugin.
Language — choose the language between English, Russian and Chinese. The plugin interface will be translated, as well as hints.
Tool tips — activation of tips
Temp files
To speed up work and increase reliability, QuickTiles saves small auxiliary temporary files (Temp files) to the hard disk (folder C/User/Quicktiles/temp). They are divided into two types:
1. With an extension .QTX — they store various information about the settings of the corresponding node, links to source files, the slicing used, etc. This file is created for each node used in the project and is automatically deleted if the user deletes the QT node.
2. With an extension .QTG — they store information about the finished texture created using QuickTiles. These files are created only if the user activates the Store to temp command, and are deleted if the user deactivates this command. When opening the scene, all the QuickTiles materials for which the file was created.QT will also read these files, and will not cover the opening of the scene. All other nodes will be regenerated from the source files and this process will take some time.
In addition, Temp files are stored for a limited time by default — 30 days from the last time the project they are involved in was opened.
After deleting them, when opening an old project, you will need to restore the temp files using the Slice and Update command from the QuickTiles Lister.
Store temp files — storage time for temp files (from 30 days to infinity)
Auto save — automatically saves QuickTiles nodes to Temp — Activates the Store to temp command for all QuickTiles nodes the next time the scene is opened.
Help documents is a direct link to this directory
Check for library updates — check and download library updates. By default, the check is performed automatically every Monday.
Version 1.3.0.0 — the installed version of the plugin
Subscription active — subscription status.
Workflow optimization
All operations performed on QuickTiles are differ in complexity and the processor resources required to perform them. The more parallel settings are enabled in the plugin, the longer it will take to process new commands.
To optimize the speed of operation, we recommend that you consider the following points:
1. In the process of setting up the test material, use a small preset size of a piece of texture. By default, it is set to 200x200cm, but you can use a smaller size.

2. The smaller the source texture and the fewer channels it has, the faster the plugin will work. Do not use large textures in 4K resolution or higher, unless necessary. Do not use 32 or 16-bit textures. This will slow things down, and the plugin will still convert them to 8-bit.
3. When making settings, do not keep the large preview window open unnecessarily. It creates a texture in a large size, and therefore slows down the work further.
The best option would be to turn off the auto-update preview, and update it manually if necessary.

4. When working in the slicer, select the base tile and specify its approximate width. This will allow the plugin to calculate the density of the original and final texture on the fly and edit its size. Also, use interactive reduction of the original texture to speed up calculations.
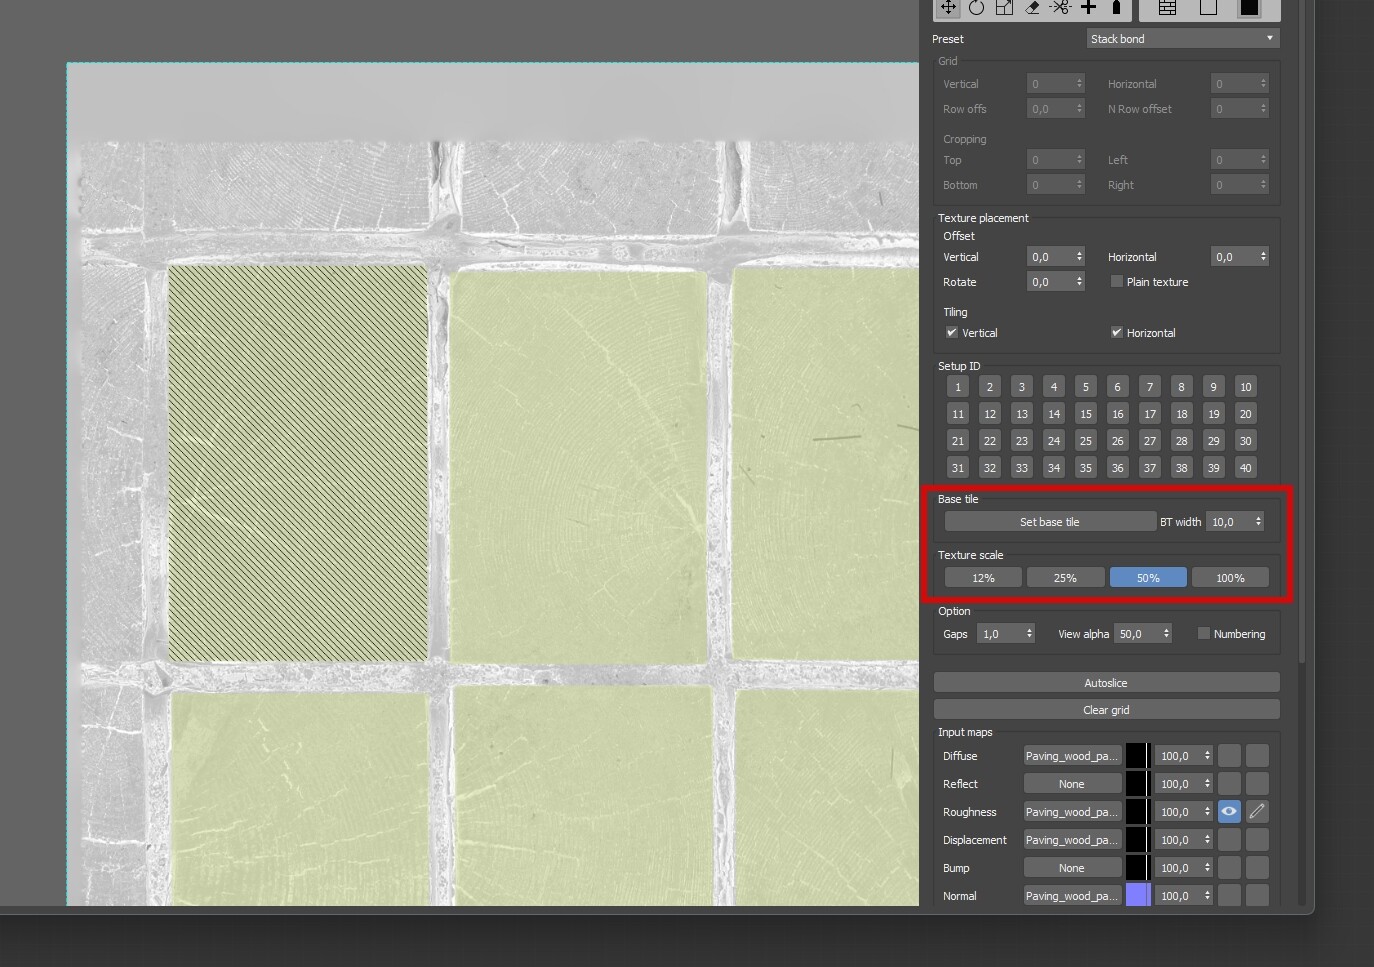
5. Also, when working with the displacement in Corona Render, we recommend adding the CoronaDisplacement modifier and increasing the quality to 2 pixels.
6. The Corner fillet and Tile edge distortion size settings complicate the shape of the tile and can slow down the speed of the plugin.

7. Randomizing bitmaps is a rather time-consuming operation. Add it at the end of the material setup.

8. After you finish setting up the material, do the tests at a low resolution of 2K — if you need to make changes, the texture update in 2K will be much faster. After finishing the settings, set the working size and resolution.
9. Keep in mind that in order to work out the mixing of the original seams, or to generate the shape of the procedural seam, the seam must have a sufficient number of pixels of the final texture. If you are dissatisfied with the appearance of the seams, increase the output resolution.
10. When setting the final resolution of a texture, we recommend that you use on the following ratios of the texture physical size and its resolution:
200х200 cm — 2K — normal quality, 4K — excellent quality.
400х400 cm — 4K — normal quality, 8K — excellent quality.
1000x1000 cm — 8K — normal quality, 16K — excellent quality.
11. After you finish working on the texture, be sure to turn on Store to temp (for storing and working locally) or Store to scene (for transferring a scene to another computer). Quick Tiles will update the texture and save it to your hard drive, in a special file, from which it will load the next time you open 3d max. Otherwise, every time you open the program, the texture will be regenerated, which can take a significant amount of time.
